Save Customer Cards
Tokenize cards with the Payment Widget for future recurring payments.
About Card Tokenization
Section titled “About Card Tokenization”In this guide, you will learn how to use the Payment Widget to store card details for future use, and how to set up recurring payments, as SumUp handles the UI/UX and consent collection for you. Alternatively, you can process payments with your own UI, following the API guidelines also provided in this document. This feature is also known as card on file or tokenization.
You will go through the following steps:
- Create a customer.
- Create checkout intended for card tokenization, where we specify it’s for tokenization purpose. This is where 3DS verification takes place. The transaction amount is instantly reimbursed.
- Process payment with the payment widget or process payment directly with SumUp API.
- Retrieve the tokenized card.
- Make subsequent payments with the tokenized card.
Prerequisites
Section titled “Prerequisites”- You have a merchant account with SumUp(Opens in a new tab) and have already filled in your account details(Opens in a new tab).
- You can also create a sandbox merchant account. Please note that setting up 3DS verification in a sandbox merchant account requires contact with our team at integrations@sumup.com.
- You have an API Key. For more details see the Authorization Guide.
- You have control over the backend server to retrieve data securely.
Creating Customer
Section titled “Creating Customer”A customer resource is a representation of a person or business paying for a product or service.
It contains personal information such as name, contact details, postal address, as well as a unique identifier relevant to your business logic (customer_id).
- Create a new customer resource with a POST request to the
https://api.sumup.com/v0.1/customersendpoint:
curl -X POST \ https://api.sumup.com/v0.1/customers \ -H "Authorization: Bearer $SUMUP_API_KEY" \ -H 'Content-Type: application/json' \ -d '{ "customer_id": "MYCUSTOMERID-123", "personal_details": { "address": { "city": "Venice", "state": "California", "country": "US", "line1": "606 Venezia Ave", "line2": "Front", "postal_code": "90291" }, "birthdate": "1949-11-11", "email": "thedude@example.com", "first_name": "Jeffrey", "last_name": "Lebowski", "phone": "+1 310-555-1234" }}'const customer = await client.customers.create({ customer_id: "MYCUSTOMERID-123", personal_details: { first_name: "Jeffrey", last_name: "Lebowski", email: "thedude@example.com", phone: "+1 310-555-1234", birth_date: "1949-11-11", address: { city: "Venice", state: "California", country: "US", line_1: "606 Venezia Ave", line_2: "Front", postal_code: "90291", }, },});var customer = await client.Customers.CreateAsync(new Customer{ CustomerId = "MYCUSTOMERID-123", PersonalDetails = new PersonalDetails { FirstName = "Jeffrey", LastName = "Lebowski", Email = "thedude@example.com", Phone = "+1 310-555-1234", BirthDate = new System.DateTime(1949, 11, 11), Address = new AddressLegacy { City = "Venice", State = "California", Country = "US", Line1 = "606 Venezia Ave", Line2 = "Front", PostalCode = "90291", }, },});var customer = client.customers().createCustomer( Customer.builder() .customerId("MYCUSTOMERID-123") .personalDetails( PersonalDetails.builder() .firstName("Jeffrey") .lastName("Lebowski") .email("thedude@example.com") .phone("+1 310-555-1234") .birthDate(java.time.LocalDate.parse("1949-11-11")) .address( AddressLegacy.builder() .city("Venice") .state("California") .country("US") .line1("606 Venezia Ave") .line2("Front") .postalCode("90291") .build() ) .build() ) .build());str := func(v string) *string { return &v }
customer, err := client.Customers.Create(ctx, sumup.CustomersCreateParams{ CustomerID: "MYCUSTOMERID-123", PersonalDetails: &sumup.PersonalDetails{ FirstName: str("Jeffrey"), LastName: str("Lebowski"), Email: str("thedude@example.com"), Phone: str("+1 310-555-1234"), Address: &sumup.AddressLegacy{ City: str("Venice"), State: str("California"), Country: str("US"), Line1: str("606 Venezia Ave"), Line2: str("Front"), PostalCode: str("90291"), }, },})from sumup.customers.resource import CreateCustomerBodyfrom sumup.customers.types import AddressLegacy, PersonalDetails
customer = client.customers.create( CreateCustomerBody( customer_id="MYCUSTOMERID-123", personal_details=PersonalDetails( first_name="Jeffrey", last_name="Lebowski", email="thedude@example.com", phone="+1 310-555-1234", birth_date="1949-11-11", address=AddressLegacy( city="Venice", state="California", country="US", line_1="606 Venezia Ave", line_2="Front", postal_code="90291", ), ), )) let customer = client .customers() .create(sumup::resources::customers::Customer { customer_id: "MYCUSTOMERID-123".into(), personal_details: Some(sumup::resources::common::PersonalDetails { first_name: Some("Jeffrey".into()), last_name: Some("Lebowski".into()), email: Some("thedude@example.com".into()), phone: Some("+1 310-555-1234".into()), birth_date: None, tax_id: None, address: Some(sumup::resources::common::AddressLegacy { city: Some("Venice".into()), state: Some("California".into()), country: Some("US".into()), line_1: Some("606 Venezia Ave".into()), line_2: Some("Front".into()), postal_code: Some("90291".into()), }), }), }) .await?;$customer = $sumup->customers->create([ 'customer_id' => 'MYCUSTOMERID-123', 'personal_details' => [ 'first_name' => 'Jeffrey', 'last_name' => 'Lebowski', 'email' => 'thedude@example.com', 'phone' => '+1 310-555-1234', 'address' => [ 'city' => 'Venice', 'state' => 'California', 'country' => 'US', 'line_1' => '606 Venezia Ave', 'line_2' => 'Front', 'postal_code' => '90291', ], ],]);You should expect a standard 201 Created response, with the customer details you passed. For full details, see the endpoint documentation. Having created the customer, we can now proceed to making a payment
Creating Checkout to Save Card
Section titled “Creating Checkout to Save Card”Now, we need to tokenize the customer’s card, and we will need a checkout for this. The checkout resource is a representation of a payment being made by the previously created customer.
It contains information such as the amount, currency, and a unique checkout_reference identifier that is relevant to your business logic.
The flow is initiated with the create a checkout endpoint. It is important to pass the customer_id parameter in this step, for future linking to a payment instrument. Critically, a purpose parameter is passed to indicate the payment type as recurring payment and process an authorization charge of the checkout amount indicated, which is instantly reimbursed. Note that this doesn’t automatically imply further payments from this customer - at this point, we’re just tokenizing the card.
- To create a new checkout resource, make a POST request to the
https://api.sumup.com/v0.1/checkoutsendpoint.
Example of such request:
curl -X POST \ https://api.sumup.com/v0.1/checkouts \ -H "Authorization: Bearer $SUMUP_API_KEY" \ -H 'Content-Type: application/json' \ -d '{ "checkout_reference": "MYCHECKOUT", "amount": 1, "currency": "EUR", "merchant_code": "MDEERENR", "description": "My checkout", "customer_id": "MYCUSTOMERID-123", "purpose": "SETUP_RECURRING_PAYMENT" }'const checkout = await client.checkouts.create({ checkout_reference: "MYCHECKOUT", amount: 1, currency: "EUR", merchant_code: "MDEERENR", description: "My checkout", customer_id: "MYCUSTOMERID-123", purpose: "SETUP_RECURRING_PAYMENT",});var checkout = await client.Checkouts.CreateAsync(new CheckoutCreateRequest{ CheckoutReference = "MYCHECKOUT", Amount = 1.0f, Currency = Currency.Eur, MerchantCode = "MDEERENR", Description = "My checkout", CustomerId = "MYCUSTOMERID-123", Purpose = "SETUP_RECURRING_PAYMENT",});var checkout = client.checkouts().createCheckout( CheckoutCreateRequest.builder() .checkoutReference("MYCHECKOUT") .amount(1.0f) .currency(Currency.EUR) .merchantCode("MDEERENR") .description("My checkout") .customerId("MYCUSTOMERID-123") .purpose(CheckoutCreateRequestPurpose.SETUP_RECURRING_PAYMENT) .build());customerID := "MYCUSTOMERID-123"purpose := sumup.CheckoutCreateRequestPurposeSetupRecurringPaymentdescription := "My checkout"
checkout, err := client.Checkouts.Create(ctx, sumup.CheckoutsCreateParams{ CheckoutReference: "MYCHECKOUT", Amount: 1, Currency: sumup.CurrencyEUR, MerchantCode: "MDEERENR", Description: &description, CustomerID: &customerID, Purpose: &purpose,})from sumup.checkouts.resource import CreateCheckoutBody
checkout = client.checkouts.create( CreateCheckoutBody( checkout_reference="MYCHECKOUT", amount=1, currency="EUR", merchant_code="MDEERENR", description="My checkout", customer_id="MYCUSTOMERID-123", purpose="SETUP_RECURRING_PAYMENT", ))let checkout = client .checkouts() .create(Some(sumup::resources::checkouts::CheckoutCreateRequest { checkout_reference: "MYCHECKOUT".into(), amount: 1.0, currency: sumup::resources::checkouts::Currency::EUR, merchant_code: "MDEERENR".into(), description: Some("My checkout".into()), customer_id: Some("MYCUSTOMERID-123".into()), purpose: Some("SETUP_RECURRING_PAYMENT".into()), id: None, status: None, date: None, valid_until: None, transactions: None, return_url: None, redirect_url: None, })) .await?;$checkout = $sumup->checkouts->create([ 'checkout_reference' => 'MYCHECKOUT', 'amount' => 1, 'currency' => 'EUR', 'merchant_code' => 'MDEERENR', 'description' => 'My checkout', 'customer_id' => 'MYCUSTOMERID-123', 'purpose' => 'SETUP_RECURRING_PAYMENT',]);You should expect a standard 201 Created response, with the checkout reference and both merchant and customer information.
{ "amount": 1, "checkout_reference": "MYCHECKOUT", "checkout_type": "checkout", "currency": "EUR", "customer_id": "MYCUSTOMERID-123", "date": "2025-10-29T15:09:11.550+00:00", "description": "My checkout", "id": "7164c99b-13cb-42a1-8ba1-3c2c46a29de7", "merchant_code": "MDEERENR", "merchant_country": "PL", "merchant_name": "Sandbox Merchant Account", "pay_to_email": "a8e019f9bb2f49159182e8bd61eb5ea6@developer.sumup.com", "purpose": "SETUP_RECURRING_PAYMENT", "status": "PENDING", "transactions": []}For more information, see the create a checkout endpoint.
Processing Request with Payment Widget
Section titled “Processing Request with Payment Widget”The SumUp’s Payment Widget is a JavaScript library that allows you to securely process checkouts and collect card details securely, handling consent collection and 3DS verification. These steps are mandatory due to legal requirements, which is why we recommend processing the checkout with our widget.
Once you have a checkout reference from the step above, you can mount the payment widget into your website and collect the card details. Pass the checkout_reference from above as the checkoutId here.
<div id="sumup-card"></div><script type="text/javascript" src="https://gateway.sumup.com/gateway/ecom/card/v2/sdk.js"></script><script type="text/javascript"> SumUpCard.mount({ id: "sumup-card", checkoutId: `${checkout_id}`, // Ex: '7164c99b-13cb-42a1-8ba1-3c2c46a29de7' onResponse: function (type, body) { console.log("Type", type); console.log("Body", body); }, });</script>Upon mounting the Payment Widget with a recurring purpose checkout, you should see the following screen:
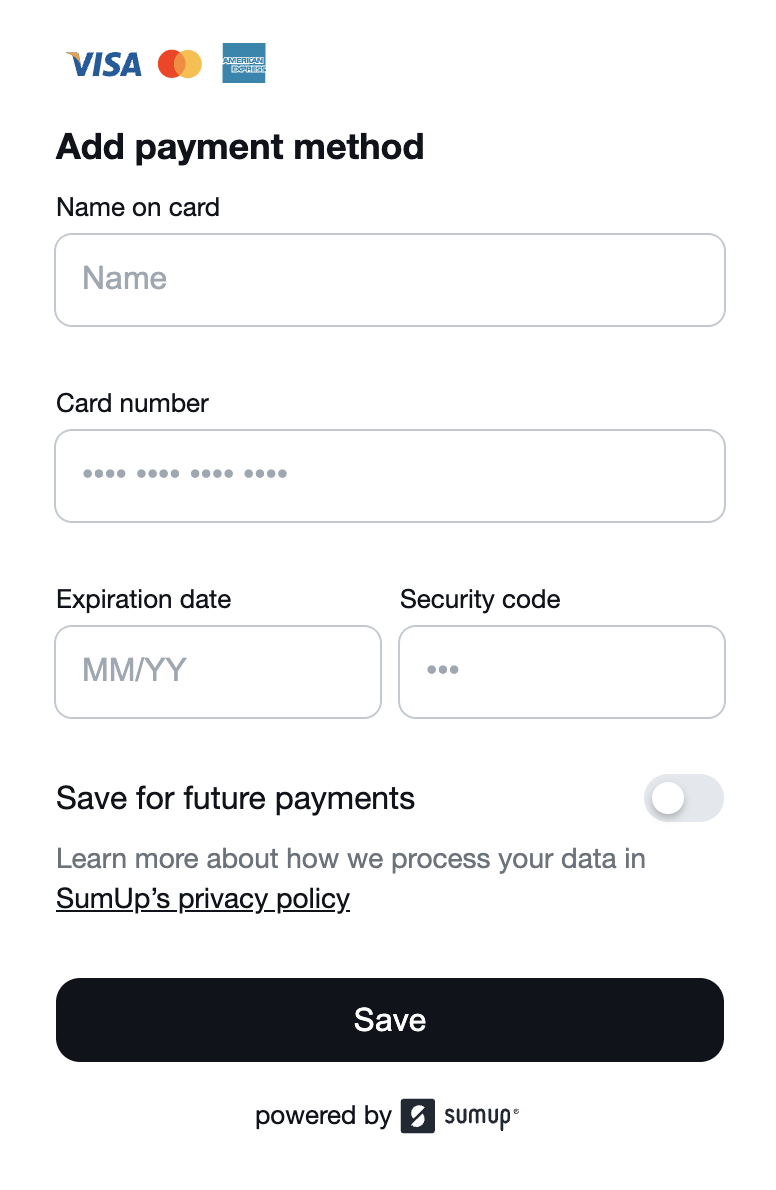
The user is prompted to enter their card details, give consent to store their card details and complete the checkout. The widget uses the Process Checkout endpoint to securely process the checkout. We strongly recommend using the widget over direct integration, as the widget correctly handles all legal requirements for payments.
If the previous operation is successful, and the card is stored with the Save for future payments option, a payment_instrument object containing a token representing the card is created (AKA tokenized card) for this customer.
"payment_instrument": { "token": "6878cb7f-6515-47bf-bdd9-1408d270fdce"}At any time, you can fetch the list of tokenized cards of a customer by requesting them via the list payment instruments endpoint.
curl -X GET \ "https://api.sumup.com/v0.1/customers/${CUSTOMER_ID}/payment-instruments" \ -H "Authorization: Bearer $SUMUP_API_KEY" \ -H "Content-Type: application/json;charset=UTF-8"const instruments = await client.customers.listPaymentInstruments("MYCUSTOMERID-123");var instruments = await client.Customers.ListPaymentInstrumentsAsync("MYCUSTOMERID-123");var instruments = client.customers().listPaymentInstruments("MYCUSTOMERID-123");instruments, err := client.Customers.ListPaymentInstruments(ctx, "MYCUSTOMERID-123")instruments = client.customers.list_payment_instruments("MYCUSTOMERID-123")let instruments = client .customers() .list_payment_instruments("MYCUSTOMERID-123") .await?;$instruments = $sumup->customers->listPaymentInstruments('MYCUSTOMERID-123');Processing Request Directly
Section titled “Processing Request Directly”If you want to provide a fully customized experience, you can process the request using SumUp API directly. In this case, you need to make sure to handle all legal requirements yourself. Critically, SumUp API expects the mandate object in the request. By providing the mandate object, you are stating that you have obtained the consent of the customer. The mandate object establishes the authorization framework for storing and reusing card details. It defines what the card token will be used for (only recurring payments for the time being), while capturing the technical details of the tokenization request for security and compliance purposes.
{ "payment_type": "card", "installments": 1, "card": { "name": "FIRSTNAME LASTNAME", "number": "4111111111111111", "expiry_year": "2023", "expiry_month": "01", "cvv": "123", "zip_code": "12345" }, "mandate": { "type": "recurrent", "user_agent": "Chrome: Mozilla/5.0 (X11; Linux x86_64) AppleWebKit/537.36 (KHTML, like Gecko) Chrome/77.0.3865.90 Safari/537.36.", "user_ip": "2001:0db8:85a3:0000:0a00:8a2e:0370:7300" }}Again, a payment_instrument object containing a token representing the card is created (AKA tokenized card) for this customer.
"payment_instrument": { "token": "6878cb7f-6515-47bf-bdd9-1408d270fdce"}At any time, you can fetch the list of tokenized cards of a customer by requesting them via the list payment instruments endpoint.
curl -X GET \ "https://api.sumup.com/v0.1/customers/${CUSTOMER_ID}/payment-instruments" \ -H "Authorization: Bearer $SUMUP_API_KEY" \ -H "Content-Type: application/json;charset=UTF-8"Retrieving Tokenized Card
Section titled “Retrieving Tokenized Card”Having successfully processed the checkout, a token representing the payment instrument (card) is created. You can now retrieve the checkout to find this token within a payment_instrument object for later recurrent payment.
Example response:
{ "id": "cd36780e-f43d-4f22-1i9e-e32a1a1bafc8", "checkout_reference": "0BYNWLYC7KV", "amount": 3.51, "currency": "EUR", ... "payment_instrument": { "token": "2fa27578-e765-5dbh-aa97-d45d3d6cdfbb" }}Processing Recurring Payments
Section titled “Processing Recurring Payments”Having tokenized the customer’s card, you can now process recurring payments by referencing the saved token and the associated customer. Both token and customer_id fields are required.
- Create a checkout again. This time, it’s for the actual payment. The previous checkout was for tokenizing the card only.
- Process the checkout. Make sure to pass the following data (
installmentsis only valid for the Brazilian market):
{ "payment_type": "card", "installments": 1, "token": "{{CARD_TOKEN}}" "customer_id": "{{CUSTOMER_ID}}",}What’s Next?
Section titled “What’s Next?”You may be interested in the following resources related to Online Payments: