This is the full developer documentation for SumUp Developer
# Getting started
> Start integrating SumUp quickly by creating a sandbox account, choosing your integration path, and processing your first payment.
Welcome to the SumUp Developer Portal. Here you'll find everything you need to integrate SumUp's payment solutions into your product. The documentation is divided into several sections:
- **[Quick start](/getting-started/)** – set up a sandbox merchant account and run through a first payment in minutes.
- **[Online Payments](/online-payments/)** – accept card payments on the web or in mobile apps.
- **[Terminal Payments](/terminal-payments/)** – use SumUp card readers to take in-person payments.
- **[Developer Resources](/tools/authorization/)** – explore authentication, webhooks, LLM tooling, and other utilities.
Create a [sandbox merchant account](https://me.sumup.com) to experiment safely and then dive into the section that best fits your use case.
# Online Payments
> Get started with accepting online payments. This guide walks you through creating a sandbox merchant account and processing your first transaction in minutes.
import { Aside, Steps } from '@astrojs/starlight/components';
import Image from '@components/content/Image.astro';
Online payments form an integral part of the SumUp product portfolio. SumUp supports online payments through multiple approaches to address every merchant use case. Use one of the out-of-the-box integrations or build a complete custom payments flow with the APIs. Your app communicates with SumUp via HTTP requests defined in the [API Reference](/api).
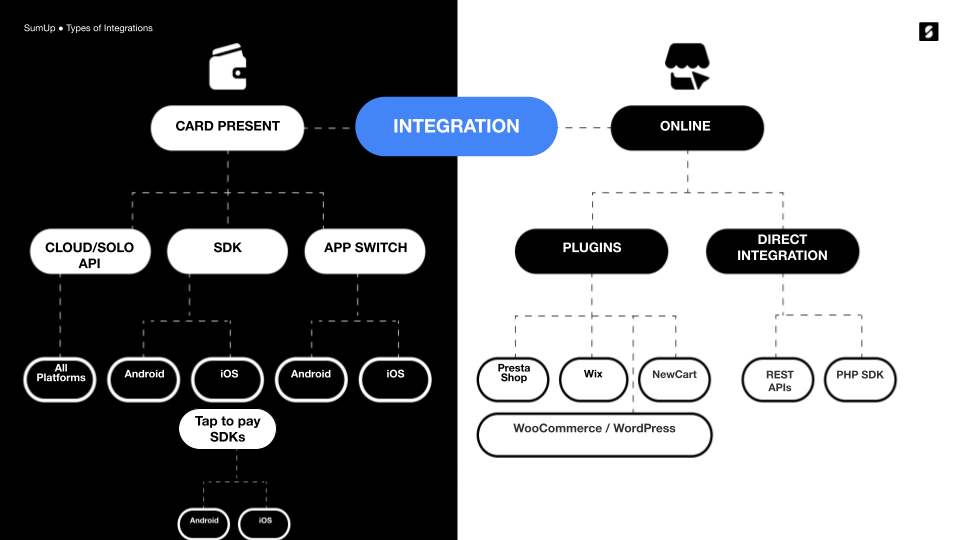
To get started, review the options SumUp offers for managing online payments.
## Getting a Sandbox Merchant Account
To test SumUp APIs and tools without involving real money, use a sandbox merchant account. Create one from your Dashboard account as follows.
1. Log in to your SumUp account.
2. Open [Developer Settings](https://me.sumup.com/settings/developer?tab=sandboxes).
3. In the **Sandboxes** tab, create a sandbox merchant account if you do not have one yet.
With your sandbox merchant account, begin making API calls with real data. Sandbox merchant accounts **do not** process transactions with real funds. The sandbox merchant account has a different ID and displays a clear warning. Requests with a value of 11 (in any currency) always fail by design, to test failed transaction scenarios.
When finished experimenting with the sandbox merchant account, switch back to a regular account for business purposes.
## Authorization
All online payment products use SumUp APIs, which require authorization via an API key or access token. See the [Authorization Guide](/tools/authorization/) for details on available options.
## Checkout Products
SumUp provides a range of checkout products for seamless integration with your website.
### Hosted Checkout
Hosted Checkout is the fastest path to launch. SumUp hosts the payment page, while your integration creates the checkout and redirects the customer to the returned URL.
See the [Hosted Checkout documentation](/online-payments/checkouts/hosted-checkout/) for details.
### Payment Widget
For an embedded checkout on your own site, use the [Payment Widget](/online-payments/checkouts/card-widget/). It only requires adding a single script to your payment page.
#### Alternative Payment Methods
The Card Widget supports [Alternative Payment Methods](/online-payments/apm) (APMs) to accept payments beyond traditional card schemes (Visa or Mastercard). Access APMs through the [SumUp Card Widget](/online-payments/checkouts/card-widget/) by contacting us via the [contact form](/contact).
Available APMs include:
- Apple Pay
- Bancontact
- Blik
- Boleto
- EPS
- Google Pay
- iDeal
- MyBank
- PIX
- Przelewy24
- Satispay
### Swift Checkout SDK
The Swift Checkout SDK provides a complete and fast checkout experience to your end users, collecting payment, address, and contact information with a click of a button.
See the [Swift Checkout Documentation](/online-payments/checkouts/swift-checkout/) for details.
## Plugins
For Prestashop, Wix, or WooCommerce, use SumUp plugins for seamless payments. See the [Plugins section](/online-payments/plugins/) for details on each.
## Custom Integrations
### SumUp APIs
SumUp provides REST APIs for services such as creating and executing payments, storing cards, and issuing refunds. SumUp APIs use API keys or [OAuth 2.0](http://tools.ietf.org/html/rfc6749) for authentication. They also support Cross-Origin Resource Sharing (CORS) for secure browser access from different domains.
The API handles requests and responses primarily in JSON format, except when requests contain form-encoded data. Typically, requests consist of name/value pairs sent to SumUp API URI: `api.sumup.com`.
### Receiving Payments
To receive payments, [create a checkout](/online-payments/guides/single-payment/#1-create-a-checkout). Use merchant-direct payments or initiate on a merchant's behalf based on your [authorization type](/tools/authorization/). Checkouts are created via server-to-server communication to keep access tokens and credentials secret and prevent changes to sensitive details like transaction amount or recipient.
[Completing checkouts](/online-payments/guides/single-payment/#2-complete-a-checkout) via web browser or mobile app to avoid handling sensitive data like card details on your servers, eliminating PCI DSS compliance needs.
SumUp offers the following checkout completion options:
- You could use [Hosted Checkout](/online-payments/checkouts/hosted-checkout/) and redirect the customer to a SumUp-hosted payment page
- You could build a [custom card form](/online-payments/guides/single-payment/#2-complete-a-checkout) that you must submit to the SumUp servers for processing
- You could use the [Payment Widget](/online-payments/checkouts/card-widget/)
- You could process payments with [Alternative Payment Methods](/online-payments/apm), like Boleto, Bancontact & iDeal
- You could process [recurring payments](/online-payments/guides/tokenization-with-payment-sdk)
Successful checkout completion processes payment to the merchant's SumUp account.
## Contact SumUp
# 3-D Secure flow
> Learn about 3DS flow, SCA requirements, and how to handle 3DS when processing payments.
import { Aside } from '@astrojs/starlight/components';
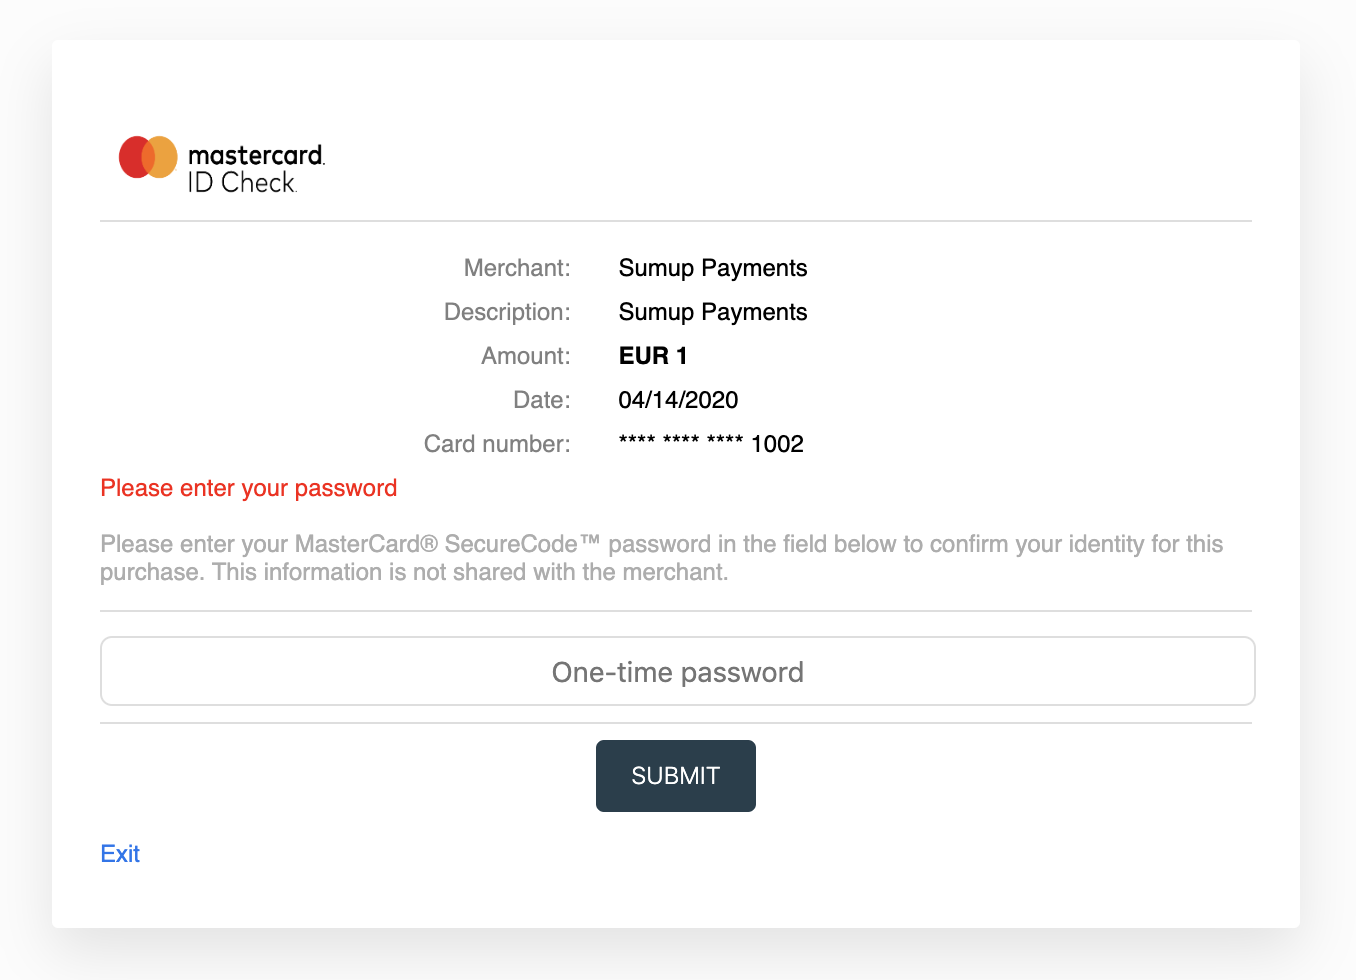
SumUp supports 3-D Secure payments for added security in online transactions.
EMVCo developed 3D Secure 2, a payment card authentication protocol that meets Strong Customer Authentication (SCA) requirements. It reduces fraud through additional layers such as biometrics.
[SCA (Strong Customer Authentication)](https://en.wikipedia.org/wiki/Strong_customer_authentication#cite_note-2) is an obligatory security measure, requiring two-factor authentication to verify consumer identity in payment transactions, using at least two independent, consumer-based factors:
- Something the customer knows (e.g. Password, PIN)
- Something the customer has (e.g. Phone, Token generator)
- Something the customer is (e.g. Fingerprint, Face ID)
Each of these elements must be independent, to ensure the security of others is not compromised in the event of a security breach.
## How It Works
Both the merchant account and card issuer must support 3-D Secure. The flow adds a checkout step, dependent on the card scheme and issuing bank.
## Integration for Single Payments
1. Add the `redirect_url` parameter to your [checkout creation request](/api/checkouts/create). This URL receives the user after payment completion.
2. [Process the checkout](/api/checkouts/process) to get a `next_step` object with details for the required next action, allowing you to redirect the user to a required challenge screen.
3. Use the `next_step` content to redirect an end user to a challenge screen. The `next_step` object contains:
| Parameter | Value |
| -------------- | ----------------------------------------------------------------------------- |
| `method` | `POST` |
| `url` | `https://issuing-bank.com/acs?reqid=B69D8F090C031E959A3BB2C4D7DFE7F8F7C09B28` |
| `redirect_url` | `https://mysite.com/completed_purchase` |
| `mechanism` | `iframe` or `browser` |
| `payload` | `object` |
Example `payload`:
```js
{
"arbitrary_param_name_1": "arbitrary_param_value_1",
"arbitrary_param_name_2": "arbitrary_param_value_2",
"arbitrary_param_name_3": "arbitrary_param_value_3",
"arbitrary_param_name_4": "arbitrary_param_value_4"
}
```
Example redirect via auto-submitting form:
```html
```
The user reaches the issuer's authentication screen for additional verification (e.g. a challenge token, SMS, or other data). After submitting, SumUp completes the payment and the user is redirected to the `redirect_url` appointed at the checkout creation, through a `GET` request with the corresponding `checkout_id` query parameter.
To confirm a checkout's status, make a `GET` request to the [retrieve a checkout](/api/checkouts/get) endpoint.
# Alternative Payment Methods
> Learn about supported alternative payment methods, activation steps, and integration options.
import { Aside } from '@astrojs/starlight/components';
Alternative Payment Methods (APMs) provide alternatives to standard card payment schemes. They offer familiar and frictionless payment experiences to your customers, while making you stand out from your competitors offering only traditional payment experiences.
APMs have completely transformed how we pay online. For example, in the Netherlands more than half of the consumers use iDeal to pay online merchandise.
Some types of APMs are prepaid cards, mobile payments, e-wallets, and "buy now, pay later" installment-based schemes.
## Supported Alternative Payment Methods
The APMs you can offer depend on the country your business is registered and operating in. Here's a list of the currently available APMs at SumUp:
| APM | Country | |
| ---------- | ------------------------------------------------------------------------------------------------------------------------------------------------------------------------------------------------------------------------------------------------------------------------------------------------------------------- | --- |
| Apple Pay | Austria, Belgium, Brazil, Bulgaria, Chile, Croatia, Cyprus, Czech Republic, Denmark, Estonia, Finland, France, Germany, Greece, Hungary, Ireland, Italy, Latvia, Lithuania, Luxembourg, Malta, Netherlands, Norway, Peru, Poland, Portugal, Romania, Slovenia, Slovakia, Spain, Sweden, Switzerland, United Kingdom | |
| Bancontact | Belgium | |
| Blik | Poland | |
| Boleto | Brazil | |
| EPS | Austria | |
| Google Pay | Austria, Belgium, Brazil, Bulgaria, Chile, Croatia, Cyprus, Czechia, Denmark, Estonia, Finland, France, Germany, Greece, Hungary, Ireland, Italy, Latvia, Lithuania, Luxembourg, Malta, Netherlands, Norway, Peru, Poland, Portugal, Romania, Slovenia, Slovakia, Spain, Sweden, Switzerland, United Kingdom | |
| iDeal | Netherlands | |
| MyBank | Greece, Italy, Spain | |
| PIX | Brazil | |
| Przelewy24 | Poland | |
| Satispay | Italy | |
## Enabling Alternative Payment Methods
As a **sole trader**, APMs are automatically enabled for your merchant account after completing the regular registration steps and performing a test transaction with one of our remote payment products, such as [Payment Links](https://sumup.co.uk/payment-links/), [Invoices](https://sumup.co.uk/invoices), and [Online Store](https://sumup.co.uk/online-store/).
As with any other legal type, you must request activation from our support team or via our [contact form here](/contact), providing your merchant ID (MXXXXX). Our team will onboard your merchant account and grant access to the APMs applicable to your business location. Once your request is processed, APMs become available within [Payment Links](https://sumup.co.uk/payment-links/), [Invoices](https://sumup.co.uk/invoices), and [Online Store](https://sumup.co.uk/online-store/).
## Integration
You can offer APMs through a number of approaches:
- Through the [SumUp Payment Widget](/online-payments/checkouts/card-widget). To make APM payments successful, you must always set a `redirect_url` upon [checkout creation](/api/checkouts/create). Beyond that step, the SumUp Payment Widget will handle the rest.
- [API Integrations](/online-payments/apm/integration-guide/)
- Through the [Swift Checkout SDK](/online-payments/checkouts/swift-checkout/)
- Direct Integration:
- [Apple Pay](/online-payments/apm/apple-pay)
- [Google Pay](/online-payments/apm/google-pay)
# Apple Pay
> Learn how to integrate Apple Pay, including prerequisites, domain validation, and API calls.
import { Aside } from "@astrojs/starlight/components";
import Image from "@components/content/Image.astro";
In this guide, you will learn how to directly integrate Apple Pay with SumUp, so that you can retain your own UI/UX flow. Please note that you can also offer Apple Pay through our Payment Widget (see [Payment Widget documentation](/online-payments/checkouts/card-widget#alternative-payment-methods)).
## Prerequisites
- You have a SumUp merchant account and have already filled in your [account details](https://me.sumup.com/account).
- Get familiar with [Apple Pay on the Web guide](https://developer.apple.com/documentation/apple_pay_on_the_web).
- Offering Apple Pay requires registering with Apple on all web domains that will expose an Apple Pay button (includes TLD and subdomains). This is a requirement for production AND test environments.
- If you want to test payments without involving real funds, [create a sandbox merchant account](/online-payments/#getting-a-sandbox-merchant-account).
- Complete the domain onboarding setup steps described in your Dashboard under **Settings** > **For developers** > **Payment wallets**.
## Accepting Apple Pay Payments with SumUp
To begin your implementation, follow these steps:
1. [Create a checkout](https://developer.sumup.com/api/checkouts/create#create-a-checkout)
2. Create an [Apple Payment request](https://developer.apple.com/documentation/apple_pay_on_the_web/applepaypaymentrequest)
```js
const applePaymentRequest = {
currencyCode: "EUR",
countryCode: "DE",
merchantCapabilities: ["supports3DS"],
supportedNetworks: ["masterCard", "visa"],
total: {
label: "Demo",
amount: "0.00",
type: "final",
},
};
```
3. Initiate an [Apple Pay session](https://developer.apple.com/documentation/apple_pay_on_the_web/applepaysession/2320659-applepaysession) and call the [begin method](https://developer.apple.com/documentation/apple_pay_on_the_web/applepaysession/1778001-begin)
4. Listen for the `onvalidatemerchant` callback and collect the validation URL from the event. Create the following payload and pass the validation URL you received from Apple as the `target` value:
```json
{
"target": "https://apple-pay-gateway-cert.apple.com/paymentservices/startSession",
"context": "your_domain_name"
}
```
and initiate a merchant session by calling
```http
PUT https://api.sumup.com/v0.1/checkouts/${checkoutId}/apple-pay-session
```
5. Use the response from the previous step to complete merchant validation with the [`completeMerchantValidation`](https://developer.apple.com/documentation/apple_pay_on_the_web/applepaysession/1778015-completemerchantvalidation/) method.
6. Submitting the payment sheet triggers the `onpaymentauthorized` callback. At that point, [process the checkout](https://developer.sumup.com/api/checkouts/process#process-a-checkout). The process-checkout request body needs to include a `payment_type` of `apple_pay` and an `apple_pay` object containing the Apple Pay payment token returned by the callback.
```json
{
"payment_type": "apple_pay",
"id": "9be2da07-a7bd-4877-bc0a-e16cd909a876",
"amount": 12,
"currency": "EUR",
"apple_pay": {
"token": {
"paymentData": {
"data": "si2xuT2ArQo689SfE-long-token",
"signature": "MIAGCSqGSIb3DQEHA-long-signature",
"header": {
"publicKeyHash": "PWfjDi3TSwgZ20TY/A7f3V6J/1rhHyRDCspbeljM0io=",
"ephemeralPublicKey": "MFkwEwYHKoZIzj0CAQYIKoZIzj0DAQcDQgAEaBtz7UN2MNV0qInJVEEhXy10PU0KfO6KxFjXm93oKWL6lCsxZZGDl/EKioUHVSlKgpsKGin0xvgldfxeJVgy0g==",
"transactionId": "62e0568bc9258e9d0e059d745650fc8211d05ef7a7a1589a6411bf9b12cdfd04"
},
"version": "EC_v1"
},
"paymentMethod": {
"displayName": "MasterCard 8837",
"network": "MasterCard",
"type": "debit"
},
"transactionIdentifier": "62E0568BC9258E9D0E059D745650FC8211D05EF7A7A1589A6411BF9B12CDFD04"
}
}
}
```
# Google Pay
> Learn how to integrate Google Pay, including domain registration, payment requests, and processing.
import { Aside } from '@astrojs/starlight/components';
import Image from '@components/content/Image.astro';
In this guide, you will learn how to directly integrate Google Pay with SumUp. Please note that you can also offer Google Pay through our Payment Widget (see [Payment Widget documentation](/online-payments/checkouts/card-widget#alternative-payment-methods)).
## Prerequisites
- You have a SumUp merchant account and have already filled in your [account details](https://me.sumup.com/account).
- If you want to test payments without involving real funds, [create a sandbox merchant account](/online-payments/#getting-a-sandbox-merchant-account).
- Review [Google Pay API terms of service](https://payments.developers.google.com/terms/sellertos).
- Complete the domain onboarding setup steps described in your Dashboard under **Settings** > **For developers** > **Payment wallets**. You can read Google's tutorial [Google Pay for Payments](https://developers.google.com/pay/api/web/guides/tutorial), which covers the requirements you're expected to follow in order to successfully offer this payment method.
## Accepting Google Pay Payments with SumUp
Considering you've adhered to the prerequisites, the following steps will enable you to begin accepting Google Pay payments through SumUp:
1. Create a base payment request object, containing:
- `tokenizationSpecification` object with the following parameters:
- `gateway`- always equal to "sumup"
- `gatewayMerchantId`- your SumUp merchant code
- [`merchantInfo` object](https://developers.google.com/pay/api/web/reference/request-objects#MerchantInfo) with the following keys:
- `merchantId`- unique identifier provided to you by Google once you register your domain with them. This is required for `PRODUCTION`.
- `merchantName`- your merchant name
```js
const baseRequest = {
apiVersion: 2,
apiVersionMinor: 0,
merchantInfo: {
merchantId: '123456789123456789',
merchantName: 'Example Merchant',
},
allowedPaymentMethods: [
{
type: 'CARD',
parameters: {
allowedAuthMethods: ['PAN_ONLY', 'CRYPTOGRAM_3DS'],
allowedCardNetworks: ['MASTERCARD', 'VISA'],
},
tokenizationSpecification: {
type: 'PAYMENT_GATEWAY',
parameters: {
gateway: 'sumup',
gatewayMerchantId: 'exampleGatewayMerchantId',
},
},
},
],
};
```
2. Load the [Google Pay API JavaScript library](https://developers.google.com/pay/api/web/guides/tutorial#js-load) on the web page you will offer this payment method
3. Initialize a `PaymentsClient` object for the environment you are implementing. Two values are possible here: `TEST` for testing the integration and `PRODUCTION` for live payments.
```js
const paymentsClient = new google.payments.api.PaymentsClient({
environment: 'PRODUCTION',
});
```
4. [Check readiness to pay](https://developers.google.com/pay/api/web/guides/tutorial#isreadytopay) with Google Pay API
5. [Launch the Google Pay button](https://developers.google.com/pay/api/web/guides/tutorial#add-button)
6. [Create a PaymentDataRequest](https://developers.google.com/pay/api/web/guides/tutorial#paymentdatarequest) using the `baseRequest` object and append the top-level `transactionInfo` and `merchantInfo` objects. Your `PaymentDataRequest` should look like this:
```js
const paymentDataRequest = {
apiVersion: 2,
apiVersionMinor: 0,
merchantInfo: {
merchantId: '123456789123456789',
merchantName: 'Example Merchant',
},
transactionInfo: {
totalPriceStatus: 'FINAL',
totalPriceLabel: 'Total',
totalPrice: `${checkoutInfo.amount}`,
currencyCode: checkoutInfo.currency || 'EUR',
countryCode: 'DE',
},
allowedPaymentMethods: [
{
type: 'CARD',
parameters: {
allowedAuthMethods: ['PAN_ONLY', 'CRYPTOGRAM_3DS'],
allowedCardNetworks: ['MASTERCARD', 'VISA'],
},
tokenizationSpecification: {
type: 'PAYMENT_GATEWAY',
parameters: {
gateway: 'sumup',
gatewayMerchantId: 'exampleGatewayMerchantId',
},
},
},
],
};
```
7. [Create a checkout](/api/checkouts/create) with SumUp
8. [Call the `loadPaymentData`](https://developers.google.com/pay/api/web/reference/client#loadPaymentData) method and pass it the `PaymentDataRequest` as an argument. This method will respond in a Promise, where if resolved you will receive a `PaymentData` object
9. [Process the checkout](/api/checkouts/process). The process checkout request body needs to include a `payment_type` of `google_pay` and a `google_pay` object, containing the response from the previous step
```json
{
"payment_type": "google_pay",
"id": "6te2da07-a7bd-4877-bc0a-e16cd909a876",
"amount": 12,
"currency": "EUR",
"google_pay": {
"apiVersionMinor": 0,
"apiVersion": 2,
"paymentMethodData": {
"description": "Visa •••• 1111",
"tokenizationData": {
"type": "PAYMENT_GATEWAY",
"token": "token-data"
},
"type": "CARD",
"info": {
"cardNetwork": "VISA",
"cardDetails": "1111"
}
}
}
}
```
## Troubleshooting
### Screenshots for Google
Google demands screenshots for the onboarding process, but you don't have the integration ready yet? Simply add `#sumup-widget:google-pay-demo-mode` to your URL to render the Google Pay button for onboarding purposes.
### Testing Google Pay Integration Locally
This is not possible at the moment. You need to use a staging environment and validate the test domain in Google API console.
### Error Decrypting Google Pay Token
An Internal Server Error that points to Google Pay token decryption can be caused by an environment mismatch. Make sure the `PaymentsClient` `environment` matches the Google Pay configuration used to create the payment data: use `TEST` for test flows and `PRODUCTION` for live payments.
```js
const paymentsClient = new google.payments.api.PaymentsClient({
environment: 'PRODUCTION',
});
```
# Integration Guide
> Learn about the request parameters and flows required to process alternative payment methods.
## Overview
Alternative Payment Methods (further referred to as APMs) are similar to normal checkouts. One key difference is that the customer needs to take an additional action in order to finalize the payment with most APMs. Before proceeding, read the [online payments guide](/online-payments/).
## Check Available APMs
Check which payment methods are available to your merchant account.
1. [Create a checkout](/api/checkouts/create) and use the checkout `id` to fetch the list of available payment methods from the following endpoint `https://api.sumup.com/v0.1/checkouts/{checkout_id}/payment-methods`.
Example response:
```json
{
"items": [
{
"id": "card",
"name": "Credit Card"
},
{
"id": "blik",
"name": "Blik"
},
{
"id": "apple_pay",
"name": "Apple Pay"
}
]
}
```
Note that this object might change between checkouts as APMs are not offered for all currencies and amounts, and we are continuously introducing new APMs for you to offer.
We recommend handling the returned payment methods as an allowlist for this checkout, and then picking all the payment methods you want to offer. Do **not** simply display all methods returned if your integration doesn't support them.
The customer chooses one of the payment methods from the returned values, sent as part of the process checkout request under `payment_type`.
The currently available payment method ids are: `card`, `ideal`, `bancontact`, `boleto`, `eps`, `mybank`, `satispay`, `blik`, `p24`, `pix`, `qr_code_pix`, `apple_pay`, `paypal`, `google_pay`. _name_ is just for display purposes.
APMs differ from the behavior of cards. There are two possible flows, which we call `artifacts` or `redirect instructions`, explained in more detail below. APMs also require different input parameters obtained from the customer, as listed below:
| Payment method name | Parameters | Flow |
| ------------------- | --------------------------------------------------- | -------- |
| bancontact | First name, Last name, Country | Redirect |
| blik | First name, Last name, Country, Email | Redirect |
| boleto | First name, Last name, Country, Email, Address, CPF | Artifact |
| eps | First name, Last name, Country, Email | Redirect |
| ideal | First name, Last name, Country, Email | Redirect |
| myBank | First name, Last name, Country, Email | Redirect |
| p24 | First name, Last name, Country, Email | Redirect |
| satispay | First name, Last name, Country, Email | Redirect |
| pix | | Artifact |
| qr_code_pix | | Artifact |
Example payload:
```json
{
"payment_type": "#Payment method name",
"personal_details": {
"email": "#Email",
"first_name:": "#First Name",
"last_name": "#Last Name",
"tax_id": "#CPF",
"address": {
"country": "#Country",
"city": "#Address",
"line1": "#Address",
"postal_code": "#Address",
"state": "#Address"
}
}
}
```
### Process Checkout Using Redirect Flow
In the Redirect Flow, when the checkout is processed, you receive the `"status": "pending"` parameter and the `next_step` parameter, which means an additional action is required to process the payment.Example response:
```json
{
...
"status": "pending",
"next_step": {
"url": "https://apm-redirect-link",
"method": "POST",
"payload": {
"....": "..."
}
},
...
}
```
Most of the time, this is a simple redirect to a 3rd party page, like Blik, where the customer can pay.
But, as shown above, POST requests are also possible. For all calls, ensure that the payload is included, and the appropriate method is used.
Once the customer completes the necessary actions on the page, they are redirected to the `redirect_url` specified under the [create checkout request](/api/checkouts/create).
Now you can retrieve the final status via a [GET checkout request](/api/checkouts/get/).
### Process Checkout Using Payment Method Artifacts Flow
Payment method artifacts are images, PDFs etc. which the customer gets in order to pay. Currently, we have 3 payment methods which have artifacts: `boleto`, `pix` and `qr_code_pix`.
Example requests for each:
**boleto:**
```json
{
"boleto": {
"barcode": "23790001246004987209031123456704579990000010000",
"url": "https://api.sumup.com/v0.1/checkouts/19c11c6c-be1d-4dd6-b718-2798878117cb/boletos/1044833949",
"valid_until": "2022-02-01T17:57:10.442+00:00",
"artefacts": [
{
"name": "invoice",
"content_type": "application/pdf",
"location": "https://homolog.meiosdepagamentobradesco.com.br/apiboleto/Bradesco?token=bWJvYXpkc1hXRzdhRVkyUUFGZUV4T25NYjBVVEZrNG93Y3RKLzM4cTh5dWdDWEh5dDQyTXN6ZHl5NFdjaHBkZg..",
"created_at": "2022-01-21T17:57:10.443+00:00"
},
{
"name": "code",
"content_type": "text/plain",
"location": "https://api.sumup.com/v0.1/artefacts/5266b29e-625b-43c0-a74a-8985ea3acd8a/content",
"content": "23790001246004987209031123456704579990000010000",
"created_at": "2022-01-21T17:57:10.445+00:00"
}
]
}
}
```
**pix:**
```json
{
"pix": {
"artefacts": [
{
"name": "barcode",
"content_type": "image/jpeg",
"location": "https://api.sumup.com/v0.1/artefacts/ee69508f-1b16-4ead-8416-8d2085933e6f/content",
"created_at": "2021-10-12T22:06:46.327+00:00"
},
{
"name": "code",
"content_type": "text/plain",
"location": "https://api.sumup.com/v0.1/artefacts/1e1e5130-17d1-495a-8e36-2a50d40dacde/content",
"content": "00020126580014br.gov.bcb.pix0136a4fac492-d03b-45a8-bd43-c3f23d4bac68520400005303986540520.005802BR5916Priscila Manhaes6009Sao Paulo62290525SUMUP202110122206453822986304A61E",
"created_at": "2021-10-12T22:06:46.326+00:00"
}
]
}
}
```
**qr_code_pix:**
```json
{
"qr_code_pix": {
"artefacts": [
{
"name": "barcode",
"content_type": "image/jpeg",
"location": "https://api.sam-app.ro/v0.1/artefacts/ee69508f-1b16-4ead-8416-8d2085933e6f/content",
"created_at": "2021-10-12T22:06:46.327+00:00"
},
{
"name": "code",
"content_type": "text/plain",
"location": "https://localhost:3000/v0.1/artefacts/1e1e5130-17d1-495a-8e36-2a50d40dacde/content",
"content": "00020126580014br.gov.bcb.pix0136a4fac492-d03b-45a8-bd43-c3f23d4bac68520400005303986540520.005802BR5916Priscila Manhaes6009Sao Paulo62290525SUMUP202110122206453822986304A61E",
"created_at": "2021-10-12T22:06:46.326+00:00"
}
]
}
}
```
The major difference between `qr_code_pix` and `pix` is that `pix` is paid directly into the merchant's SumUp bank account if they have one. `qr_code_pix` is paid out with the normal payout process and incurs a fee.
For all artifact payments, you need to provide the customer with the artifact and wait for the checkout to eventually complete.
Once the user has paid, you can retrieve the final status via the [GET checkout request](/api/checkouts/get/).
# Checkout Integrations
> Compare SumUp checkout integrations for embedded, hosted, and accelerated online payment experiences.
SumUp provides the following checkout integrations for online payments:
- [Payment Widget](/online-payments/checkouts/card-widget/) - embedded checkout UI for cards and supported payment methods
- [Hosted Checkout](/online-payments/checkouts/hosted-checkout/) - SumUp-hosted payment page with minimal integration effort
- [Swift Checkout SDK](/online-payments/checkouts/swift-checkout/) - accelerated wallet checkout for Apple Pay and Google Pay
- [Server-side SDKs](/online-payments/sdks/) - Node.js, Go, Python, Java, PHP, .NET, and Rust clients for the SumUp API
- [React Native SDK](/online-payments/sdks/react-native/) - payment sheet for mobile apps
# Payment Widget
> Explore the SumUp Payment Widget, including mounting and configuration for your site.
import { Aside, Steps } from "@astrojs/starlight/components";
import CardWidget from "@components/content/CardWidget.astro";
The Payment Widget, available to all SumUp merchants, simplifies website checkouts while handling PCI and PSD2 compliance with flexible customization options. It collects card and alternative payment method details. For card payments, it dynamically recognizes the brand and shows the relevant brand icon.
A secure HTTPS connection is used to submit the payment information. For production usage we only support HTTPS for the payment page. (note: [during development browsers will treat `localhost` as secure](https://developer.mozilla.org/en-US/docs/Web/Security/Defenses/Secure_Contexts#potentially_trustworthy_origins)).
## Prerequisites
Payment Widget requires only the ability to create online checkouts via [SumUp checkout API](/api/checkouts/create), authorized by API key or access token (see the [Authorization Guide](/tools/authorization/) for details).
## Compliance
### Payment Card Industry
The Payment Widget ensures PCI compliance for your business. You do not need to worry about storing or sending sensitive information, such as card details, to SumUp servers.
### Payment Services Directive 2
Strong Customer Authentication (SCA) under Payment Services Directive 2 (PSD2) requires two-factor authentication for European online payments. The widget supports 3D Secure, with bank fallback to 3D Secure 1 in case the customer's bank doesn't support 3DS 2, adding security layers like bank redirects, SMS codes, or app confirmation. Regardless of the 3DS version used, the customer is provided with a seamless checkout experience.
## Integration
1. In order to integrate the Payment Widget on your website, include the `sdk.js` script on your payment page.
```js
```
2. Once the script is loaded, you have access to a global variable `SumUpCard`, with a `mount` method which renders the available payment methods.
3. [Create a checkout](/api/checkouts/create) and copy the returned `id`.
4. Pass the returned `id` from the checkout response to the widget component.
```html
```
The Payment Widget makes a request to execute the checkout and after the request is completed, you get a response based on the callback function configured. As a result of successful integration, you can see the following component:
## Configurations
The Payment Widget allows you to customize certain properties on the card display, as listed below. If you wish to override the default settings, add your own configuration property-value pairs to the `SumUpCard.mount` method.
```js
SumUpCard.mount({
checkoutId: "...",
// 'config-name': 'config-value'
});
```
| Property Name | Description | Value | Default Value | Required |
| ------------------------ | ----------------------------------------------------------------------------------------------------------------------------------------------------------------------------------------------------------------------------------------------------------------------------------------------------------------------------------------------------------------------------------------------------------------------------------------------------------------------------------------------------------------------------------------------------------------------------------------------------------------------------------------------------------------------------------------------------------------------------------------------------------------------------------------------------------------------------------------------------------------------------------------------------------------------------------------------------------------------------------------------------------------------------------------------------------------------------- | ------------------------------------------------------------------------------------------------------------------------------------------------------------------------------------------------------------------------------------------------------------------------------------------------------------------------------------------------------------------------------------------------------------ | ------------------ | -------- |
| `checkoutId` | The unique ID you receive once you [create a checkout](/online-payments/guides/single-payment/#1-create-a-checkout). | `string` | _no default value_ | yes |
| `onResponse` | The callback function that will be called when you receive a response from the payment form. The first parameter is one of the following: - `sent` - the form is sent to the server for processing. The second parameter contains information about the last four digits of the card's number and the card's scheme.
- `invalid` - trying to submit the form but there are validation errors.
- `auth-screen` - the user is prompt to authenticate the payment.
- `error` - the server responded with error. The second parameter gives more information about the error.
- `success` - successful result returned by the checkout endpoint **which does not always mean the transaction was successful**. We recommend verifying the [checkout status](/api/checkouts/get) on your server. The second parameter contains the response from the [endpoint](/api/checkouts/process).
- `fail` - failed result returned by the checkout endpoint, can occur when the user cancels the payment form or the session has timed out.
| `function` | `null` | no |
| `onLoad` | The callback function that will be called when the card widget is loaded. | `function` | `null` | no |
| `onPaymentMethodsLoad` | The callback is called when the payment methods are loaded for the given `checkoutId`. Usually used for when the host page needs to change depending on the payment methods available.
Payment methods can be filtered in order to limit those shown by the widget. `return` the list of payment methods for the widget to render as an _Array of Strings_. E.g. to show only Boleto, when available: `() => ['boleto']`; | `function` | `null` | no |
| `onChangeInstallments`\* | The callback function that will be called when the user changes the dropdown for installments. The first and only parameter will be the number of selected installments. (`showInstallments` must be enabled). | `function` | `null` | no |
| `showSubmitButton` | Displays or hides the form's submit button. | `boolean` | `true` | no |
| `showFooter` | Displays or hides "Powered by SumUp" label. | `boolean` | `true` | no |
| `showInstallments`\* | Displays or hides a dropdown for choosing installments. Once enabled this overrides any value of the configuration `installments` and will not display `amount` on the submit button. | `boolean` | `false` | no |
| `showZipCode`\*\* | Displays or hides ZIP code input field. It is mandatory for merchant users from USA. | `boolean` | `false` | no |
| `showEmail` | Displays or hides email input field. At some time in the future it'll be a mandatory field for every integrator because of the SCA. | `boolean` | `false` | no |
| `email` | Alternative way (to `showEmail`) to pass user's email if for example you know it from a previous step in your application. This configuration doesn't display additional input fields. If for some reason both `showEmail` and `email` are passed the `email` will have no effect over the displayed input field. | `string` | `null` | no |
| `installments`\* | The number of installments with which the transaction should be processed. | `number`
[1 .. 12] | `null` | no |
| `maxInstallments`\* | The maximum amount of installments in the selector displayed by the widget. | `number`
[1 .. 12] | `12` | no |
| `id` | `id` of the element that you wish to render the card widget in. _Example:_ `` | `string` | `"sumup-card"` | no |
| `donateSubmitButton` | Changes the text of the submit button to "Donate". | `boolean` | `false` | no |
| `amount` | The `amount` you want to be displayed on the submit button. _Requires_ `currency` _and_ `locale` _to take effect._ | `string` | `null` | no |
| `currency` | The `currency` for the `amount` you want to be displayed on the submit button. | One of: `"EUR"`, `"BGN"`, `"BRL"`, `"CHF"`, `"CZK"`, `"DKK"`, `"GBP"`, `"HUF"`, `"NOK"`, `"PLN"`, `"SEK"`, `"USD"` | `null` | no |
| `locale` | Translates all texts into the given locale. Also specifies the formatting of the `amount` and `currency`. | One of:
`"bg-BG"`, `"cs-CZ"`, `"da-DK"`, `"de-AT"`, `"de-CH"`, `"de-DE"`, `"de-LU"`, `"el-CY"`, `"el-GR"`, `"en-GB"`, `"en-IE"`, `"en-MT"`, `"en-US"`, `"es-CL"`, `"es-ES"`, `"et-EE"`, `"fi-FI"`, `"fr-BE"`, `"fr-CH"`, `"fr-FR"`, `"fr-LU"`, `"hu-HU"`, `"it-CH"`, `"it-IT"`, `"lt-LT"`, `"lv-LV"`, `"nb-NO"`, `"nl-BE"`, `"nl-NL"`, `"pt-BR"`, `"pt-PT"`, `"pl-PL"`, `"sk-SK"`, `"sl-SI"`, `"sv-SE"` | `"en-GB"` | no |
| `country` | Sets the country where the user account is from. | One of: `"AT"`, `"BE"`, `"BG"`, `"BR"`, `"CH"`, `"CL"`, `"CO"`, `"CY"`, `"CZ"`, `"DE"`, `"DK"`, `"EE"`, `"ES"`, `"FI"`, `"FR"`, `"GB"`, `"GR"`, `"HR"`, `"HU"`, `"IE"`, `"IT"`, `"LT"`, `"LU"`, `"LV"`, `"MT"`, `"NL"`, `"NO"`, `"PE"`, `"PL"`, `"PT"`, `"RO"`, `"SE"`, `"SI"`, `"SK"`, `"US"` | `null` | no |
| `googlePay` | Required for accepting payments with the widget via Google Pay:
- **`merchantId`** is a value provided by Google [after registration](https://developers.google.com/pay/api/web/guides/setup#registration). (not to be confused with your SumUp `merchantCode`)
- **`merchantName`** is visible to the customer on the Google Pay payment flow.
For more details check [Google Pay **`merchantInfo`** documentation](https://developers.google.com/pay/api/web/reference/request-objects#MerchantInfo). | `{merchantId: string, merchantName: string}` | `null` | no |
_\* Installments are available only to merchant users in Brazil, Chile, Colombia and Peru._
_\*\* ZIP code is required only for merchant users in the USA._
## Methods
| Name | Description | Parameters | Return Type |
| ------- | ----------------------------------------- | ---------------------------------------------------- | ----------------------------------------------------------------------------------------------------------------------------------------------------------------------------------------------------------------------------------------------------------------------------------------------------------------------------------------------------------------------------------------------------------------------------------------- |
| `mount` | Initializes and renders the payment form. | JSON object with a [configuration](#configurations). | Returns object that contains three methods: `submit`, `unmount` and `update`.- `submit()` method will submit the form.
- `unmount()` method will destroy the card.
- `update({})` method will dynamically change some configurations, it accepts one argument which has to be an object with at least one of the following configuration keys: `checkoutId`, `email`, `amount`, `currency` or `installments`.
|
## Alternative Payment Methods
Depending on the country a merchant is registered in, [Alternative Payment Methods (APMs)](/online-payments/apm) are available for accepting payments from your customers. Please note, the `show*` configuration properties from the [widget configurations](#configurations) do not apply to APMs. The APMs will only render fields applicable to the respective payment method.
You can begin offering APMs to your customers, once you are onboarded as a merchant. Request assistance with getting onboarded for APMs through our [contact form](/contact).
## Custom Styling
Custom styling to most of the SumUp Payment Widget elements is enabled by the `data-sumup-id` attribute. To get all elements, query the DOM with `document.querySelectorAll('[data-sumup-id]')`.
Here's an example of updating styles for one of the elements:
```css
[data-sumup-id="widget__container"] {
color: red;
line-height: 18px;
}
```
You can also style child elements to those with the `data-sumup-id`, by chaining their tag or other uniquely identifiable attribute.
Elements like Payment Selector have some additional items you can query to extend your customizations. To style a specific Payment Selector, you need to appoint the `data-sumup-item=${payment.id}`.
```css
[data-sumup-id="payment_option"][data-sumup-item="blik"] {
display: none;
}
```
## Using Your Own Submit Button
If you need to use your own submit button, you can achieve this by following the example below:
```html
```
## Handling Strict Content Security Policies
Pages with strict [Content Security Policies](https://developer.mozilla.org/en-US/docs/Web/HTTP/CSP) (CSP) may experience issues with styles or images when rendering the SumUp Payment Widget. This section contains the necessary adjustments to render the Payment Widget properly.
To confirm your issue is related to CSP, check your browser's console for a similar error message:
```text
Refused to apply inline style because it violates the following Content Security Policy directive: "style-src 'self' \*\*\* Either the 'unsafe-inline' keyword, a hash ('sha256-47DEQpj8HBSa+/TImW+5JCeuQeRkm5NMpJWZG3hSuFU='), or a nonce ('nonce-...') is required to enable inline execution.
```
### Required Configurations
In order to properly render the card widget with CSP in place, you must whitelist the following URLs for your application:
| Content Type | URL |
| ------------ | ----------------------------------- |
| SDK & API | 'https://\*.sumup.com' |
| Images | 'data:', 'https://static.sumup.com' |
Additionally, `nonce` is required to make inline styles work on your host page. For more information view [the CSP docs](https://content-security-policy.com/nonce/).
Example implementation with `nonce`:
```js
const express = require("express");
const app = express();
const http = require("http");
const server = http.createServer(app);
const port = process.env.PORT || 4000;
const crypto = require("crypto");
// Resources
const apisToConnect = ["https://gateway.sumup.com", "https://api.sumup.com"];
const imagesResources = [
"data:", // inline icons
"https://static.sumup.com",
// For generated barcodes
"https://api.sumup.com",
];
const scriptsResources = [
"https://gateway.sumup.com",
// PLUS nonce-$HASH
];
const stylesResources = [
// nonce-$HASH
];
const framesResources = ["https://gateway.sumup.com"];
app.get("/", (req, res) => {
const nonce = crypto.randomBytes(16).toString("base64");
res.setHeader(
"Content-Security-Policy",
`default-src 'self';` +
` connect-src 'self' ${apisToConnect.join(" ")};` +
` img-src 'self' ${imagesResources.join(" ")};` +
` script-src 'self' ${scriptsResources.join(" ")} 'nonce-${nonce}';` +
` style-src 'self' 'nonce-${nonce}';` +
` frame-src 'self' ${framesResources.join(" ")};`,
);
//
res.send(`
Test CSP
Test using generated nonce: ${nonce}
See without nonce
Footer
`);
});
server.listen(port, () => {
console.log("listening on:", port);
});
```
If you continue to experience issues with rendering the Payment Widget, reach out to our support through this [contact form](/contact).
### Apple Pay specific policies
To allow Apple Pay functionality on third party browsers, make sure to allow Apple Pay SDK domain in your CSP:
```text
default-src 'self' applepay.cdn-apple.com ...; script-src 'self' applepay.cdn-apple.com ...
```
This is an optional feature, not including these policies will simply prevent Apple Pay from extended availability on unsupported browsers.
# Hosted Checkout
> Use Hosted Checkout to accept online payments with a SumUp-hosted payment page and minimal integration effort.
import { Aside, Tabs, TabItem } from "@astrojs/starlight/components";
import Image from "@components/content/Image.astro";
Hosted Checkout lets you accept online payments with a payment page hosted by SumUp. Your integration creates a checkout through the SumUp API, receives a `hosted_checkout_url`, and sends the customer to that page to complete the payment.
This is the lowest-effort way to launch an online checkout while keeping payment collection, status pages, and wallet support inside a SumUp-hosted flow.
## Prerequisites
- Ability to [create a checkout](/api/checkouts/create) through the SumUp API.
- Authentication via API key or access token. See the [Authorization Guide](/tools/authorization/).
- A server-side integration to create the checkout and keep credentials secret.
## How Hosted Checkout Works
1. Create a checkout and set `hosted_checkout.enabled` to `true`.
2. Store the returned checkout `id` and `hosted_checkout_url`.
3. Redirect the customer to `hosted_checkout_url`, or share that URL in the flow you are building.
4. After the customer completes the payment, verify the final result through the API or with [webhooks](/online-payments/webhooks/).
## Create a Hosted Checkout
Send a request to the [Create a checkout endpoint](/api/checkouts/create) with `hosted_checkout.enabled` set to `true`. If you want the success page to link back to your website, include `redirect_url` at the same time.
```bash
curl -X POST https://api.sumup.com/v0.1/checkouts \
-H "Content-Type: application/json" \
-H "Authorization: Bearer $SUMUP_API_KEY" \
-d '{
"amount": 12.00,
"checkout_reference": "b50pr914-6k0e-3091-a592-890010285b3d",
"currency": "EUR",
"description": "A sample checkout",
"merchant_code": "MCXXXXXX",
"redirect_url": "https://example.com/orders/123/complete",
"hosted_checkout": { "enabled": true }
}'
```
```ts
const checkout = await client.checkouts.create({
merchant_code: merchantCode,
amount: 12.0,
currency: "EUR",
checkout_reference: "b50pr914-6k0e-3091-a592-890010285b3d",
description: "A sample checkout",
redirect_url: "https://example.com/orders/123/complete",
hosted_checkout: { enabled: true },
});
```
```csharp
var checkout = await client.Checkouts.CreateAsync(new CheckoutCreateRequest
{
MerchantCode = merchantCode,
Amount = 12.0f,
Currency = Currency.Eur,
CheckoutReference = "b50pr914-6k0e-3091-a592-890010285b3d",
Description = "A sample checkout",
RedirectUrl = "https://example.com/orders/123/complete",
HostedCheckout = new CheckoutCreateRequestHostedCheckout
{
Enabled = true,
},
});
```
```java
var checkout = client.checkouts().createCheckout(
CheckoutCreateRequest.builder()
.merchantCode(merchantCode)
.amount(12.0f)
.currency(Currency.EUR)
.checkoutReference("b50pr914-6k0e-3091-a592-890010285b3d")
.description("A sample checkout")
.redirectUrl("https://example.com/orders/123/complete")
.hostedCheckout(
CheckoutCreateRequestHostedCheckout.builder()
.enabled(true)
.build()
)
.build()
);
```
```go
checkout, err := client.Checkouts.Create(ctx, sumup.CheckoutsCreateParams{
MerchantCode: merchantCode,
Amount: 12.0,
Currency: sumup.CurrencyEUR,
CheckoutReference: "b50pr914-6k0e-3091-a592-890010285b3d",
Description: "A sample checkout",
RedirectURL: "https://example.com/orders/123/complete",
HostedCheckout: &sumup.CheckoutHostedCheckout{
Enabled: true,
},
})
```
```py
checkout = client.checkouts.create(
CreateCheckoutBody(
merchant_code=merchant_code,
amount=12.00,
currency="EUR",
checkout_reference="b50pr914-6k0e-3091-a592-890010285b3d",
description="A sample checkout",
redirect_url="https://example.com/orders/123/complete",
hosted_checkout={"enabled": True},
)
)
```
```rust
let checkout = client.checkouts().create(Some(CheckoutCreateRequest {
merchant_code,
amount: 12.,
currency: Currency::EUR,
checkout_reference: "b50pr914-6k0e-3091-a592-890010285b3d".into(),
description: Some("A sample checkout".into()),
redirect_url: Some("https://example.com/orders/123/complete".into()),
hosted_checkout: Some(CheckoutCreateRequestHostedCheckout {
enabled: true,
}),
return_url: None,
customer_id: None,
purpose: None,
id: None,
status: None,
date: None,
valid_until: None,
transactions: None,
})).await?;
```
```php
$checkout = $sumup->checkouts->create([
'merchant_code' => $merchantCode,
'amount' => 12.00,
'currency' => 'EUR',
'checkout_reference' => 'b50pr914-6k0e-3091-a592-890010285b3d',
'description' => 'A sample checkout',
'redirect_url' => 'https://example.com/orders/123/complete',
'hosted_checkout' => [
'enabled' => true,
],
]);
```
The response includes the hosted checkout configuration and the URL you send the customer to:
```json
{
"amount": 12,
"checkout_reference": "b50pr914-6k0e-3091-a592-890010285b3d",
"checkout_type": "checkout",
"currency": "EUR",
"date": "2000-01-01T12:49:24.899+00:00",
"description": "A sample checkout",
"hosted_checkout": { "enabled": true },
"hosted_checkout_url": "https://checkout.sumup.com/pay/8f9316a3-cda9-42a9-9771-54d534315676",
"id": "64553e20-3f0e-49e4-8af3-fd0eca86ce91",
"merchant_code": "MCXXXXXX",
"merchant_country": "DE",
"merchant_name": "Sample Shop",
"purpose": "CHECKOUT",
"status": "PENDING",
"transactions": []
}
```
## Redirect Customers to the Hosted Page
Use the `hosted_checkout_url` returned by the API as the payment page URL in your application.
- Redirect the customer there immediately after checkout creation.
- Or store the URL and present it later in your own flow, for example in an order confirmation page or email.
When the customer opens the Hosted Checkout page, SumUp handles the payment UI and payment confirmation flow.
The business branding shown on Hosted Checkout, such as your business logo and icon, can be configured from the [Branding page](https://me.sumup.com/settings/branding) in SumUp Dashboard. The business name and other customer-facing information can be configured from the [Business profile page](https://me.sumup.com/settings/business-profile/information).
## Configure the Return Flow
If you want the success page to include a button back to your website, set `redirect_url` when you create the checkout, as shown in the examples above.
If `redirect_url` is present, the success page shows a button that sends the customer back to your website.
## Handle Payment Outcomes
Hosted Checkout covers the customer-facing flow from payment page to final status page. Depending on the outcome, customers see different pages:
- Success page after a successful payment.
- Failure page when payment authorization or processing fails.
- Expired page when the checkout session is no longer valid.
- Not found page when the URL does not match an active hosted checkout session.
### Success
### Failure
### Expired Session
### Not Found
# Swift Checkout SDK
> Learn about the Swift Checkout SDK to offer Apple Pay and Google Pay on your website with minimal setup.
import { Aside } from "@astrojs/starlight/components";
The Swift Checkout SDK enables you to offer a complete and fast checkout experience to your end users, allowing you to collect payment, address, and contact information with a click of a button. Swift Checkout SDK allows for Google Pay and Apple Pay setup.
## Prerequisites
- Add a payment method to your browser or wallet. For example, you can save a card in Chrome, add a card to your Apple Wallet for Safari and iOS
- Serve your application over HTTPS. This is a requirement both in development and in production environments. One way to get up and running is to use a service like [ngrok](https://ngrok.com/)
Currently available payment methods through Swift Checkout SDK:
- [Apple Pay](#apple-pay-setup)
- [Google Pay](#google-pay-setup)
## SumUp Swift Checkout SDK Setup
Include the SDK.js in your page as shown below:
```html
```
Or with JavaScript:
```javascript
function injectScript() {
return new Promise((resolve) => {
var script = document.createElement("script");
script.type = "text/javascript";
script.onload = function () {
resolve(window.SumUp);
};
script.src = "https://js.sumup.com/swift-checkout/v1/sdk.js";
document.body.appendChild(script);
});
}
```
Once the script is loaded, a new SumUp object is injected into the window instance representing SumUp SDK namespace, which contains the SwiftCheckout client.
## Obtaining a Public API Key
To obtain a public API key, go to the [API keys page](https://me.sumup.com/settings/api-keys) in the SumUp Dashboard. Your public merchant key will be automatically generated with a `Private` label and a value such as `sup_pk_0x98lsJhJAs...u5kvg`.
## SumUp Swift Checkout Client
```javascript
const swiftCheckoutClient = new window.SumUp.SwiftCheckout(
"sup_pk_0x98lsJhJAs...u5kvg",
);
```
The client contains a set of objects to render a payment element UI, request payment authorization and process a payment using SumUp’s API.
### Payment Request Object
The payment request object requests payment authorizations made with various payment methods. It requires an argument that contains a set of details, information about the requested transaction to be processed, that will be presented to the user to authorize the payment later.
Payment request object arguments consist of:
- `countryCode`: Represents the country or region of the merchant’s principle place of business.
- `total`: Represents what is about to be paid by the user, E.g. a summary of an order. It requires a `label` and an `amount`. The `amount` value must be provided as a string in major unit and should use a period (`.`) as a decimal separator. More specifically, the `amount` value should match the following regex: `^[0-9]+(\.[0-9][0-9])?$`
Optional:
- `locale`: Represents the locale the text "Pay with \{\{payment method\}\}" will be displayed with in the buttons.
```js
const paymentRequest = swiftCheckoutClient.paymentRequest({
countryCode: "DE",
locale: "de-DE",
total: {
label: "My goods",
amount: { currency: "EUR", value: "65.00" },
},
});
```
- `shippingOptions`: Represents a collection of shipping methods the end user can select from to receive their purchased goods. The initial `shippingOptions` list can be later modified according to the shipping address the user selects in the payment dialog.
```js
const paymentRequest = swiftCheckoutClient.paymentRequest({
shippingOptions: [
{
id: "post",
label: "postal service",
amount: { currency: "EUR", value: "0.00" },
description: "free post",
},
],
});
```
This object is an analogue to the [PaymentRequest - Web APIs](https://developer.mozilla.org/en-US/docs/Web/API/PaymentRequest/PaymentRequest).
The payment request instance contains the logic related to **checking payment method availability and showing** the payment method dialogue once the user interacts with a **payment element**.
### Payment Request Interface
All methods in the payment request object are asynchronous. Listed below are the payment request methods and their usage:
#### `canMakePayment`
Checks if the given merchant public key has access to at least one payment method and checks the payment method availability in the given environment (browser). Returns a promise that resolves in a `boolean`.
#### `availablePaymentMethods`
Returns the available payment methods for a merchant. Returns a promise that resolves in an `array` of objects representing each available payment method.
#### `show`
Shows the payment authorization dialogue for a given payment method. It requires an object containing a `paymentMethod`, which defines the selected payment method. This method is usually used along with the `PaymentElement`'s `onSubmit` event.
The `show` method resolves with a `AuthorizedPayment`, which contains the `details` shared by the user once they authorize the payment request. The property `details` contains `paymentMethod`, `contactInformation`, `shippingAddress` and may contain `shippingOptions`.
A `PaymentRequestCancelledError` will be thrown when the user rejects or cancels the transaction.
```js
paymentRequest
.show({ paymentMethod: "apple_pay" })
.then(processCheckoutAttempt)
.then(handleResponse)
.catch((error) => {
if (
error instanceof SumUp.SwiftCheckout.Errors.PaymentRequestCancelledError
) {
console.log("Cancelled by the user");
} else {
throw error;
}
});
```
#### `abort`
Terminates a payment request before it is processed. Once a payment request has been terminated using this method, the payment request will not be processed and the payment dialogue will be closed.
```js
if (someCustomCheck()) {
try {
await paymentRequest.abort(); // will throw an error.
console.log("Payment request aborted due to my custom reason.");
} catch (e) {
console.error(
"Unable to abort, because the user is currently in the process of paying.",
);
}
}
```
#### `onShippingAddressChange`
Allows adding an event handler which will be triggered every time the user changes their shipping address. The handler can optionally provide a return value to change the following in the payment dialog:
- `total`
- `shippingOptions`
```js
paymentRequest.onShippingAddressChange(async (newShippingAddress) => {
const { total, shippingOptions } =
await someAsyncOperation(newShippingAddress);
return {
total,
shippingOptions,
};
});
```
#### `onShippingOptionsChange`
Allows adding an event handler which will be triggered every time the user changes their shipping option choice. The handler can optionally provide a return value to change the following in the payment dialog:
- `total`
- `shippingAddress`
- `shippingOptions`
```js
paymentRequest.onShippingOptionsChange(async (selectedShippingOption) => {
const { newTotal, newShippingAddress, newShippingOptions } = await someAsyncOperation(
total
shippingOption,
);
return {
total,
shippingAddress,
shippingOptions,
};
});
```
### Payment Element Builder
In order to request a payment, you need to create a UI element. The SDK provides a built-in PaymentElement UI builder, which allows you to create and configure the payment buttons.
_Each payment button can be rendered individually as well._
The Swift Elements Builder allows you to attach an `onSubmit` handler, which will be called once the user clicks on one of the buttons rendered by it. You can pass a `label` option to `elements()` to control the wallet button text, and the `mount` method accepts a `paymentMethods` array to filter the payment methods you want to offer. The arguments passed during `mount`, will render one or more buttons:
```js
const buttons = swiftCheckoutClient.elements({
label: "book",
});
buttons
.onSubmit((paymentEvent) => console.log(paymentEvent))
.mount({
paymentMethods: [
{ id: "apple_pay" },
{ id: "google_pay" },
// See `paymentRequest.availablePaymentMethods()` for all available payment methods
],
container: document.querySelector("#express-checkout-container"),
});
```
#### `label`
Sets the action text used by the rendered Apple Pay and Google Pay buttons. The supported values are `book`, `buy`, `checkout`, `donate`, `order`, `pay`, `plain`, and `subscribe`.
Use the following labels depending on the checkout context:
- `book` for reservations, appointments, and other booking flows
- `buy` for standard ecommerce purchases
- `checkout` when you want the wallet button to match a broader checkout step
- `donate` for donation and contribution flows
- `order` for order-placement flows such as food ordering or fulfillment
- `pay` for paying an existing amount due, such as an invoice or bill
- `plain` for a minimal wallet-branded button without extra action text
- `subscribe` for subscription and recurring purchase flows
Label rendering depends on wallet and browser support. For example, `label: "book"` can be used to show booking-oriented Apple Pay and Google Pay buttons where supported. On Google Pay, `buy`, `pay`, and `plain` can also show the card brand and last four digits when the user's payment method is an eligible card.
#### Rendering Buttons for Available Payment Methods
Once the UI and Payment Request are configured, you have to check the availability of Swift payment methods and `mount` them into the page.
The SDK checks several factors to determine if a given payment method is available:
- Is the payment method available for the given merchant?
- Is the payment method available on the browser?
- Is the wallet/card ready to accept payment requests?
After checking if making payments is possible, render the payment element into a given placeholder as shown below:
```js
paymentRequest.canMakePayment().then((isAvailable) => {
if (isAvailable) {
paymentRequest.availablePaymentMethods().then((paymentMethods) => {
buttons.mount({
paymentMethods,
container: document.querySelector("#express-checkout-container"),
});
});
} else {
console.error("No payment method available!");
}
});
```
### Requesting Payment Authorization
The authorization dialogue is where the user will review the payment requested, select a payment card and a shipping address. Finally, they can authorize the payment request to be **processed**.
Using the payment element builder, configure it to `show` the payment authorization dialogue from the Payment Request instance upon the `onSubmit` event. Once the user authorizes the payment the `show` method will resolve a `PaymentResponse` containing details about the payment authorization.
```js
buttons.onSubmit((paymentMethodEvent) => {
paymentRequest
.show(paymentMethodEvent)
.then((paymentResponse) => console.log(paymentResponse));
});
```
To understand more about the PaymentResponse objects see Mozilla's official [PaymentResponse - Web APIs](https://developer.mozilla.org/en-US/docs/Web/API/PaymentResponse) documentation.
### Processing an Authorized Payment Request
To process a payment, the SumUp API requires you to create a checkout for a given amount. The checkout creation requires an authenticated request. Thus, we recommend implementing an endpoint on your backend that will authenticate with our API, create a checkout and return a `checkoutId`.
Once you obtain a `checkoutId`, call the `processCheckout` method from the SwiftCheckout client with the `checkoutId` and the `PaymentResponse`, which was received in the previous step, to start the processing the checkout.
```js
paymentRequest
.show(paymentMethodEvent)
.then((paymentResponse) => {
console.log(paymentResponse.details); // contactInfo, shippingAddress, etc.
// here you create your order and a sumup checkout
const checkoutId = "c463bf5e-d397-4bca-9d2e-a4e04f668b1c";
return swiftCheckoutClient.processCheckout(checkoutId, paymentResponse);
})
.then(console.log)
.catch(console.error);
```
### The Complete Implementation
```js
const swiftCheckoutClient = new window.SumUp.SwiftCheckout(
"fOcmczrYtYMJ7Li5GjMLLcUeC9dN",
);
const paymentRequest = swiftCheckoutClient.paymentRequest({
total: {
label: "One Shoe",
amount: {
value: "100.0",
},
},
shippingOptions: [
{
id: "post",
label: "postal service",
amount: { currency: "EUR", value: "0.00" },
description: "free post",
},
],
});
const buttons = swiftCheckoutClient.elements({
label: "book",
});
buttons.onSubmit((paymentMethodEvent) => {
paymentRequest
.show(paymentMethodEvent)
.then((paymentResponse) => {
console.log(paymentResponse.details);
// Create your order and a checkout
const checkoutId = "c463bf5e-d397-4bca-9d2e-a4e04f668b1c";
return swiftCheckoutClient.processCheckout(checkoutId, paymentResponse);
})
.then((result) => {
if (result.status === "PAID") {
window.location.href = "/thankyou";
} else {
console.error(
"It was not possible to process the checkout",
result.message,
);
}
})
.catch((error) => {
if (
error instanceof SumUp.SwiftCheckout.Errors.PaymentRequestCancelledError
) {
console.error("Cancelled by the user");
} else {
throw error;
}
});
});
paymentRequest.canMakePayment().then((isAvailable) => {
if (isAvailable) {
paymentRequest.availablePaymentMethods().then((paymentMethods) => {
buttons.mount({
paymentMethods,
container: document.querySelector("#express-checkout-container"),
});
});
} else {
console.error("No payment method is available.");
}
});
```
## Error Handling
The Swift Checkout SDK returns a series of Errors depending on the event that has taken place. You can use the errors to customise the user experience and communicate error causes as you see fit.
- `PaymentRequestCancelledError` is thrown when the end user closes the open payment dialog or presses the button `esc`.
- `PaymentRequestInvalidActionError` is thrown when the end user has submitted the payment dialog and then attempted to cancel the payment. Once the payment form is submitted the payment can no longer be cancelled.
- `PaymentRequestInternalError` is thrown when attempting to handle the payment request in a forbidden manner. Reasons that you may receive include the following codes, available in the `code` field of the Error object:
- `SHIPPING_CONTACT_SELECTION`
- `SHIPPING_ADDRESS_SELECTION`
- `SHIPPING_METHOD_SELECTION`
- `INTERNAL_VALIDATION`
- `COMPLETE_PAYMENT`
- `UNKNOWN`
## Apple Pay Setup
### Prerequisites
- [Verify your domain with Apple Pay](#verify-your-domain-with-apple-pay), both in development and production
- For Apple Pay [additional configurations](#apple-pay-setup) are required, including macOS 10.12.1+ or iOS 10.1+
### Verify your domain with Apple Pay
To use Apple Pay, you need to register with Apple on all of your web domains which will show an Apple Pay button.
Apple’s documentation for Apple Pay on the Web describes their process of “merchant validation”, which SumUp handles for you behind the scenes. You don’t need to create an Apple Merchant ID, CSR and so on, as described in their documentation. Instead, follow the steps in this section:
1. Request the domain association file through our [contact form](https://developer.sumup.com/contact/) and host it at `https://[YOUR_DOMAIN_NAME]/.well-known/apple-developer-merchantid-domain-association`.
2. Once hosted, request assistance from our integration specialists through the form, to register your domain with Apple.
## Google Pay Setup
### Prerequisites
- [Request production access](https://pay.google.com/business/console/) to Google Pay for your domain name
- Adhere to the [Google Pay requirements](https://developers.google.com/pay/api/web/guides/setup#get-started)
- Review [Google Pay API terms of service](https://payments.developers.google.com/terms/sellertos)
### Google Pay Specific Parameters
Google Pay’s base payment request object requires a few unique parameters:
- [`merchantInfo` object](https://developers.google.com/pay/api/web/reference/request-objects#MerchantInfo) with the following keys:
- `merchantId`- unique identifier provided to you by Google once you [register your domain](https://pay.google.com/business/console/) with them
- `merchantName`- your merchant name
Here’s an example of how the merchantInfo object is included in a Google Pay payment request:
```js
const paymentRequest = sumUpClient.paymentRequest({
methodData: [
{
supportedMethods: "google_pay",
data: {
merchantInfo: {
merchantId: "123456789123456789",
merchantName: "Example Merchant",
},
},
},
],
});
```
### Validating Your Domain with Google Pay
In order to use Google Pay you need to validate your domain with Google. This process requires rendering a nonfunctional Google Pay button on your website and providing them with screenshots of your checkout flow.
To render a Google Pay button on your shop in demo mode, you need to add the `#sumup:google-pay-demo-mode` hash to the page's URL.
Once the hash has been applied you can proceed with the domain validation steps:
1. Create an account in the [Google Pay console](https://pay.google.com/business/console)
2. Go to the **Google Pay API** tabitem in your Google Pay console
3. Navigate to the **Integrate with your website** and click on **+ Add website**
4. Fill out the form with the requested information (domain name, buyflow screenshots, etc.)
5. At the top of the page click on **Submit for approval**
# Custom Integrations
> Integration guides for building with SumUp SDKs and APIs.
import { Aside, Steps } from '@astrojs/starlight/components';
import Image from '@components/content/Image.astro';
Guides in this section cover the basics of SumUp APIs, allowing you to develop a custom integration if SumUp products don't fully support your use case.
## Getting a Sandbox Merchant Account
Create a sandbox merchant account to test APIs without real money:
1. Log in to your SumUp account.
2. Open [Developer Settings](https://me.sumup.com/settings/developer?tab=sandboxes).
3. In the **Sandboxes** tab, create a sandbox merchant account if you do not have one yet.
With your sandbox merchant account, begin making API calls with real data. Sandbox merchant accounts **do not** process transactions with real funds. The sandbox merchant account has a different ID and displays a clear warning. Requests with a value of 11 (in any currency) always fail by design, to test failed transaction scenarios.
When finished experimenting with the sandbox merchant account, switch back to a regular account for business purposes.
SumUp provides official SDKs for Node.js, Go, Python, Java, PHP, .NET, and Rust — visit the [SDKs overview page](/online-payments/sdks/) to choose the client that fits your stack.
# Refunds
> Walks through looking up transactions and issuing full or partial refunds.
import { Aside, Tabs, TabItem } from '@astrojs/starlight/components';
import Multicode from '@components/content/Multicode.astro';
## Overview
In this guide, you will learn how to refund a transaction. You will go through the following steps:
1. [Look up a transaction ID (Optional)](#1-look-up-a-transaction-id)
2. [Refund a transaction](#2-refund-a-transaction) by using one of the available options:
- [Option A: Make a full refund](#make-a-full-refund)
- [Option B: Make a partial refund](#make-a-partial-refund)
When you complete these steps, the payment you have previously processed through SumUp will be refunded either partially or in full.
## Before You Begin
Here are the things that you need in order to complete the steps in this guide:
- [SumUp merchant account](https://me.sumup.com/login) with completed [account details](https://me.sumup.com/account).
- You can also use a [sandbox merchant account](/online-payments/#getting-a-sandbox-merchant-account).
- [Registered client application](/tools/authorization/oauth/#register-an-oauth-application) with SumUp.
- Valid access token obtained with the [Authorization code flow](/tools/authorization/oauth/#authorization-code-flow).
- You have processed a checkout and you have the checkout ID.
## Steps
### 1. Look up a Transaction ID
1. Make a GET request to the `https://api.sumup.com/v0.1/checkouts/{id}` endpoint, where the value of the `{id}` path parameter is the identifier of the checkout resource.
Example request:
```bash
curl -X GET \
https://api.sumup.com/v0.1/checkouts/4ebc2ed7-bb8c-4d4d-a110-08fd31301bf2 \
-H "Authorization: Bearer $SUMUP_API_KEY"
```
```ts
const checkout = await client.checkouts.get("4ebc2ed7-bb8c-4d4d-a110-08fd31301bf2");
```
```csharp
var checkout = await client.Checkouts.GetAsync("4ebc2ed7-bb8c-4d4d-a110-08fd31301bf2");
```
```java
var checkout = client.checkouts().getCheckout("4ebc2ed7-bb8c-4d4d-a110-08fd31301bf2");
```
```go
ctx := context.Background()
client := sumup.NewClient()
checkout, err := client.Checkouts.Get(ctx, "4ebc2ed7-bb8c-4d4d-a110-08fd31301bf2")
```
```py
checkout = client.checkouts.get("4ebc2ed7-bb8c-4d4d-a110-08fd31301bf2")
```
```rust
let checkout = client
.checkouts()
.get("4ebc2ed7-bb8c-4d4d-a110-08fd31301bf2")
.await?;
```
```php
$checkout = $sumup->checkouts->get('4ebc2ed7-bb8c-4d4d-a110-08fd31301bf2');
$checkoutReference = $checkout->checkout_reference;
$checkoutId = $checkout->id;
```
The response contains a JSON body with the full details of the processed checkout resource. You can find the transaction ID in the `id` attribute of the respective transaction resource (`664200af-2b62-4142-9c73-a2a505310d78` in the sample response below).
```json
{
"checkout_reference": "CO287866",
...
"id": "4ebc2ed7-bb8c-4d4d-a110-08fd31301bf2",
...
"transactions": [
{
"id": "664200af-2b62-4142-9c73-a2a505310d78",
...
}
]
}
```
### 2. Refund a Transaction
- [Option A: Make a full refund](#make-a-full-refund)
- [Option B: Make a partial refund](#make-a-partial-refund)
#### Make a Full Refund
1. Make a POST request with an empty request body to the `https://api.sumup.com/v0.1/me/refund/{txn_id}` endpoint, where the value of the `{txn_id}` path parameter is the identifier of the transaction resource.
Example request for the transaction with identifier `664200af-2b62-4142-9c73-a2a505310d78`:
```bash
curl -X POST \
https://api.sumup.com/v0.1/me/refund/19aa3cca-89f6-42d2-b462-463b0b53e959 \
-H "Authorization: Bearer $SUMUP_API_KEY"
```
```ts
await client.transactions.refund("19aa3cca-89f6-42d2-b462-463b0b53e959");
```
```csharp
await client.Transactions.RefundAsync("19aa3cca-89f6-42d2-b462-463b0b53e959");
```
```java
client.transactions().refundTransaction(
"19aa3cca-89f6-42d2-b462-463b0b53e959",
RefundTransactionRequest.builder().build()
);
```
```go
ctx := context.Background()
client := sumup.NewClient()
err := client.Transactions.Refund(ctx, "19aa3cca-89f6-42d2-b462-463b0b53e959", sumup.TransactionsRefundParams{})
```
```py
from sumup.transactions.resource import RefundTransactionBody
client.transactions.refund(
"19aa3cca-89f6-42d2-b462-463b0b53e959",
RefundTransactionBody(),
)
```
```rust
client
.transactions()
.refund("19aa3cca-89f6-42d2-b462-463b0b53e959", None)
.await?;
```
```php
$sumup->transactions->refund('19aa3cca-89f6-42d2-b462-463b0b53e959');
```
The response returns a 204 HTTP status code and contains no body.
#### Make a Partial Refund
1. Make a POST request to the `https://api.sumup.com/v0.1/me/refund/{txn_id}` endpoint, where the value of the `{txn_id}` path parameter is the identifier of the transaction resource.
Unlike the option for a full refund, the request body for partial refunds should be a JSON object with the amount you want to refund for the transaction.
Example request for a partial refund for the amount of 24.42 EUR:
```bash
curl -X POST \
https://api.sumup.com/v0.1/me/refund/19aa3cca-89f6-42d2-b462-463b0b53e959 \
-H "Authorization: Bearer $SUMUP_API_KEY" \
-H 'Content-Type: application/json' \
-d '{"amount": 24.42}'
```
```ts
await client.transactions.refund("19aa3cca-89f6-42d2-b462-463b0b53e959", {
amount: 24.42,
});
```
```csharp
await client.Transactions.RefundAsync(
"19aa3cca-89f6-42d2-b462-463b0b53e959",
new TransactionsRefundRequest
{
Amount = 24.42f,
});
```
```java
client.transactions().refundTransaction(
"19aa3cca-89f6-42d2-b462-463b0b53e959",
RefundTransactionRequest.builder().amount(24.42f).build()
);
```
```go
ctx := context.Background()
client := sumup.NewClient()
amount := float32(24.42)
client.Transactions.Refund(ctx, "19aa3cca-89f6-42d2-b462-463b0b53e959", sumup.TransactionsRefundParams{
Amount: &amount,
})
```
```py
from sumup.transactions.resource import RefundTransactionBody
client.transactions.refund(
"19aa3cca-89f6-42d2-b462-463b0b53e959",
RefundTransactionBody(amount=24.42),
)
```
```rust
use sumup::resources::transactions::RefundTransactionBody;
client
.transactions()
.refund(
"19aa3cca-89f6-42d2-b462-463b0b53e959",
Some(RefundTransactionBody { amount: Some(24.42) }),
)
.await?;
```
```php
$sumup->transactions->refund('19aa3cca-89f6-42d2-b462-463b0b53e959', [
'amount' => 24.42,
]);
```
The response returns a 204 HTTP status code and contains no body.
## Result
You have successfully refunded a transaction (either partially or in full) for a payment you previously processed. The refunded amount will be credited to the same payment method the customer had used to pay with in the original transaction.
The processing fees associated with the original transaction are not returned.
# Response Handling
> Explains how to interpret SumUp API responses.
## Overview
Once an API call is submitted to SumUp, you will receive a standard HTTP response informing you if your request has been successful or not. In most cases the HTTP codes are accompanied by a response body in [JSON](https://json.org/) format.
Codes in the `2xx` range indicate success,`4xx` range indicates errors where the information provided results in a failure. Codes in the `5xx` range are rare and indicate server-side errors.
## Successful Requests
Successfully processed requests return one of the following HTTP status codes: `200 OK`, `201 Created`, `202 Accepted`, `204 No Content`. Depending on the use case response bodies may not be present at all. A response body can look like this:
```json
{
"next_step": {
"url": "https://dummy-3ds-gateway.com/cap?RID=1233&VAA=A",
"method": "POST",
"redirect_url": "https://mysite.com/completed_purchase",
"mechanism": "iframe",
"payload": {
"PaReq": "eJxVUttu2zAM/RXDr4MjyY5dO6BVuE27FZuDZHGG9VGRmMSFb/..f16+jLt/gPhUvGGw==",
"MD": "b1a536c0-29b9-11eb-adc1-0242ac120002"
}
}
}
```
## Client-Side Issues
`4xx` are occasions where you can take action to correct your application requests. Typically, these codes are returned upon user error, such as invalid API calls, incorrect values, missing parameters, etc. The response you receive will provide an indication to the root cause that triggered it. Here's an example of a `4xx` response:
```json
{
"message": "Validation error",
"error_code": "MISSING",
"param": "merchant_code"
}
```
## Server-Side Issues
`5xx` stand for server errors. Although rare, if you receive such code, we recommend retrying your request. Should the returned codes continue to be in the `5xx` range, [reach out to us](/contact).
# Accept a Payment
> Create and process a checkout for a single card payment.
import { Aside, Tabs, TabItem } from '@astrojs/starlight/components';
## Overview
This guide covers single payments over SumUp API, using customer-entered card details without associating them with a saved customer profile. Use this flow when you want to build your own payment form instead of using [Hosted Checkout](/online-payments/checkouts/hosted-checkout/) or the [Payment Widget](/online-payments/checkouts/card-widget/).
You will go through the following steps:
1. [Create a checkout](#1-create-a-checkout)
2. [Complete a checkout](#2-complete-a-checkout)
When you complete these steps, you will have processed a payment with a payment card entered by a customer.
## Prerequisites
- [SumUp merchant account](https://me.sumup.com/login) with completed [account details](https://me.sumup.com/account).
- You can also use a [sandbox merchant account](/online-payments/#getting-a-sandbox-merchant-account).
- [Registered client application](/tools/authorization/oauth/#register-an-oauth-application) with SumUp.
- Valid access token obtained either with the [Authorization code flow](/tools/authorization/oauth/#authorization-code-flow) or [Client credentials flow](/tools/authorization/oauth/#client-credentials-flow).
## Steps
### 1. Create a Checkout
To create a new checkout resource, make a POST request to the `https://api.sumup.com/v0.1/checkouts` endpoint.
| Attribute name | Description |
| ------------------ | ---------------------------------------------------------------------------------------------------------------------------------------------------------------------------------------- |
| checkout_reference | A unique string identifying the payment in your system. It must be unique for your application. |
| amount | The amount for which the payment is made. |
| currency | The three-letter [ISO4217](https://en.wikipedia.org/wiki/ISO_4217) code of the payment currency. It must match the currency registered for the specified merchant (see `merchant_code`). |
| merchant_code | The code of the registered SumUp merchant the payment is made. |
Example request:
```bash
curl -X POST \
https://api.sumup.com/v0.1/checkouts \
-H "Authorization: Bearer $SUMUP_API_KEY" \
-H 'Content-Type: application/json' \
-d '{
"merchant_code": "ME7RMQN3",
"amount": 15.0,
"currency": "EUR",
"checkout_reference": "unique-checkout-ref-123"
}'
```
```ts
const checkout = await client.checkouts.create({
merchant_code: merchantCode,
amount: 15.0,
currency: "EUR",
checkout_reference: "unique-checkout-ref-123"
});
```
```csharp
var checkout = await client.Checkouts.CreateAsync(new CheckoutCreateRequest
{
MerchantCode = merchantCode,
Amount = 15.0f,
Currency = Currency.Eur,
CheckoutReference = "unique-checkout-ref-123",
});
```
```java
var checkout = client.checkouts().createCheckout(
CheckoutCreateRequest.builder()
.merchantCode(merchantCode)
.amount(15.0f)
.currency(Currency.EUR)
.checkoutReference("unique-checkout-ref-123")
.build()
);
```
```go
checkout, err := client.Checkouts.Create(ctx, sumup.CheckoutsCreateParams{
MerchantCode: merchantCode,
Amount: 15.0,
Currency: sumup.CurrencyEUR,
CheckoutReference: "unique-checkout-ref-123",
})
```
```py
checkout = client.checkouts.create(
CreateCheckoutBody(
merchant_code=merchant_code,
amount=15.00,
currency="EUR",
checkout_reference="unique-checkout-ref-123",
)
)
```
```rust
let checkout = client.checkouts().create(Some(CheckoutCreateRequest {
merchant_code,
amount: 15.,
currency: Currency::EUR,
checkout_reference: "unique-checkout-ref-123".into(),
description: None,
return_url: None,
customer_id: None,
purpose: None,
id: None,
status: None,
date: None,
valid_until: None,
transactions: None,
redirect_url: None,
})).await?;
```
```php
$checkout = $sumup->checkouts->create([
'merchant_code' => $merchantCode,
'amount' => 15.0,
'currency' => 'EUR',
'checkout_reference' => 'unique-checkout-ref-123',
]);
```
The response contains a JSON body with the details of the created checkout resource. Note the identifier of the resource - you will need it for all operations on the resource, such as processing the payment in the next step.
The resource identifier is returned in the `id` attribute, or `f14425c6-8bc1-4d02-957c-47573f762828` in the sample response below. The `status` attribute shows that the payment for this resource is pending and will be processed when you complete the checkout with the payment instrument details.
```json
{
"checkout_reference": "CO746453",
"amount": 10,
"currency": "EUR",
"merchant_code": "ME7RMQN3",
"description": "Sample one-time payment",
"id": "f14425c6-8bc1-4d02-957c-47573f762828",
"status": "PENDING",
"date": "2018-09-28T13:47:01.832Z",
"transactions": []
}
```
### 2. Complete a Checkout
To process the checkout and trigger the payment, make a PUT request to the `https://api.sumup.com/v0.1/checkouts/{id}` endpoint, where the value of the `{id}` path parameter is the identifier of the checkout resource.
The request body should be a JSON object with the payment type (`card`) and the payment card details. For more information about the request, see the [API Reference](/api/checkouts/process).
Example request for [Step 1 checkout](#1-create-a-checkout):
```bash
curl -X PUT \
https://api.sumup.com/v0.1/checkouts/f14425c6-8bc1-4d02-957c-47573f762828 \
-H "Authorization: Bearer $SUMUP_API_KEY" \
-H 'Content-Type: application/json' \
-d '{
"payment_type": "card",
"card": {
"name": "Boaty McBoatface",
"number": "4200000000000042",
"expiry_month": "12",
"expiry_year": "23",
"cvv": "123"
}
}'
```
```ts
const checkout = await client.checkouts.process("f14425c6-8bc1-4d02-957c-47573f762828", {
payment_type: "card",
card: {
name: "Boaty McBoatface",
number: "4200000000000042",
expiry_month: "12",
expiry_year: "23",
cvv: "123",
},
});
```
```csharp
var checkout = await client.Checkouts.ProcessAsync(
"f14425c6-8bc1-4d02-957c-47573f762828",
new ProcessCheckout
{
PaymentType = "card",
Card = new Card
{
Name = "Boaty McBoatface",
Number = "4200000000000042",
ExpiryMonth = "12",
ExpiryYear = "23",
Cvv = "123",
Last4Digits = "0042",
Type = CardType.Visa,
},
});
```
```java
var checkout = client.checkouts().processCheckout(
"f14425c6-8bc1-4d02-957c-47573f762828",
ProcessCheckout.builder()
.paymentType(ProcessCheckoutPaymentType.CARD)
.card(
Card.builder()
.name("Boaty McBoatface")
.number("4200000000000042")
.expiryMonth(CardExpiryMonth.fromValue("12"))
.expiryYear("23")
.cvv("123")
.build()
)
.build()
);
```
```go
checkoutSuccess, err := client.Checkouts.Process(ctx, "f14425c6-8bc1-4d02-957c-47573f762828", sumup.CheckoutsProcessParams{
Card: &sumup.Card{
Cvv: "123",
ExpiryMonth: "12",
ExpiryYear: "23",
Name: "Boaty McBoatface",
Number: "4200000000000042",
},
PaymentType: sumup.ProcessCheckoutPaymentTypeCard,
})
```
```py
from sumup.checkouts.resource import Card, ProcessCheckoutBody
checkout = client.checkouts.process(
"f14425c6-8bc1-4d02-957c-47573f762828",
ProcessCheckoutBody(
payment_type="card",
card=Card(
name="Boaty McBoatface",
number="4200000000000042",
expiry_month="12",
expiry_year="23",
cvv="123",
),
),
)
```
```rust
let checkout = client
.checkouts()
.process(
"f14425c6-8bc1-4d02-957c-47573f762828",
sumup::resources::checkouts::ProcessCheckout {
payment_type: "card".into(),
installments: None,
mandate: None,
customer_id: None,
token: None,
personal_details: None,
card: Some(sumup::resources::checkouts::Card {
name: "Boaty McBoatface".into(),
number: "4200000000000042".into(),
expiry_month: "12".into(),
expiry_year: "23".into(),
cvv: "123".into(),
zip_code: None,
last_4_digits: "0042".into(),
type_: "VISA".into(),
}),
},
)
.await?;
```
```php
$checkout = $sumup->checkouts->process(
'f14425c6-8bc1-4d02-957c-47573f762828',
[
'payment_type' => 'card',
'card' => [
'name' => 'Boaty McBoatface',
'number' => '4200000000000042',
'expiry_month' => '12',
'expiry_year' => '23',
'cvv' => '123',
],
]
);
```
The response contains a JSON body with the details of the processed checkout resource in which the attributes related to the payment outcome are populated:
```json
{
"checkout_reference": "CO746453",
"amount": 10.0,
"currency": "EUR",
"merchant_code": "ME7RMQN3",
"description": "Sample one-time payment",
"id": "f14425c6-8bc1-4d02-957c-47573f762828",
"status": "PAID",
"date": "2018-09-28T13:47:01.832Z",
"transaction_code": "TFDCP3FLQ7",
"transaction_id": "19aa3cca-89f6-42d2-b462-463b0b53e959",
"transactions": [
{
"id": "19aa3cca-89f6-42d2-b462-463b0b53e959",
"transaction_code": "TFDCP3FLQ7",
"merchant_code": "ME7RMQN3",
"amount": 10.0,
"vat_amount": 0.0,
"tip_amount": 0.0,
"currency": "EUR",
"timestamp": "2018-09-28T13:48:28.768Z",
"status": "SUCCESSFUL",
"payment_type": "ECOM",
"entry_mode": "CUSTOMER_ENTRY",
"installments_count": 1,
"auth_code": "585388",
"internal_id": 24118507
}
]
}
```
## Result
You have made a payment with a payment card entered by a customer without associating it with a specific customer saved for a merchant user's account. If the payment is successful, the funds will be transferred to the merchant user according to the configured account settings.
# Save Customer Cards
> Tokenize cards with the Payment Widget for future recurring payments.
import { Aside, Tabs, TabItem } from '@astrojs/starlight/components';
import Image from '@components/content/Image.astro';
## About Card Tokenization
In this guide, you will learn how to use the Payment Widget to store card details for future use, and how to set up recurring payments, as SumUp handles the UI/UX and consent collection for you. Alternatively, you can process payments with your own UI, following the API guidelines also provided in this document.
This feature is also known as **card on file** or **tokenization**.
You will go through the following steps:
1. [Create a customer](#creating-customer).
2. [Create checkout intended for card tokenization](#creating-checkout-to-save-card), where we specify it's for tokenization purpose. This is where 3DS verification takes place. The transaction amount is instantly reimbursed.
3. [Process payment with the payment widget](#processing-request-with-payment-widget) or [process payment directly with SumUp API](#processing-request-directly).
4. [Retrieve the tokenized card](#retrieving-tokenized-card).
5. [Make subsequent payments with the tokenized card](#processing-recurring-payments).
## Prerequisites
- You have a merchant account with [SumUp](https://me.sumup.com/login) and have already filled in your [account details](https://me.sumup.com/account).
- You can also create a [sandbox merchant account](/online-payments/#getting-a-sandbox-merchant-account). Please note that setting up 3DS verification in a sandbox merchant account requires contacting our team through the [contact form](/contact).
- You have an API Key. For more details see the [Authorization Guide](/tools/authorization/api-keys/).
- You have control over the backend server to retrieve data securely.
## Creating Customer
A customer resource is a representation of a person or business paying for a product or service.
It contains personal information such as name, contact details, postal address, as well as a unique identifier relevant to your business logic (`customer_id`).
1. Create a new customer resource with a POST request to the `https://api.sumup.com/v0.1/customers` endpoint:
```bash
curl -X POST \
https://api.sumup.com/v0.1/customers \
-H "Authorization: Bearer $SUMUP_API_KEY" \
-H 'Content-Type: application/json' \
-d '{
"customer_id": "MYCUSTOMERID-123",
"personal_details": {
"address": {
"city": "Venice",
"state": "California",
"country": "US",
"line1": "606 Venezia Ave",
"line2": "Front",
"postal_code": "90291"
},
"birthdate": "1949-11-11",
"email": "thedude@example.com",
"first_name": "Jeffrey",
"last_name": "Lebowski",
"phone": "+1 310-555-1234"
}
}'
```
```ts
const customer = await client.customers.create({
customer_id: "MYCUSTOMERID-123",
personal_details: {
first_name: "Jeffrey",
last_name: "Lebowski",
email: "thedude@example.com",
phone: "+1 310-555-1234",
birth_date: "1949-11-11",
address: {
city: "Venice",
state: "California",
country: "US",
line_1: "606 Venezia Ave",
line_2: "Front",
postal_code: "90291",
},
},
});
```
```csharp
var customer = await client.Customers.CreateAsync(new Customer
{
CustomerId = "MYCUSTOMERID-123",
PersonalDetails = new PersonalDetails
{
FirstName = "Jeffrey",
LastName = "Lebowski",
Email = "thedude@example.com",
Phone = "+1 310-555-1234",
BirthDate = new System.DateTime(1949, 11, 11),
Address = new AddressLegacy
{
City = "Venice",
State = "California",
Country = "US",
Line1 = "606 Venezia Ave",
Line2 = "Front",
PostalCode = "90291",
},
},
});
```
```java
var customer = client.customers().createCustomer(
Customer.builder()
.customerId("MYCUSTOMERID-123")
.personalDetails(
PersonalDetails.builder()
.firstName("Jeffrey")
.lastName("Lebowski")
.email("thedude@example.com")
.phone("+1 310-555-1234")
.birthDate(java.time.LocalDate.parse("1949-11-11"))
.address(
AddressLegacy.builder()
.city("Venice")
.state("California")
.country("US")
.line1("606 Venezia Ave")
.line2("Front")
.postalCode("90291")
.build()
)
.build()
)
.build()
);
```
```go
str := func(v string) *string { return &v }
customer, err := client.Customers.Create(ctx, sumup.CustomersCreateParams{
CustomerID: "MYCUSTOMERID-123",
PersonalDetails: &sumup.PersonalDetails{
FirstName: str("Jeffrey"),
LastName: str("Lebowski"),
Email: str("thedude@example.com"),
Phone: str("+1 310-555-1234"),
Address: &sumup.AddressLegacy{
City: str("Venice"),
State: str("California"),
Country: str("US"),
Line1: str("606 Venezia Ave"),
Line2: str("Front"),
PostalCode: str("90291"),
},
},
})
```
```py
from sumup.customers.resource import CreateCustomerBody
from sumup.customers.types import AddressLegacy, PersonalDetails
customer = client.customers.create(
CreateCustomerBody(
customer_id="MYCUSTOMERID-123",
personal_details=PersonalDetails(
first_name="Jeffrey",
last_name="Lebowski",
email="thedude@example.com",
phone="+1 310-555-1234",
birth_date="1949-11-11",
address=AddressLegacy(
city="Venice",
state="California",
country="US",
line_1="606 Venezia Ave",
line_2="Front",
postal_code="90291",
),
),
)
)
```
```rust
let customer = client
.customers()
.create(sumup::resources::customers::Customer {
customer_id: "MYCUSTOMERID-123".into(),
personal_details: Some(sumup::resources::common::PersonalDetails {
first_name: Some("Jeffrey".into()),
last_name: Some("Lebowski".into()),
email: Some("thedude@example.com".into()),
phone: Some("+1 310-555-1234".into()),
birth_date: None,
tax_id: None,
address: Some(sumup::resources::common::AddressLegacy {
city: Some("Venice".into()),
state: Some("California".into()),
country: Some("US".into()),
line_1: Some("606 Venezia Ave".into()),
line_2: Some("Front".into()),
postal_code: Some("90291".into()),
}),
}),
})
.await?;
```
```php
$customer = $sumup->customers->create([
'customer_id' => 'MYCUSTOMERID-123',
'personal_details' => [
'first_name' => 'Jeffrey',
'last_name' => 'Lebowski',
'email' => 'thedude@example.com',
'phone' => '+1 310-555-1234',
'address' => [
'city' => 'Venice',
'state' => 'California',
'country' => 'US',
'line_1' => '606 Venezia Ave',
'line_2' => 'Front',
'postal_code' => '90291',
],
],
]);
```
You should expect a standard `201 Created` response, with the customer details you passed. For full details, see the [endpoint documentation](/api/customers/create). Having created the customer, we can now proceed to making a payment
## Creating Checkout to Save Card
Now, we need to tokenize the customer's card, and we will need a checkout for this. The checkout resource is a representation of a payment being made by the previously created customer.
It contains information such as the amount, currency, and a unique `checkout_reference` identifier that is relevant to your business logic.
The flow is initiated with the `create a checkout` endpoint. It is important to pass the `customer_id` parameter in this step, for future linking to a payment instrument. Critically, a `purpose` parameter is passed to indicate the payment type as **recurring payment** and process an authorization charge of the checkout amount indicated, **which is instantly reimbursed**. Note that this doesn't automatically imply further payments from this customer - at this point, we're just tokenizing the card.
1. To create a new checkout resource, make a POST request to the `https://api.sumup.com/v0.1/checkouts` endpoint.
Example of such request:
```bash
curl -X POST \
https://api.sumup.com/v0.1/checkouts \
-H "Authorization: Bearer $SUMUP_API_KEY" \
-H 'Content-Type: application/json' \
-d '{
"checkout_reference": "MYCHECKOUT",
"amount": 1,
"currency": "EUR",
"merchant_code": "MDEERENR",
"description": "My checkout",
"customer_id": "MYCUSTOMERID-123",
"purpose": "SETUP_RECURRING_PAYMENT"
}'
```
```ts
const checkout = await client.checkouts.create({
checkout_reference: "MYCHECKOUT",
amount: 1,
currency: "EUR",
merchant_code: "MDEERENR",
description: "My checkout",
customer_id: "MYCUSTOMERID-123",
purpose: "SETUP_RECURRING_PAYMENT",
});
```
```csharp
var checkout = await client.Checkouts.CreateAsync(new CheckoutCreateRequest
{
CheckoutReference = "MYCHECKOUT",
Amount = 1.0f,
Currency = Currency.Eur,
MerchantCode = "MDEERENR",
Description = "My checkout",
CustomerId = "MYCUSTOMERID-123",
Purpose = "SETUP_RECURRING_PAYMENT",
});
```
```java
var checkout = client.checkouts().createCheckout(
CheckoutCreateRequest.builder()
.checkoutReference("MYCHECKOUT")
.amount(1.0f)
.currency(Currency.EUR)
.merchantCode("MDEERENR")
.description("My checkout")
.customerId("MYCUSTOMERID-123")
.purpose(CheckoutCreateRequestPurpose.SETUP_RECURRING_PAYMENT)
.build()
);
```
```go
customerID := "MYCUSTOMERID-123"
purpose := sumup.CheckoutCreateRequestPurposeSetupRecurringPayment
description := "My checkout"
checkout, err := client.Checkouts.Create(ctx, sumup.CheckoutsCreateParams{
CheckoutReference: "MYCHECKOUT",
Amount: 1,
Currency: sumup.CurrencyEUR,
MerchantCode: "MDEERENR",
Description: &description,
CustomerID: &customerID,
Purpose: &purpose,
})
```
```py
from sumup.checkouts.resource import CreateCheckoutBody
checkout = client.checkouts.create(
CreateCheckoutBody(
checkout_reference="MYCHECKOUT",
amount=1,
currency="EUR",
merchant_code="MDEERENR",
description="My checkout",
customer_id="MYCUSTOMERID-123",
purpose="SETUP_RECURRING_PAYMENT",
)
)
```
```rust
let checkout = client
.checkouts()
.create(Some(sumup::resources::checkouts::CheckoutCreateRequest {
checkout_reference: "MYCHECKOUT".into(),
amount: 1.0,
currency: sumup::resources::checkouts::Currency::EUR,
merchant_code: "MDEERENR".into(),
description: Some("My checkout".into()),
customer_id: Some("MYCUSTOMERID-123".into()),
purpose: Some("SETUP_RECURRING_PAYMENT".into()),
id: None,
status: None,
date: None,
valid_until: None,
transactions: None,
return_url: None,
redirect_url: None,
}))
.await?;
```
```php
$checkout = $sumup->checkouts->create([
'checkout_reference' => 'MYCHECKOUT',
'amount' => 1,
'currency' => 'EUR',
'merchant_code' => 'MDEERENR',
'description' => 'My checkout',
'customer_id' => 'MYCUSTOMERID-123',
'purpose' => 'SETUP_RECURRING_PAYMENT',
]);
```
You should expect a standard `201 Created` response, with the checkout reference and both merchant and customer information.
```json
{
"amount": 1,
"checkout_reference": "MYCHECKOUT",
"checkout_type": "checkout",
"currency": "EUR",
"customer_id": "MYCUSTOMERID-123",
"date": "2025-10-29T15:09:11.550+00:00",
"description": "My checkout",
"id": "7164c99b-13cb-42a1-8ba1-3c2c46a29de7",
"merchant_code": "MDEERENR",
"merchant_country": "PL",
"merchant_name": "Sandbox Merchant Account",
"pay_to_email": "a8e019f9bb2f49159182e8bd61eb5ea6@developer.sumup.com",
"purpose": "SETUP_RECURRING_PAYMENT",
"status": "PENDING",
"transactions": []
}
```
For more information, see the [create a checkout](/api/checkouts/create) endpoint.
## Processing Request with Payment Widget
The [SumUp's Payment Widget](/online-payments/checkouts/card-widget/) is a JavaScript library that allows you to securely process checkouts and collect card details securely, handling consent collection and 3DS verification. These steps are mandatory due to legal requirements, which is why we recommend processing the checkout with our widget.
Once you have a checkout reference from the step above, you can mount the payment widget into your website and collect the card details. Pass the `checkout_reference` from above as the `checkoutId` here.
```html
```
Upon mounting the Payment Widget with a recurring purpose checkout, you should see the following screen:
The user is prompted to enter their card details, give consent to store their card details and complete the checkout. The widget uses the [Process Checkout endpoint](/api/checkouts/process) to securely process the checkout. We strongly recommend using the widget over direct integration, as the widget correctly handles all legal requirements for payments.
If the previous operation is successful, and the card is stored with the **Save for future payments option**, a `payment_instrument` object containing a `token` representing the card is created (AKA tokenized card) for this customer.
```json
"payment_instrument": {
"token": "6878cb7f-6515-47bf-bdd9-1408d270fdce"
}
```
At any time, you can fetch the list of tokenized cards of a customer by
requesting them via [the list payment instruments](/api/customers/list-payment-instruments) endpoint.
```bash
curl -X GET \
"https://api.sumup.com/v0.1/customers/${CUSTOMER_ID}/payment-instruments" \
-H "Authorization: Bearer $SUMUP_API_KEY" \
-H "Content-Type: application/json;charset=UTF-8"
```
```ts
const instruments = await client.customers.listPaymentInstruments("MYCUSTOMERID-123");
```
```csharp
var instruments = await client.Customers.ListPaymentInstrumentsAsync("MYCUSTOMERID-123");
```
```java
var instruments = client.customers().listPaymentInstruments("MYCUSTOMERID-123");
```
```go
instruments, err := client.Customers.ListPaymentInstruments(ctx, "MYCUSTOMERID-123")
```
```py
instruments = client.customers.list_payment_instruments("MYCUSTOMERID-123")
```
```rust
let instruments = client
.customers()
.list_payment_instruments("MYCUSTOMERID-123")
.await?;
```
```php
$instruments = $sumup->customers->listPaymentInstruments('MYCUSTOMERID-123');
```
## Processing Request Directly
If you want to provide a fully customized experience, you can process the request using [SumUp API directly](/api/checkouts/process). In this case, you need to make sure to handle all legal requirements yourself. Critically, SumUp API expects the `mandate` object in the request. By providing the `mandate` object, **you are stating that you have obtained the consent of the customer**. The `mandate` object establishes the authorization framework for storing and reusing card details. It defines what the card token will be used for (only recurring payments for the time being), while capturing the technical details of the tokenization request for security and compliance purposes.
```json
{
"payment_type": "card",
"installments": 1,
"card": {
"name": "FIRSTNAME LASTNAME",
"number": "4111111111111111",
"expiry_year": "2023",
"expiry_month": "01",
"cvv": "123",
"zip_code": "12345"
},
"mandate": {
"type": "recurrent",
"user_agent": "Chrome: Mozilla/5.0 (X11; Linux x86_64) AppleWebKit/537.36 (KHTML, like Gecko) Chrome/77.0.3865.90 Safari/537.36.",
"user_ip": "2001:0db8:85a3:0000:0a00:8a2e:0370:7300"
}
}
```
Again, a `payment_instrument` object containing a `token` representing the card is created (AKA tokenized card) for this customer.
```json
"payment_instrument": {
"token": "6878cb7f-6515-47bf-bdd9-1408d270fdce"
}
```
At any time, you can fetch the list of tokenized cards of a customer by
requesting them via [the list payment instruments](/api/customers/list-payment-instruments) endpoint.
```bash
curl -X GET \
"https://api.sumup.com/v0.1/customers/${CUSTOMER_ID}/payment-instruments" \
-H "Authorization: Bearer $SUMUP_API_KEY" \
-H "Content-Type: application/json;charset=UTF-8"
```
## Retrieving Tokenized Card
Having successfully processed the checkout, a token representing the payment instrument (card) is created. You can now [retrieve the checkout](/api/checkouts/get) to find this token within a `payment_instrument` object for later recurrent payment.
Example response:
```json
{
"id": "cd36780e-f43d-4f22-1i9e-e32a1a1bafc8",
"checkout_reference": "0BYNWLYC7KV",
"amount": 3.51,
"currency": "EUR",
...
"payment_instrument": {
"token": "2fa27578-e765-5dbh-aa97-d45d3d6cdfbb"
}
}
```
## Processing Recurring Payments
Having tokenized the customer's card, you can now process recurring payments by referencing the saved token and the associated customer. Both `token` and `customer_id` fields are required.
1. [Create a checkout](/api/checkouts/create) again. This time, it's for the actual payment. The previous checkout was for tokenizing the card only.
2. Process the checkout. Make sure to pass the following data (`installments` is only valid for the Brazilian market):
```json
{
"payment_type": "card",
"installments": 1,
"token": "{{CARD_TOKEN}}"
"customer_id": "{{CUSTOMER_ID}}",
}
```
## What's Next?
You may be interested in the following resources related to Online Payments:
- [Handling Refunds](/online-payments/guides/refund)
- [Response Handling](/online-payments/guides/response-handling)
# Payment Methods
> Learn which SumUp online payment methods you can offer, how availability works, and which integration path to start with.
import { Aside } from "@astrojs/starlight/components";
import Country from "@components/content/Country.astro";
import PaymentMethodTitle from "@components/content/PaymentMethodTitle.astro";
SumUp supports cards, wallets, bank redirects, bank debits, real-time payment methods, vouchers, and buy now, pay later payment methods. Use this page to understand which payment methods SumUp can offer, how they behave in a checkout, and where to start your integration.
If you're deciding what to build first, start with [Hosted Checkout](/online-payments/checkouts/hosted-checkout/) for the fastest launch, or [Payment Widget](/online-payments/checkouts/card-widget/) if you want an embedded checkout experience.
Payment method families:
- [Cards](#cards)
- [Wallets](#wallets)
- [Bank redirects](#bank-redirects)
- [Bank debits](#bank-debits)
- [Real-time payments](#real-time-payments)
- [Vouchers](#vouchers)
## Before You Start
The payment methods you can offer depend on more than the payment method itself. In practice, availability depends on your merchant setup and on the specific checkout you create.
- Merchant country and onboarding status determine which methods can be enabled for your account.
- Checkout currency, amount, and product can change the set of methods returned for a specific checkout.
- Some methods redirect the customer away from your site or return payment artifacts such as QR codes or vouchers instead of completing immediately.
Treat the payment methods returned for a checkout as the source of truth for that checkout.
## Cards
Cards are the baseline online payment option. For Europe, the United Kingdom, and Chile, SumUp supports the following card schemes. Brazil also supports Elo and some additional niche local card schemes.
Cards are the simplest place to start if you want broad coverage with a single integration. For most websites, use [Hosted Checkout](/online-payments/checkouts/hosted-checkout/), [Payment Widget](/online-payments/checkouts/card-widget/), or [Swift Checkout](/online-payments/checkouts/swift-checkout/), depending on how much checkout UI you want to own.
**Availability:**
[Visa](https://www.visa.com/) is one of the most widely accepted global card networks for online debit and credit card payments.
**Availability:**
[Visa Electron](https://www.visa.com/) is a Visa debit card product commonly used for consumer card payments in supported markets.
**Availability:**
[V Pay](https://www.visa.co.uk/pay-with-visa/find-a-card/v-pay.html) is Visa's European debit card scheme designed for regional card acceptance.
**Availability:**
[Mastercard](https://www.mastercard.com/) is a global card network used for both credit and debit card payments.
**Availability:**
[Maestro](https://www.mastercard.com/) is Mastercard's debit card brand for everyday consumer payments.
**Availability:**
[American Express](https://www.americanexpress.com/) is a global card network widely used for consumer and business card payments.
**Availability:**
[Discover](https://www.discover.com/) is an international card network that can be used for online card payments in supported markets.
**Availability:**
[JCB](https://www.global.jcb/en/) is a global card network originating in Japan and accepted for online payments in supported regions.
**Availability:**
[Elo](https://www.elo.com.br/) is a Brazilian card scheme supported for online payments in Brazil. Additional niche local card schemes may also be supported.
## Wallets
Wallets provide a faster checkout experience by reusing saved payment details or wallet balances.
Wallets are useful when you want faster checkout on mobile and supported browsers. Apple Pay and Google Pay can be offered through [Payment Widget](/online-payments/checkouts/card-widget/), through the [Swift Checkout SDK](/online-payments/checkouts/swift-checkout/), or through their dedicated direct integration guides.
**Availability:**
[Apple Pay](https://www.apple.com/apple-pay/) is Apple's wallet-based checkout experience for Safari and Apple devices.
**Availability:**
[Google Pay](https://pay.google.com/about/) is Google's wallet checkout option for supported browsers, devices, and Android surfaces.
**Availability:**
[PayPal](https://www.paypal.com/) lets customers authorize payments using their PayPal account instead of entering card details directly.
**Availability:**
[SumUp Pay](https://www.sumup.com/) is SumUp's own payment experience for returning customers within the SumUp ecosystem.
**Availability:**
[BANCOMAT Pay](https://www.bancomat.it/en/bancomat-pay/) is an Italian account-linked mobile payment method operated by BANCOMAT.
## Bank Redirects
Bank redirect methods send the customer to their bank or local payment network to approve the payment.
These methods usually require you to handle a pending status and send the customer through an additional authorization step. Payment Widget handles this checkout experience for the customer.
**Availability:**
[Bancontact](https://bancontact.com/en) is Belgium's domestic online payment method for redirect-based checkout.
**Availability:**
[Blik](https://blik.com/en) is a Polish payment method that lets customers confirm payments through their banking app.
**Availability:**
[EPS](https://www.eps-ueberweisung.at/) is an Austrian online bank redirect method commonly used for domestic ecommerce payments.
**Availability:**
[iDeal](https://www.ideal.nl/en/) is the Netherlands' most widely used online banking payment method for ecommerce.
**Availability:**
[MyBank](https://www.mybank.eu/) is a European online bank payment scheme that redirects customers to authorize the transaction with their bank.
**Availability:**
[Przelewy24](https://www.przelewy24.pl/en) is a Polish online bank redirect method and payment network for local ecommerce checkout.
**Availability:**
[TWINT](https://www.twint.ch/en/) is a Swiss mobile payment method that supports wallet-style and bank-linked payments.
## Bank Debits
Bank debit methods collect funds directly from the customer's bank account.
Bank debit methods can require additional customer details depending on the checkout flow.
## Real-Time Payments
Real-time payment methods confirm funds immediately and are commonly used for local account-to-account payment flows.
Some real-time methods return payment artifacts such as QR codes instead of using a browser redirect.
**Availability:**
[PIX](https://www.bcb.gov.br/estabilidadefinanceira/pix) is Brazil's instant payment system for real-time account-to-account transfers.
**Availability:**
[QR Code powered by PIX](https://www.bcb.gov.br/estabilidadefinanceira/pix) lets customers complete a PIX payment by scanning a generated QR code.
## Vouchers
Voucher-based methods generate a payment artifact that the customer uses to complete the purchase.
Voucher methods are asynchronous by nature and rely on a payment artifact that the customer uses to complete the payment.
**Availability:**
[Boleto](https://portal.febraban.org.br/pagina/3166/33/en/) is a Brazilian voucher-based payment method where the customer pays using a generated boleto document or barcode.
# Plugins
> Overview of SumUp plugins for third-party platforms.
import PluginsList from '@components/OnlinePayments/PluginsList';
These plugins enable quick SumUp payment integration on PrestaShop, Wix, WooCommerce, Medusa, and Vendure requiring only your API key and merchant information to start. Select a plugin of interest for further, detailed instructions.
# Medusa
> Accept SumUp payments in Medusa with the SumUp plugin for Medusa v2.
import { Aside, LinkButton } from "@astrojs/starlight/components";
The [SumUp plugin for Medusa](https://github.com/sumup/sumup-plugin-medusa) adds SumUp as a payment provider for [Medusa v2](https://medusajs.com/). It lets your Medusa backend create and manage SumUp online checkouts while keeping your SumUp credentials on the server side.
The plugin supports:
- Hosted Checkout, where the customer is redirected to a SumUp-hosted payment page
- Payment Widget, where your storefront mounts the SumUp card widget using a checkout created by Medusa
- Refunds through SumUp transactions
- Medusa payment webhooks for asynchronous status updates
View Medusa Plugin Repository
## Prerequisites
- Active [SumUp account](https://me.sumup.com)
- SumUp [API key](/tools/authorization/api-keys/#create-an-api-key)
- SumUp merchant code
- Medusa `v2.15.x`
- A Medusa backend with the payment module enabled
Before going live, make sure your SumUp account is fully verified and your business model is supported according to our [allowed businesses article](https://help.sumup.com/en-GB/articles/3G8ZHjdgFZjmKWOmDWS52m).
## Install the Plugin
Install the package in your Medusa project:
```bash
yarn add @sumup/medusa-plugin
```
## Configure Medusa
Register the plugin and payment provider in `medusa-config.ts`:
```ts
import { defineConfig } from "@medusajs/framework/utils";
export default defineConfig({
plugins: [
{
resolve: "@sumup/medusa-plugin",
options: {},
},
],
modules: [
{
resolve: "@medusajs/medusa/payment",
options: {
providers: [
{
resolve: "@sumup/medusa-plugin/providers/sumup",
id: "sumup",
options: {
apiKey: process.env.SUMUP_API_KEY,
merchantCode: process.env.SUMUP_MERCHANT_CODE,
checkoutMode: "hosted",
returnUrl: `${process.env.MEDUSA_BACKEND_URL}/hooks/payment/sumup_sumup`,
redirectUrl: `${process.env.STOREFRONT_URL}/checkout/sumup/return`,
},
},
],
},
},
],
});
```
After your application starts, enable the provider for the relevant region in Medusa Admin.
For the service identifier `sumup` and provider `id` `sumup`, the resulting Medusa payment provider identifier is `pp_sumup_sumup`.
## Configuration Options
The plugin accepts the following provider options:
| Option | Required | Description |
| --- | --- | --- |
| `apiKey` | Yes | SumUp API key or access token. Keep it server-side. |
| `merchantCode` | Yes | SumUp merchant code that receives the payment. |
| `checkoutMode` | No | Checkout mode: `hosted` or `widget`. Defaults to `hosted`. |
| `returnUrl` | No | Backend webhook URL. For provider `id: "sumup"`, use `/hooks/payment/sumup_sumup`. |
| `redirectUrl` | No | Storefront URL used after redirect or Strong Customer Authentication flows. |
| `paymentDescription` | No | Default SumUp checkout description. |
| `timeout` | No | SumUp SDK request timeout in milliseconds. |
| `maxRetries` | No | SumUp SDK retry count. |
You can also override `checkout_mode`, `description`, `return_url`, `redirect_url`, and `checkout_reference` per payment session through provider data.
## Choose a Checkout Flow
### Hosted Checkout
With `checkoutMode: "hosted"`, the plugin creates a SumUp checkout with Hosted Checkout enabled and stores the returned `hosted_checkout_url` in the Medusa payment session. Your storefront should redirect the customer to that URL to complete the payment.
Use your backend state as the source of truth. The redirect alone should not be treated as proof of a successful payment.
### Payment Widget
With `checkoutMode: "widget"`, the plugin creates a SumUp checkout and stores the returned `checkout_id` in the payment-session data. Your storefront is then responsible for loading and mounting the SumUp widget and asking the backend to re-check the payment state after a successful widget response.
If you need a lower-level widget implementation reference, see the [Payment Widget guide](/online-payments/checkouts/card-widget/).
## Webhooks
Medusa provides a built-in webhook listener route for payment providers at:
```text
/hooks/payment/[identifier]_[provider]
```
For this plugin, with service identifier `sumup` and provider `id` `sumup`, the webhook URL is:
```text
https://your-medusa-backend.com/hooks/payment/sumup_sumup
```
The plugin receives the webhook payload, retrieves the checkout from SumUp, maps the result to a Medusa payment action, and returns the payment session reference back to Medusa.
## What the Plugin Stores
The payment-session data returned by the provider includes:
- `checkout_id`
- `checkout_reference`
- `checkout_mode`
- `hosted_checkout_url` for hosted flows
- `transaction_id` and `transaction_code` when available
- `merchant_code`
- `amount` and `currency`
## Sandbox Checklist
Before enabling the plugin in production, verify the following in a sandbox environment:
- One successful Hosted Checkout payment
- One successful Payment Widget payment
- At least one webhook-driven payment update
- One full refund and one partial refund
- SumUp's deliberate failure path with amount `11`
- Expired or canceled checkouts mapping cleanly back into Medusa session state
# PrestaShop
> Accept SumUp payments with the PrestaShop plugin.
import { Aside, LinkButton } from '@astrojs/starlight/components';
To use PrestaShop with SumUp, download the SumUp Payment module plugin, which requires configuration in your SumUp dashboard.
Download PrestaShop Plugin
## Prerequisites
You will need an active [SumUp account](https://me.sumup.com). As an authorized Payment Institution by the Central Bank of Ireland, SumUp must verify your identity and business ownership. Please make sure your [business model is supported by SumUp](https://help.sumup.com/en-GB/articles/3G8ZHjdgFZjmKWOmDWS52m).
## Installation
1. Follow [the register application guide](/tools/authorization/oauth/#register-an-oauth-application) to obtain the client credentials for your app.
2. Download the client credentials file.
3. Upload the JSON to the **Module Configuration** page in PrestaShop Backoffice.
4. After SumUp account verification, [contact us](/contact) to enable online payments scope for your PrestaShop online store.
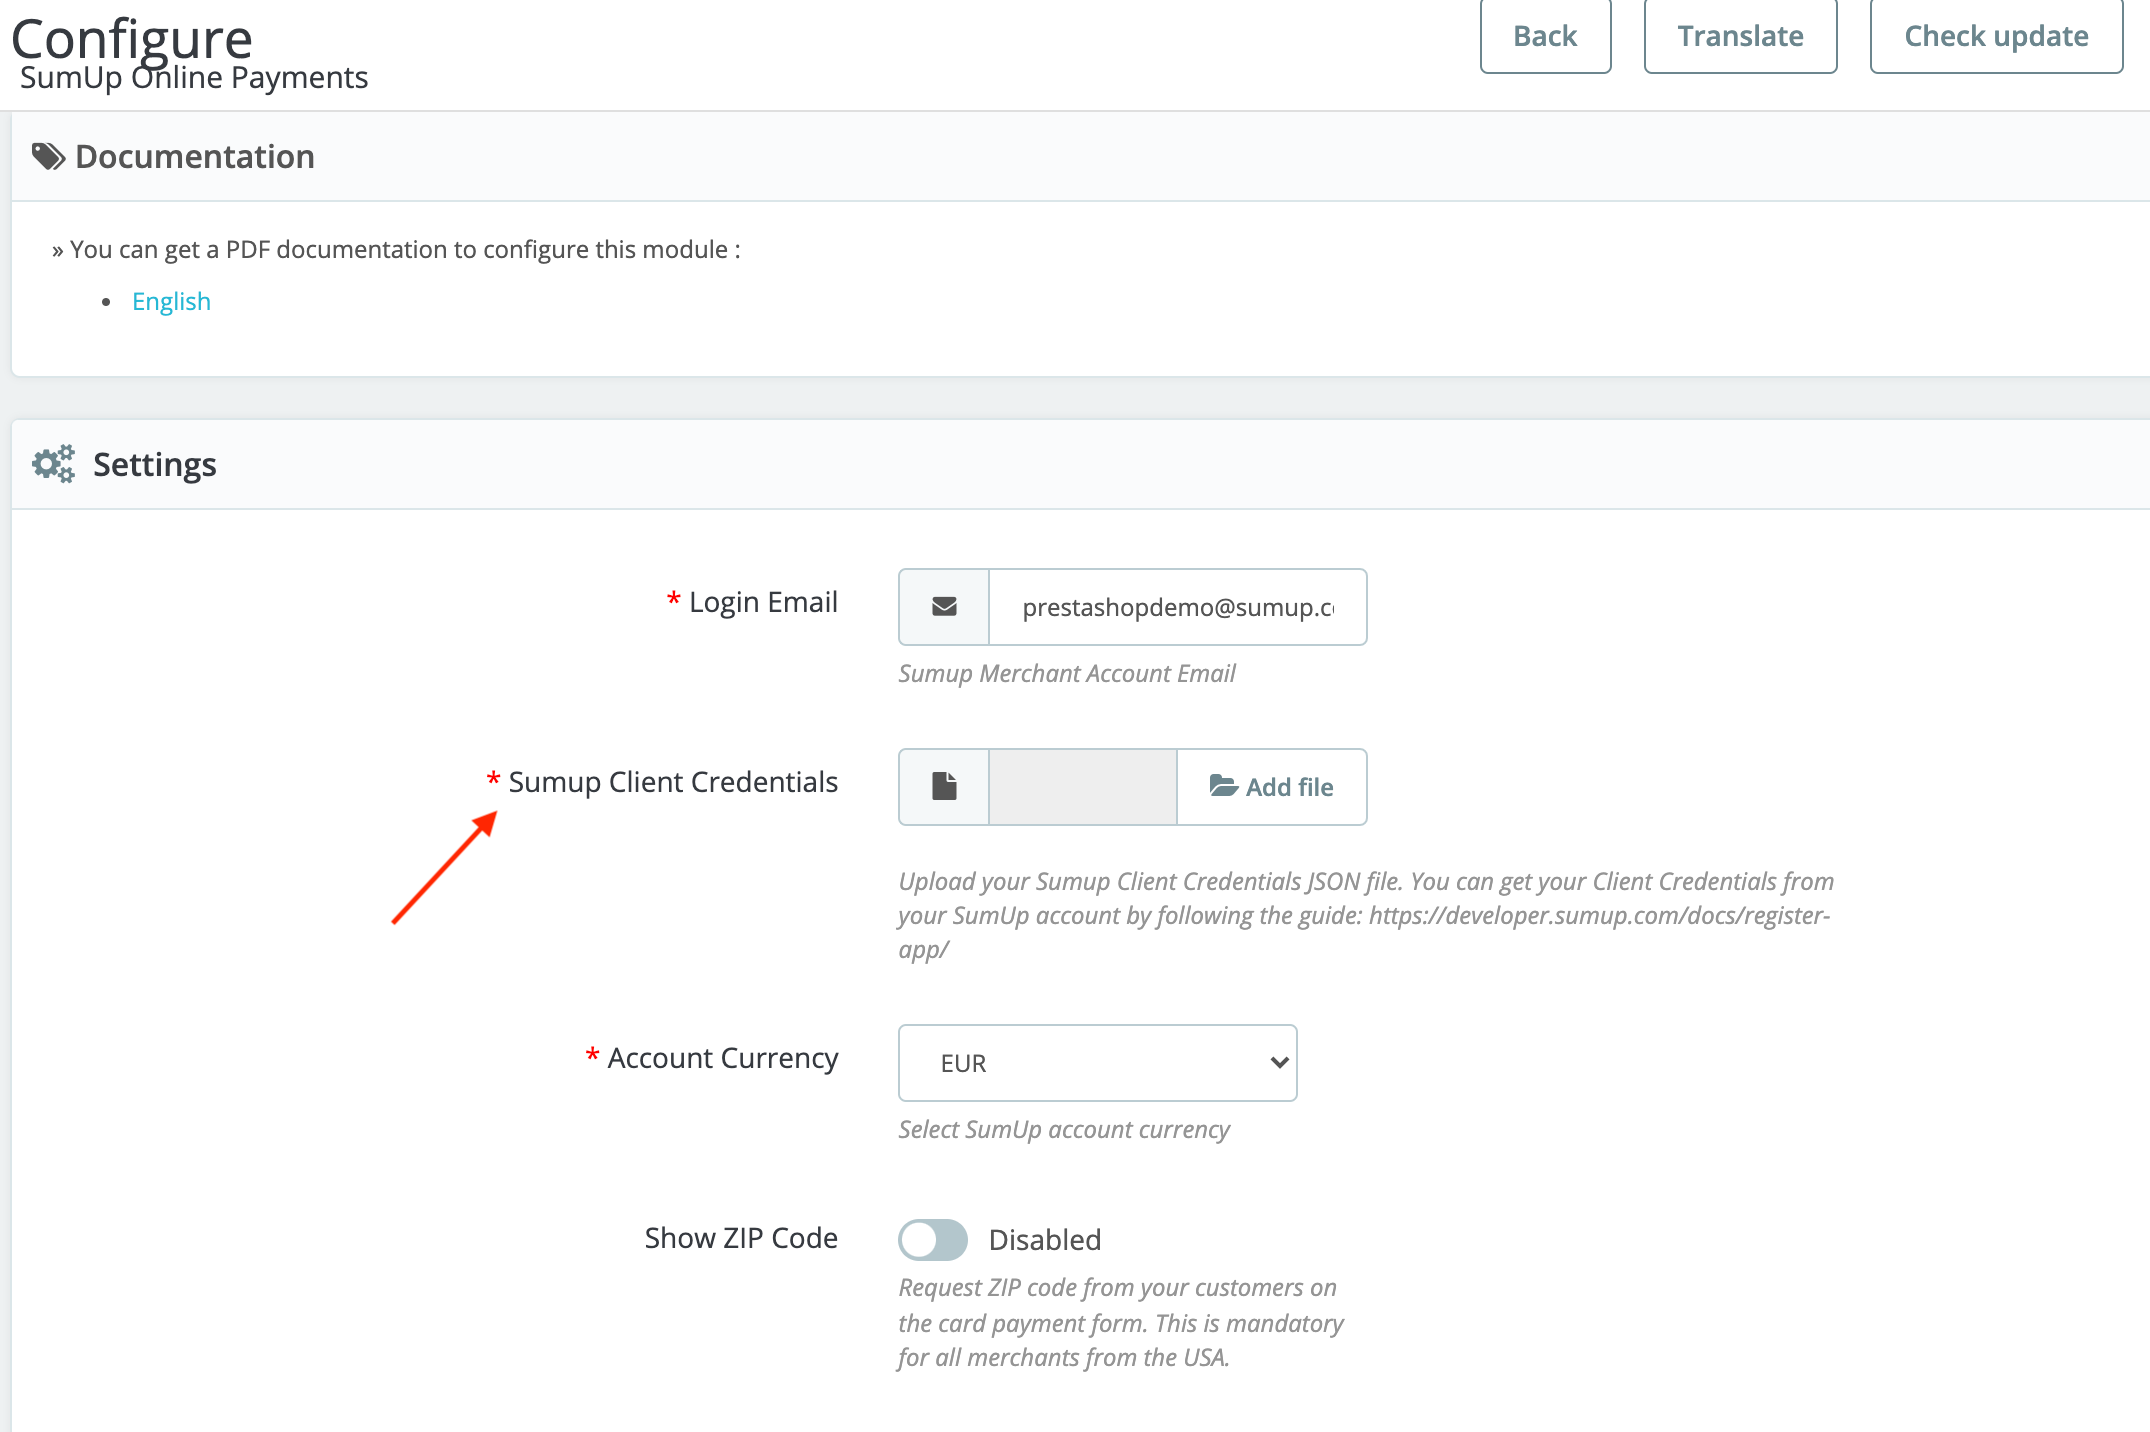
Once you receive a confirmation from SumUp, you’re fully set-up! Note that minimum transaction amount is 1 EUR (or equivalent).
# Vendure
> Accept SumUp payments in Vendure with the SumUp plugin.
import { Aside, LinkButton } from "@astrojs/starlight/components";
The [SumUp plugin for Vendure](https://github.com/sumup/sumup-plugin-vendure) adds SumUp as a payment integration for [Vendure](https://vendure.io/). It creates SumUp checkouts from Vendure's payment flow while keeping your SumUp credentials on the server side.
The plugin supports:
- Hosted Checkout, where the customer is redirected to a SumUp-hosted payment page
- Widget-oriented storefront integrations that use a returned `checkoutId`
- Webhook-driven payment updates through Vendure's payment flow
View Vendure Plugin Repository
## Prerequisites
- Active [SumUp account](https://me.sumup.com)
- SumUp [API key](/tools/authorization/api-keys/#create-an-api-key)
- SumUp merchant code
- Vendure `^3.6.4`
- A Vendure server with payment methods enabled
Before going live, make sure your SumUp account is fully verified and your business model is supported according to our [allowed businesses article](https://help.sumup.com/en-GB/articles/3G8ZHjdgFZjmKWOmDWS52m).
## Install the Plugin
Install the package in your Vendure project:
```bash
npm install @sumup/vendure-plugin
```
## Configure Vendure
Register the plugin and payment handler in your Vendure config:
```ts
import { VendureConfig } from "@vendure/core";
import {
SumUpPlugin,
sumUpPaymentHandler,
} from "@sumup/vendure-plugin";
export const config: VendureConfig = {
plugins: [
SumUpPlugin.init({
apiKey: process.env.SUMUP_API_KEY!,
merchantCode: process.env.SUMUP_MERCHANT_CODE!,
checkoutMode: "hosted",
returnUrl: "https://your-vendure.example/payments/sumup/webhook",
redirectUrl: "https://storefront.example/checkout/sumup/return",
}),
],
paymentOptions: {
paymentMethodHandlers: [sumUpPaymentHandler],
},
};
```
`returnUrl` should be a publicly reachable URL that SumUp can call with checkout status updates. In most setups that should be your Vendure server's `/payments/sumup/webhook` route.
## Create the Payment Method
Create a payment method in the Vendure Admin UI with:
- `Code`: `sumup`
- `Handler`: `sumup`
Optional handler arguments:
- `merchantCode`
- `checkoutMode`
- `returnUrl`
- `redirectUrl`
- `paymentDescription`
Global defaults can be defined in `SumUpPlugin.init()` and overridden per payment method when needed.
## Storefront Flow
Once the order is in `ArrangingPayment`, call `addPaymentToOrder` with `method: "sumup"` and any SumUp-specific metadata you need:
```graphql
mutation AddPaymentToOrder {
addPaymentToOrder(
input: {
method: "sumup"
metadata: {
checkout_mode: "hosted"
checkout_reference: "ORDER-1001"
}
}
) {
... on Order {
id
state
payments {
transactionId
metadata
}
}
... on ErrorResult {
errorCode
message
}
}
}
```
The plugin stores SumUp data on the Vendure payment and exposes a safe subset through `payments[].metadata.public`.
## Choose a Checkout Flow
### Hosted Checkout
Use `checkout_mode: "hosted"` or set `checkoutMode: "hosted"` in the plugin or payment-method config.
After `addPaymentToOrder`, redirect the shopper to:
```text
payments[].metadata.public.hostedCheckoutUrl
```
Use your backend payment state as the source of truth. The redirect alone should not be treated as proof of a successful payment.
### Widget-Oriented Flow
Use `checkout_mode: "widget"` if your storefront will mount SumUp's checkout UI itself.
After `addPaymentToOrder`, read:
```text
payments[].metadata.public.checkoutId
```
Use that `checkoutId` in your storefront's SumUp client integration. The plugin still treats the webhook callback or a later checkout lookup as the source of truth for the final payment state.
If you need a lower-level widget implementation reference, see the [Payment Widget guide](/online-payments/checkouts/card-widget/).
## Webhooks
The plugin exposes a notification endpoint at:
```text
POST /payments/sumup/webhook
```
When SumUp calls this endpoint, the plugin re-fetches the checkout from SumUp and updates the matching Vendure payment from the checkout state.
## Public Payment Metadata
The plugin exposes these fields in `payments[].metadata.public`:
| Field | Description |
| --- | --- |
| `checkoutId` | SumUp checkout ID |
| `checkoutReference` | Merchant checkout reference sent to SumUp |
| `checkoutMode` | `hosted` or `widget` |
| `hostedCheckoutUrl` | Hosted Checkout URL when SumUp returns one |
| `redirectUrl` | Redirect URL associated with the checkout |
## Configuration Options
| Option | Required | Description |
| --- | --- | --- |
| `apiKey` | Yes | SumUp API key or access token. Keep it server-side. |
| `merchantCode` | Yes | SumUp merchant code that receives the payment. |
| `defaultLanguageCode` | No | Language used for the handler description shown in Vendure. |
| `checkoutMode` | No | Default checkout mode: `hosted` or `widget`. Defaults to `hosted`. |
| `returnUrl` | No | Backend callback URL used by SumUp for checkout status updates. |
| `redirectUrl` | No | URL the shopper is sent to after redirect-based payment flows. |
| `paymentDescription` | No | Default SumUp checkout description. |
| `timeout` | No | SumUp SDK request timeout in milliseconds. |
| `maxRetries` | No | SumUp SDK retry count. |
| `supportedCurrencies` | No | Override the built-in supported currency allowlist. |
| `client` | No | Inject a custom SumUp client implementation. Useful for tests. |
## Payment State Mapping
The plugin maps SumUp checkout state to Vendure payment state like this:
- Successful transaction or `PAID` checkout -> `Settled`
- `PENDING` -> `Authorized`
- `FAILED` -> `Declined`
- `EXPIRED` -> `Cancelled`
- Anything else -> `Created`
## Sandbox Checklist
Before enabling the plugin in production, verify the following in a sandbox environment:
- One successful Hosted Checkout payment
- One successful widget-oriented payment flow
- At least one webhook-driven payment update
- SumUp's deliberate failure path with amount `11`
- Expired or canceled checkouts mapping cleanly back into Vendure payment state
# Wix
> Accept SumUp payments on your Wix online store.
import { Aside } from "@astrojs/starlight/components";
Connect your [Wix online store](https://wix.com) dashboard to SumUp for secure payment processing through our payment gateway, as explained in this guide.
## Prerequisites
- Active [SumUp account](https://me.sumup.com). If you don't have one yet, sign up on [our website](https://me.sumup.com/signup). As an authorized Payment Institution by the Central Bank of Ireland, SumUp must verify your identity and business ownership.
- Business model supported by SumUp, according to our [allowed businesses article](https://help.sumup.com/en-GB/articles/3G8ZHjdgFZjmKWOmDWS52m).
- Wix online store.
The Wix integration supports the following Alternative Payment Methods (APMs): iDeal (Netherlands), Bancontact (Belgium), P24 (Poland), EPS (Austria). Apple Pay and Google Pay are currently unavailable.
## Installation
1. First, create your secret API Key. [See this article](/tools/authorization/api-keys/#create-an-api-key) for details. Copy your key before proceeding.
2. In the Wix dashboard, go to **Settings** > **Accept payments**.
3. Select **SumUp**, paste your secret API Key in **Account Information**, and **Save**.
That's it! You can now start accepting payments through SumUp on your Wix online store.
If you have any questions or encounter any issues, contact our [customer service](https://me.sumup.com/en-gb/support) team.
# WooCommerce
> Accept SumUp payments with the WooCommerce plugin.
import { Aside, LinkButton } from "@astrojs/starlight/components";
The [SumUp Payment Gateway for WooCommerce](https://wordpress.org/plugins/sumup-payment-gateway-for-woocommerce/) enables payments on WordPress sites without coding, enabling your customizations and providing your customers the convenience of securely buying products from your website without being redirected to other pages. The plugin supports major cards (Visa, Mastercard, Amex, Diners, Discover, JCB) via embedded forms. Transactions are processed through the SumUp payment platform with [transaction history provided in the SumUp Dashboard](https://me.sumup.com/sales/transactions).
Go to plugin page
## Prerequisites
- Active [SumUp account](https://me.sumup.com). If you don't have one yet, sign up on [our website](https://me.sumup.com/signup). As an authorized Payment Institution by the Central Bank of Ireland, SumUp must verify your identity and business ownership.
- [Review allowed businesses](https://help.sumup.com/hc/en-gb/articles/115008338707-Restricted-businesses) before [signing up](https://me.sumup.com).
## Installing the Plugin
### Automatic Installation
The automatic installation is the easiest option, as WordPress handles the file transfer and you don't need to leave your web browser.
1. Install the plugin via the **Plugins** section in the WordPress Dashboard.
2. Click on **Add new** and search for **SumUp Payment Gateway for WooCommerce**.
3. Click on the **Install Now** button.
4. Click **Activate** to active the plugin.
### Manual Installation
1. [Download our plugin](https://wordpress.org/plugins/sumup-payment-gateway-for-woocommerce/).
2. Upload it to your web server using FTP. See [WordPress codex](https://wordpress.org/support/article/managing-plugins/#manual-upload-via-wordpress-admin) for details on how to do this.
Before setting up the plugin, create your client credentials.
## Integration Options
For plugin versions `2.5` or later, both a [simple](#simple-integration) and [advanced](#advanced-integration) integration flows are available. If you are using a plugin version below `2.5`, follow the steps in our [advanced integration guide](#advanced-integration).
### Simple Integration
Available for plugin versions above `2.5`.
1. Click **Connect account** to initiate the lightweight integration flow (redirects to SumUp Dashboard).
2. In your SumUp Dashboard, click on **Start setup** to generate your production API keys.
Once the flow is initiated, we will take care of generating live API keys for your SumUp account. When the flow completes successfully, they will become available to your WordPress shop.
At this point, you can start accepting payments through SumUp on your WordPress shop.

### Advanced Integration
1. Once the plugin is activated, click **Advanced version**.
2. [Create your API Key](/tools/authorization/api-keys/#create-an-api-key).
3. Enter SumUp credentials (API Key, email, and merchant code) and settings.
## Additional Configuration
- Enable the SumUp Payment Gateway
- Set customer-facing title/description
- Apply an optional payment method description, visible by your customers
- Match shop currency to SumUp account
- Require ZIP code from your customers. **Mandatory for US merchants**
- We recommend enabling the logging option for better troubleshooting should any issues occur (logs can be found in **WooCommerce** > **Status** > **Logs**)
- Choose between popup or embedded payment form with the **Open Payment in modal?** option
### Update Your Website
Before accepting payments through SumUp, your website should display the following information:
- Business & product information
- Delivery, cancellation & return/refund policy
- Payment & billing process
- All prices must have the respective currency prefix
- Privacy policy
- Security policy
## Configuration for Legacy Plugin (Version Older than 2.5)
### Create Your Client Credentials
To create client credentials you must have an active [SumUp account](https://me.sumup.com) with completed [account details](https://me.sumup.com/account). Your account has successfully completed the onboarding process, and you have received the `payments` scope activation. If you don't have the `payments` scope activated yet, [contact us](/contact) for assistance.
Once you ensure you've met the above requirements, you can proceed with our [Register application guide](/tools/authorization/oauth/#register-an-oauth-application) to set up your client credentials.
## Plugin Configuration
Now that you have created your client credentials and installed the plugin, you can proceed with configuration.
In WordPress Dashboard, go to **Plugins** `. **Settings** under the SumUp WooCommerce plugin. You will find the following customization options:
- Enable the SumUp Payment Gateway
- Apply custom title of the payment method, visible by your customers
- Apply an optional payment method description, visible by your customers
- Apply your shop currency corresponding to the one set in your SumUp account
- **Client ID** and **Client Secret** of your application. Both are located in the JSON file you created in the [Create your client credentials step](#create-your-client-credentials), in the following key-value pair:
```json
{
"id": "CCCFAXYD",
"name": "My Online Store Name",
"client_id": "fOcmczrYtYMJ7Li5GjMLLcUeC9dN",
"client_secret": "717bd571b54297494cd7a79b491e8f2c1da6189c4cc2d3481380e8366eef539c",
"application_type": "web",
"redirect_uris": ["https://mywebsite.com/callback"]
}
```
- The email address of your SumUp merchant account
- The merchant code associated with your SumUp account
- Require ZIP code from your customers. **Mandatory for US merchants**
- We recommend enabling logs for better troubleshooting, should any issues occur (Logs can be accessed in **WooCommerce** > **Status** > **Logs**)
# SDKs
> Build on SumUp's APIs with officially supported server-side SDKs.
SumUp maintains open-source SDKs that wrap the public API and handle the heavy lifting of authentication, pagination, and resource helpers. Each package ships with examples and type definitions so you spend less time wiring HTTP requests and more time on your business logic.
## Choose Your SDK
- **[Node.js](/online-payments/sdks/nodejs/)** – published on npm as `@sumup/sdk` with first-class TypeScript typings and ESM support.
- **[Go](/online-payments/sdks/go/)** – idiomatic Go module `github.com/sumup/sumup-go` with context-aware clients and pkg.go.dev documentation.
- **[Python](/online-payments/sdks/python/)** – `sumup-py` provides both synchronous and asynchronous clients built on top of `httpx`.
- **[Java](/online-payments/sdks/java/)** – Java 17+ SDK published to Maven Central as `com.sumup:sumup-sdk`.
- **[PHP](/online-payments/sdks/php/)** – Composer package `sumup/sumup-php` with first-party clients for SumUp APIs.
- **[Rust](/online-payments/sdks/rust/)** – `sumup` crate published to crates.io with comprehensive docs at docs.rs.
- **[.NET](/online-payments/sdks/dotnet/)** – NuGet package `SumUp` targeting supported .NET releases.
All SDKs require valid [authorisation credentials](/tools/authorization/) and work against both sandbox and production environments. After picking an SDK, follow the quickstart guide for installation, environment variables, and example calls.
:::tip[Client-side options]
Looking for client-side or checkout experiences? See the
[React Native SDK](/online-payments/sdks/react-native/) and
[Swift Checkout SDK](/online-payments/checkouts/swift-checkout/).
:::
# .NET SDK
> Use the official .NET client to talk to every SumUp public API.
The [`SumUp`](https://github.com/sumup/sumup-dotnet) package is the official .NET SDK for SumUp APIs. It targets all currently supported .NET releases and ships async-first clients.
## Installation
```bash
dotnet add package SumUp --prerelease
```
## Configure Authentication
Set the `SUMUP_ACCESS_TOKEN` environment variable or pass the token into `SumUpClientOptions`.
```bash
export SUMUP_ACCESS_TOKEN="sup_sk_MvxmLOl0..."
```
## Examples
### Online Payment Checkout
```csharp
using System;
using SumUp;
using var client = new SumUpClient();
var merchantResponse = await client.Merchant.GetAsync();
var merchantCode = merchantResponse.Data?.MerchantProfile?.MerchantCode
?? throw new InvalidOperationException("Merchant code not returned.");
var checkoutReference = $"checkout-{Guid.NewGuid():N}";
var checkoutResponse = await client.Checkouts.CreateAsync(new CheckoutCreateRequest
{
Amount = 10.00f,
Currency = Currency.Eur,
CheckoutReference = checkoutReference,
MerchantCode = merchantCode,
Description = "Test payment",
RedirectUrl = "https://example.com/success",
ReturnUrl = "https://example.com/webhook",
});
Console.WriteLine($"Checkout ID: {checkoutResponse.Data?.Id}");
```
### Cloud API Checkout
```csharp
using SumUp;
using var client = new SumUpClient();
var readerCheckout = await client.Readers.CreateCheckoutAsync(
merchantCode: "your-merchant-code",
readerId: "your-reader-id",
body: new CreateReaderCheckoutRequest
{
Description = "Coffee purchase",
ReturnUrl = "https://example.com/webhook",
TotalAmount = new CreateReaderCheckoutRequestTotalAmount
{
Currency = "EUR",
MinorUnit = 2,
Value = 1000,
},
});
Console.WriteLine($"Reader checkout created: {readerCheckout.Data?.Data?.ClientTransactionId}");
```
# Go SDK
> Call the SumUp APIs from idiomatic Go code.
[`sumup-go`](https://github.com/sumup/sumup-go) is the official Go module. It exposes typed clients for every endpoint, handles authentication headers, and surfaces helpers for common request payloads.
## Installation
Install the module with `go get github.com/sumup/sumup-go` (or `go install` for reproducible builds).
## Configure Authentication
Create a secret API key or OAuth access token in the [developer dashboard](https://me.sumup.com/developers). The SDK reads `SUMUP_API_KEY` by default, so setting `SUMUP_API_KEY=sup_sk_MvxmLOl0...` before running your binary is enough. You can also pass the key explicitly:
```go
client := sumup.NewClient(client.WithAPIKey("sup_sk_MvxmLOl0..."))
```
## Examples
### Online Payment Checkout
```go
package main
import (
"context"
"fmt"
"log"
"os"
sumup "github.com/sumup/sumup-go"
)
func main() {
ctx := context.Background()
client := sumup.NewClient()
merchantCode := os.Getenv("SUMUP_MERCHANT_CODE")
desc := "Online payment via card widget"
checkout, err := client.Checkouts.Create(ctx, sumup.CheckoutsCreateParams{
Amount: 25.00,
CheckoutReference: "ORDER-1001",
Currency: sumup.CurrencyEUR,
Description: &desc,
MerchantCode: merchantCode,
})
if err != nil {
log.Fatalf("create checkout: %v", err)
}
fmt.Println(*checkout.ID)
// Return checkout ID to your webpage so the SumUp card widget can complete the payment.
}
```
### Cloud API Checkout
```go
package main
import (
"context"
"fmt"
"log"
"os"
"strings"
"time"
sumup "github.com/sumup/sumup-go"
)
func main() {
ctx := context.Background()
client := sumup.NewClient()
merchantCode := os.Getenv("SUMUP_MERCHANT_CODE")
affiliateKey := os.Getenv("SUMUP_AFFILIATE_KEY")
appID := os.Getenv("SUMUP_APP_ID")
readerList, err := client.Readers.List(ctx, merchantCode)
if err != nil {
log.Fatalf("list readers: %v", err)
}
var solo sumup.Reader
for _, rdr := range readerList.Items {
if strings.EqualFold(string(rdr.Device.Model), "solo") {
solo = rdr
break
}
}
if solo.ID == "" {
log.Fatal("Pair a Solo reader before using the Cloud API.")
}
checkout, err := client.Readers.CreateCheckout(ctx, merchantCode, string(solo.ID), sumup.CreateCheckoutRequest{
TotalAmount: sumup.CreateCheckoutRequestTotalAmount{
Currency: "EUR",
MinorUnit: 2,
Value: 1500,
},
})
if err != nil {
log.Fatalf("create checkout: %v", err)
}
fmt.Println(checkout.Data.ClientTransactionId)
}
```
# Java SDK
> Use the official Java client to talk to every SumUp public API.
import JavaSdkInstallTabs from "@components/content/JavaSdkInstallTabs.astro";
The [`com.sumup:sumup-sdk`](https://github.com/sumup/sumup-java) package is the official Java SDK generated from the SumUp OpenAPI specification. It requires Java 17 or newer and ships both synchronous and asynchronous clients.
## Installation
Add the dependency to your build file.
## Configure Authentication
Set the `SUMUP_API_KEY` environment variable or pass the token directly.
```bash
export SUMUP_API_KEY="sup_sk_MvxmLOl0..."
```
```java
import com.sumup.sdk.SumUpClient;
SumUpClient client = new SumUpClient("sup_sk_MvxmLOl0...");
```
## Examples
### Online Payment Checkout
```java
import com.sumup.sdk.SumUpClient;
import com.sumup.sdk.models.CheckoutCreateRequest;
import com.sumup.sdk.models.Currency;
SumUpClient client = SumUpClient.builder().build();
CheckoutCreateRequest request =
CheckoutCreateRequest.builder()
.amount(25.00f)
.currency(Currency.EUR)
.checkoutReference("ORDER-1001")
.merchantCode(System.getenv("SUMUP_MERCHANT_CODE"))
.description("Online payment via card widget")
.build();
var checkout = client.checkouts().createCheckout(request);
System.out.println(checkout.id());
```
### Cloud API Checkout
```java
import com.sumup.sdk.SumUpClient;
import com.sumup.sdk.models.CreateReaderCheckoutRequest;
import com.sumup.sdk.models.Money;
SumUpClient client = SumUpClient.builder().build();
String merchantCode = System.getenv("SUMUP_MERCHANT_CODE");
String readerId =
client.readers().listReaders(merchantCode).items().stream()
.findFirst()
.orElseThrow(() -> new IllegalStateException("No paired readers found."))
.id()
.value();
CreateReaderCheckoutRequest request =
CreateReaderCheckoutRequest.builder()
.description("Reader checkout")
.totalAmount(
Money.builder()
.currency("EUR")
.minorUnit(2L)
.value(1500L)
.build())
.build();
client.readers().createReaderCheckout(merchantCode, readerId, request);
```
# Node.js SDK
> Use the official TypeScript client to talk to every SumUp public API.
The [`@sumup/sdk`](https://github.com/sumup/sumup-ts) package wraps SumUp API, ships TypeScript declarations, and works in modern Node.js runtimes (>=18) as well as Cloudflare Workers, Vercel, and other ESM-friendly environments.
## Installation
Install with `npm install @sumup/sdk` (or `yarn add` / `pnpm add`).
## Configure Authentication
The client reads the `SUMUP_API_KEY` environment variable automatically, so deploying with `SUMUP_API_KEY=sup_sk_MvxmLOl0...` is enough for most server workloads. You can also pass the secret explicitly:
```ts
const client = new SumUp({ apiKey: "sup_sk_MvxmLOl0..." });
```
If you use OAuth, exchange the authorization code for an access token and pass it as the `accessToken` option instead of `apiKey`.
## Examples
### Online Payment Checkout
```ts
import SumUp from "@sumup/sdk";
const client = new SumUp({ apiKey: process.env.SUMUP_API_KEY ?? "" });
async function createOnlineCheckout() {
const checkout = await client.checkouts.create({
amount: 2500,
checkout_reference: "ORDER-1001",
currency: "EUR",
merchant_code: process.env.SUMUP_MERCHANT_CODE ?? "",
pay_to_email: process.env.SUMUP_PAY_TO_EMAIL ?? "",
description: "Online payment via card widget",
});
console.log(checkout.id);
// Return checkout.id to your webpage so the SumUp card widget can complete the payment.
}
createOnlineCheckout().catch((error) => {
console.error(error);
process.exit(1);
});
```
### Cloud API Checkout
```ts
import SumUp from "@sumup/sdk";
const client = new SumUp({ apiKey: process.env.SUMUP_API_KEY ?? "" });
async function createSoloCheckout() {
const merchantCode = process.env.SUMUP_MERCHANT_CODE ?? "";
const affiliateKey = process.env.SUMUP_AFFILIATE_KEY ?? "";
const affiliateAppId = process.env.SUMUP_APP_ID ?? "";
if (!affiliateKey || !affiliateAppId) {
throw new Error(
"Set SUMUP_AFFILIATE_KEY and SUMUP_APP_ID to use the Cloud API.",
);
}
const { items: readers } = await client.readers.list(merchantCode);
const solo = readers.find((reader) => reader.device.model === "solo");
if (!solo) {
throw new Error("Pair a Solo reader before using the Cloud API.");
}
const checkout = await client.readers.createCheckout(merchantCode, solo.id, {
total_amount: {
currency: "EUR",
minor_unit: 2,
value: 1500,
},
});
console.log(checkout.data.client_transaction_id);
}
createSoloCheckout().catch((error) => {
console.error(error);
process.exit(1);
});
```
# PHP SDK
> Introduction to the SumUp PHP SDK and first steps to get you started.
The [`sumup-php`](https://github.com/sumup/sumup-php) package is the official PHP SDK for SumUp APIs. It provides service clients for common resources, such as:
- managing merchant accounts
- managing checkouts
- managing customers
- managing payouts
- querying transactions
- managing readers
## Installation
Install with `composer require sumup/sumup-php`.
## Configure Authentication
Set the `SUMUP_API_KEY` environment variable or pass the API key directly to the `SumUp\SumUp` constructor. You can also provide an OAuth access token via `access_token`.
```bash
export SUMUP_API_KEY='your-api-key-here'
```
## Examples
### Online Payment Checkout
```php
checkouts->create([
'merchant_code' => getenv('SUMUP_MERCHANT_CODE'),
'amount' => 25.00,
'currency' => 'EUR',
'checkout_reference' => 'ORDER-1001',
'description' => 'Online payment via card widget',
]);
echo $checkout->id . PHP_EOL;
// Return $checkout->id to your webpage so the SumUp card widget can complete the payment.
} catch (SDKException $exception) {
echo 'SumUp SDK error: ' . $exception->getMessage();
}
```
### Cloud API Checkout
```php
readers->list($merchantCode)->items ?? [];
$firstSolo = $readers[0] ?? null;
if (!$firstSolo) {
throw new RuntimeException('Pair a Solo reader before using the Cloud API.');
}
$payload = [
'total_amount' => [
'currency' => 'EUR',
'minor_unit' => 2,
'value' => 1500,
],
'affiliate' => [
'app_id' => getenv('SUMUP_APP_ID'),
'foreign_transaction_id' => 'solo-' . time(),
'key' => getenv('SUMUP_AFFILIATE_KEY'),
],
'description' => 'Cloud API checkout',
];
$checkoutResponse = $sumup->readers->createCheckout(
$merchantCode,
$firstSolo->id,
$payload
);
echo $checkoutResponse->data['client_transaction_id'] . PHP_EOL;
} catch (SDKException | RuntimeException $exception) {
echo 'Error: ' . $exception->getMessage();
}
```
## SDK Documentation
For more information read the **[documentation](https://github.com/sumup/sumup-php)**.
# Python SDK
> Build synchronous or async SumUp integrations with Python.
[`sumup-py`](https://github.com/sumup/sumup-py) provides first-party Python bindings for every SumUp API. It ships both synchronous and asynchronous clients powered by `httpx`, includes Pydantic models for request bodies, and offers type hints for modern editors.
## Installation
Install with `pip install sumup`. If you use [uv](https://docs.astral.sh/uv/), run `uv add sumup`.
## Configure Authentication
Expose your secret API key or OAuth access token as an environment variable and pass it to either the synchronous `Sumup` or asynchronous `AsyncSumup` client. You can also pass the key manually:
```py
client = Sumup(api_key="sup_sk_MvxmLOl0...")
```
## Examples
### Online Payment Checkout
```py
import os
from sumup import Sumup
from sumup.checkouts.resource import CreateCheckoutBody
client = Sumup(api_key=os.environ["SUMUP_API_KEY"])
checkout = client.checkouts.create(
CreateCheckoutBody(
merchant_code=os.environ["SUMUP_MERCHANT_CODE"],
amount=25.00,
checkout_reference="ORDER-1001",
currency="EUR",
description="Online payment via card widget",
)
)
print(checkout.id)
# Return checkout.id to your webpage so the SumUp card widget can complete the payment.
```
### Cloud API Checkout
```py
import asyncio
import os
from time import time
from sumup import AsyncSumup
from sumup.readers.resource import (
CreateReaderCheckoutBody,
CreateReaderCheckoutBodyAffiliate,
CreateReaderCheckoutBodyTotalAmount,
)
async def create_solo_checkout() -> None:
client = AsyncSumup(api_key=os.environ["SUMUP_API_KEY"])
merchant_code = os.environ["SUMUP_MERCHANT_CODE"]
readers = await client.readers.list(merchant_code)
solo = next((reader for reader in readers.items if reader.device.model == "solo"), None)
if solo is None:
raise RuntimeError("Pair a Solo reader before using the Cloud API.")
checkout = await client.readers.create_checkout(
merchant_code,
solo.id,
CreateReaderCheckoutBody(
total_amount=CreateReaderCheckoutBodyTotalAmount(currency="EUR", minor_unit=2, value=1500),
),
)
print(checkout.data.client_transaction_id)
asyncio.run(create_solo_checkout())
```
# React Native Checkout SDK
> Step-by-step guide for integrating the SumUp React Native Payment SDK, from prerequisites to checkout creation and mounting the payment sheet.
import { Aside, Tabs, TabItem } from '@astrojs/starlight/components';
import Image from '@components/content/Image.astro';
SumUp's React Native Payment SDK provides a payment sheet that is displayed on top of your app. It collects user payment details, confirms a payment, and saves a card for future usage. Moreover, it allows a user to use Apple Pay or Google Pay to process payments.
## Integration
### Before You Begin
Here are the things that you need in order to complete the steps in this guide:
- You have a merchant account with [SumUp](https://me.sumup.com/login) and have already filled in your [account details](https://me.sumup.com/account).
- For a **sandbox merchant account** reach out to our support team through this [contact form](/contact).
- You have [registered your client application](/tools/authorization/oauth/#register-an-oauth-application) with SumUp.
- You have a valid access token obtained via the [Authorization code flow](/tools/authorization/oauth/#authorization-code-flow).
- The restricted `payment_instruments` scope is enabled for your client application. If it isn't enabled, [contact us](/contact) and request it.
- Review the [single payment guide](https://developer.sumup.com/online-payments/guides/single-payment/#before-you-begin).
### Create a Checkout
Initializing the SDK works by passing it a `checkout_id`. To [create a checkout](/api/checkouts/create) on your backend make the following request:
```bash
curl --request POST \
--url https://api.sumup.com/v0.1/checkouts \
--header "Authorization: Bearer $SUMUP_API_KEY" \
--header 'Content-Type: application/json' \
--data '{
"checkout_reference": "44ea5096-b83f-46e1-9323-fe82a8cb7eb5",
"currency": "SEK",
"amount": 9.99,
"description": "Order #1234",
"merchant_code": "MXXXXXXX",
"return_url": "https://example.com",
"redirect_url": "https://sumup.com"
}'
```
```ts
const checkout = await client.checkouts.create({
checkout_reference: "44ea5096-b83f-46e1-9323-fe82a8cb7eb5",
amount: 9.99,
currency: "SEK",
merchant_code: "MXXXXXXX",
description: "Order #1234",
return_url: "https://example.com",
redirect_url: "https://sumup.com",
});
```
```csharp
var checkout = await client.Checkouts.CreateAsync(new CheckoutCreateRequest
{
CheckoutReference = "44ea5096-b83f-46e1-9323-fe82a8cb7eb5",
Amount = 9.99f,
Currency = Currency.Sek,
MerchantCode = "MXXXXXXX",
Description = "Order #1234",
ReturnUrl = "https://example.com",
RedirectUrl = "https://sumup.com",
});
```
```java
var checkout = client.checkouts().createCheckout(
CheckoutCreateRequest.builder()
.checkoutReference("44ea5096-b83f-46e1-9323-fe82a8cb7eb5")
.amount(9.99f)
.currency(Currency.SEK)
.merchantCode("MXXXXXXX")
.description("Order #1234")
.returnUrl("https://example.com")
.redirectUrl("https://sumup.com")
.build()
);
```
```go
description := "Order #1234"
returnURL := "https://example.com"
redirectURL := "https://sumup.com"
checkout, err := client.Checkouts.Create(ctx, sumup.CheckoutsCreateParams{
CheckoutReference: "44ea5096-b83f-46e1-9323-fe82a8cb7eb5",
Amount: 9.99,
Currency: sumup.CurrencySEK,
MerchantCode: "MXXXXXXX",
Description: &description,
ReturnURL: &returnURL,
RedirectURL: &redirectURL,
})
```
```py
from sumup.checkouts.resource import CreateCheckoutBody
checkout = client.checkouts.create(
CreateCheckoutBody(
checkout_reference="44ea5096-b83f-46e1-9323-fe82a8cb7eb5",
amount=9.99,
currency="SEK",
merchant_code="MXXXXXXX",
description="Order #1234",
return_url="https://example.com",
redirect_url="https://sumup.com",
)
)
```
```rust
let checkout = client
.checkouts()
.create(Some(sumup::resources::checkouts::CheckoutCreateRequest {
checkout_reference: "44ea5096-b83f-46e1-9323-fe82a8cb7eb5".into(),
amount: 9.99,
currency: sumup::resources::checkouts::Currency::SEK,
merchant_code: "MXXXXXXX".into(),
description: Some("Order #1234".into()),
return_url: Some("https://example.com".into()),
redirect_url: Some("https://sumup.com".into()),
customer_id: None,
purpose: None,
id: None,
status: None,
date: None,
valid_until: None,
transactions: None,
}))
.await?;
```
```php
$checkout = $sumup->checkouts->create([
'checkout_reference' => '44ea5096-b83f-46e1-9323-fe82a8cb7eb5',
'currency' => 'SEK',
'amount' => 9.99,
'description' => 'Order #1234',
'merchant_code' => 'MXXXXXXX',
'return_url' => 'https://example.com',
'redirect_url' => 'https://sumup.com',
]);
```
The SDK will process the checkout once a customer provides payment details. If payment details aren't passed an error will be received.
## Set up SDK
Install the npm module by one of the following commands:
```bash
npm i sumup-react-native-alpha
npm i react-native-webview
```
```bash
yarn add sumup-react-native-alpha
yarn add react-native-webview
```
You need to install `react-native-localization` to automatically detect the user system language.
```bash
npm i react-native-localization
```
```bash
yarn add react-native-localization
```
If you don't need it, please provide the language field in the `initPaymentSheet` function.
```javascript
await initPaymentSheet({
checkoutId,
language: 'en',
});
```
Next, install the native modules.
```bash
cd ios
pod install
```
SDK should be initialized by wrapping your payment screen into SumUpProvider. This component requires an `apiKey` you can create in the [API Keys settings](/tools/authorization/api-keys/).
```javascript
import { SumUpProvider } from 'sumup-react-native-alpha';
export default function App() {
return (
);
}
```
## Provide Payment Details
Before showing the payment sheet, it needs to be initialized. Call `initPaymentSheet` with the parameters like in example below:
```js
import React, { useEffect } from "react";
import { View, Alert } from "react-native";
import { useSumUp } from "sumup-react-native-alpha";
export default function MainScreen() {
const { initPaymentSheet } = useSumUp();
const initSumUpPaymentSheet = async () => {
const { error } = await initPaymentSheet({
checkoutId: "...",
customerId: "...",
language: "en", // en or sv are supported
});
if (error) {
Alert.alert(
error.status,
error.status === "failure" ? error.message : undefined
);
} else {
Alert.alert("Payment Sheet was configured");
}
};
useEffect(() => {
initSumUpPaymentSheet();
}, []);
...
```
**Required** fields for `initPaymentSheet`:
- `checkoutId` - described in section [Create a checkout](/online-payments/sdks/react-native/#create-a-checkout).
*Optional*:
- `customerId` - used for saving cards for future usage.
- `language` - English and Sweden are supported (if undefined, react-native-localization will be used to check user device language).
## Show Payment Sheet
After initialization a payment sheet can be shown. When a user presses a button, you can show it by calling `presentPaymentSheet()`. After a user completes a payment, this function will return a callback. If any errors take place, the callback will contain an error field with the details.
```js
...
const showPaymentSheet = async () => {
const { error } = await presentPaymentSheet();
if (error) {
Alert.alert(
error.status,
error.status === "failure" ? error.message : undefined
);
} else {
Alert.alert("Payment successfully was processed");
}
};
return (
);
}
```
## Optional Integrations
### Save a Card for Future Usage
To save a card for future usage, a customer should be created. It can be achieved by making the following request:
```bash
curl -L -X POST 'https://api.sumup.com/v0.1/customers' \
-H 'Content-Type: application/json' \
-H 'Accept: application/json' \
-H "Authorization: Bearer $SUMUP_API_KEY" \
--data-raw '{
"customer_id": "831ff8d4cd5958ab5670",
"personal_details": {
"first_name": "John",
"last_name": "Doe",
"email": "user@example.com",
"phone": "+491635559723",
"birthdate": "1993-12-31",
"address": {
"city": "Berlin",
"country": "DE",
"line1": "Sample street",
"line2": "ap. 5",
"postal_code": "10115",
"state": "Berlin"
}
}
}'
```
```ts
const customer = await client.customers.create({
customer_id: "831ff8d4cd5958ab5670",
personal_details: {
first_name: "John",
last_name: "Doe",
email: "user@example.com",
phone: "+491635559723",
birth_date: "1993-12-31",
address: {
city: "Berlin",
state: "Berlin",
country: "DE",
line_1: "Sample street",
line_2: "ap. 5",
postal_code: "10115",
},
},
});
```
```csharp
var customer = await client.Customers.CreateAsync(new Customer
{
CustomerId = "831ff8d4cd5958ab5670",
PersonalDetails = new PersonalDetails
{
FirstName = "John",
LastName = "Doe",
Email = "user@example.com",
Phone = "+491635559723",
BirthDate = new System.DateTime(1993, 12, 31),
Address = new AddressLegacy
{
City = "Berlin",
State = "Berlin",
Country = "DE",
Line1 = "Sample street",
Line2 = "ap. 5",
PostalCode = "10115",
},
},
});
```
```java
var customer = client.customers().createCustomer(
Customer.builder()
.customerId("831ff8d4cd5958ab5670")
.personalDetails(
PersonalDetails.builder()
.firstName("John")
.lastName("Doe")
.email("user@example.com")
.phone("+491635559723")
.birthDate(java.time.LocalDate.parse("1993-12-31"))
.address(
AddressLegacy.builder()
.city("Berlin")
.state("Berlin")
.country("DE")
.line1("Sample street")
.line2("ap. 5")
.postalCode("10115")
.build()
)
.build()
)
.build()
);
```
```go
str := func(v string) *string { return &v }
customer, err := client.Customers.Create(ctx, sumup.CustomersCreateParams{
CustomerID: "831ff8d4cd5958ab5670",
PersonalDetails: &sumup.PersonalDetails{
FirstName: str("John"),
LastName: str("Doe"),
Email: str("user@example.com"),
Phone: str("+491635559723"),
Address: &sumup.AddressLegacy{
City: str("Berlin"),
State: str("Berlin"),
Country: str("DE"),
Line1: str("Sample street"),
Line2: str("ap. 5"),
PostalCode: str("10115"),
},
},
})
```
```py
from sumup.customers.resource import CreateCustomerBody
from sumup.customers.types import AddressLegacy, PersonalDetails
customer = client.customers.create(
CreateCustomerBody(
customer_id="831ff8d4cd5958ab5670",
personal_details=PersonalDetails(
first_name="John",
last_name="Doe",
email="user@example.com",
phone="+491635559723",
birth_date="1993-12-31",
address=AddressLegacy(
city="Berlin",
state="Berlin",
country="DE",
line_1="Sample street",
line_2="ap. 5",
postal_code="10115",
),
),
)
)
```
```rust
let customer = client
.customers()
.create(sumup::resources::customers::Customer {
customer_id: "831ff8d4cd5958ab5670".into(),
personal_details: Some(sumup::resources::common::PersonalDetails {
first_name: Some("John".into()),
last_name: Some("Doe".into()),
email: Some("user@example.com".into()),
phone: Some("+491635559723".into()),
birth_date: None,
tax_id: None,
address: Some(sumup::resources::common::AddressLegacy {
city: Some("Berlin".into()),
state: Some("Berlin".into()),
country: Some("DE".into()),
line_1: Some("Sample street".into()),
line_2: Some("ap. 5".into()),
postal_code: Some("10115".into()),
}),
}),
})
.await?;
```
```php
$customer = $sumup->customers->create([
'customer_id' => '831ff8d4cd5958ab5670',
'personal_details' => [
'first_name' => 'John',
'last_name' => 'Doe',
'email' => 'user@example.com',
'phone' => '+491635559723',
'address' => [
'city' => 'Berlin',
'state' => 'Berlin',
'country' => 'DE',
'line_1' => 'Sample street',
'line_2' => 'ap. 5',
'postal_code' => '10115',
],
],
]);
```
For more information on saving a customer refer to [this guide](/api/customers/create).
To use the newly created customer, create a checkout by passing the `customer_id` and provide it to the `initPaymentSheet` function.
```js
await initPaymentSheet({
// ...
customerId: '...',
});
```
### Use Google Pay
To use Google Pay, first enable the Google Pay API by adding the following to the `application` tag of your `AndroidManifest.xml`:
```bash
...
```
For more details, see [Google Pay’s Set up Google Pay API for Android](https://developers.google.com/pay/api/android/guides/setup).
Then provide `googlePay` object to the `initPaymentSheet` to initialize.
```js
await initPaymentSheet({
// ...
googlePay: {
isProductionEnvironment: false,
},
});
```
### Use Apple Pay
#### Register for an Apple Merchant ID
Obtain an Apple Merchant ID by registering for a new identifier on the Apple Developer website. Fill out the form with a description and identifier. Your description is for your own records and you can modify it in the future.
**Create a new Apple Pay certificate - needs to be implemented.**
To enable Apple Pay in Xcode:
1. Open your target settings
2. Go to Signing & Capabilities tab
3. Click on Add Capability button
4. Select your merchant identifier
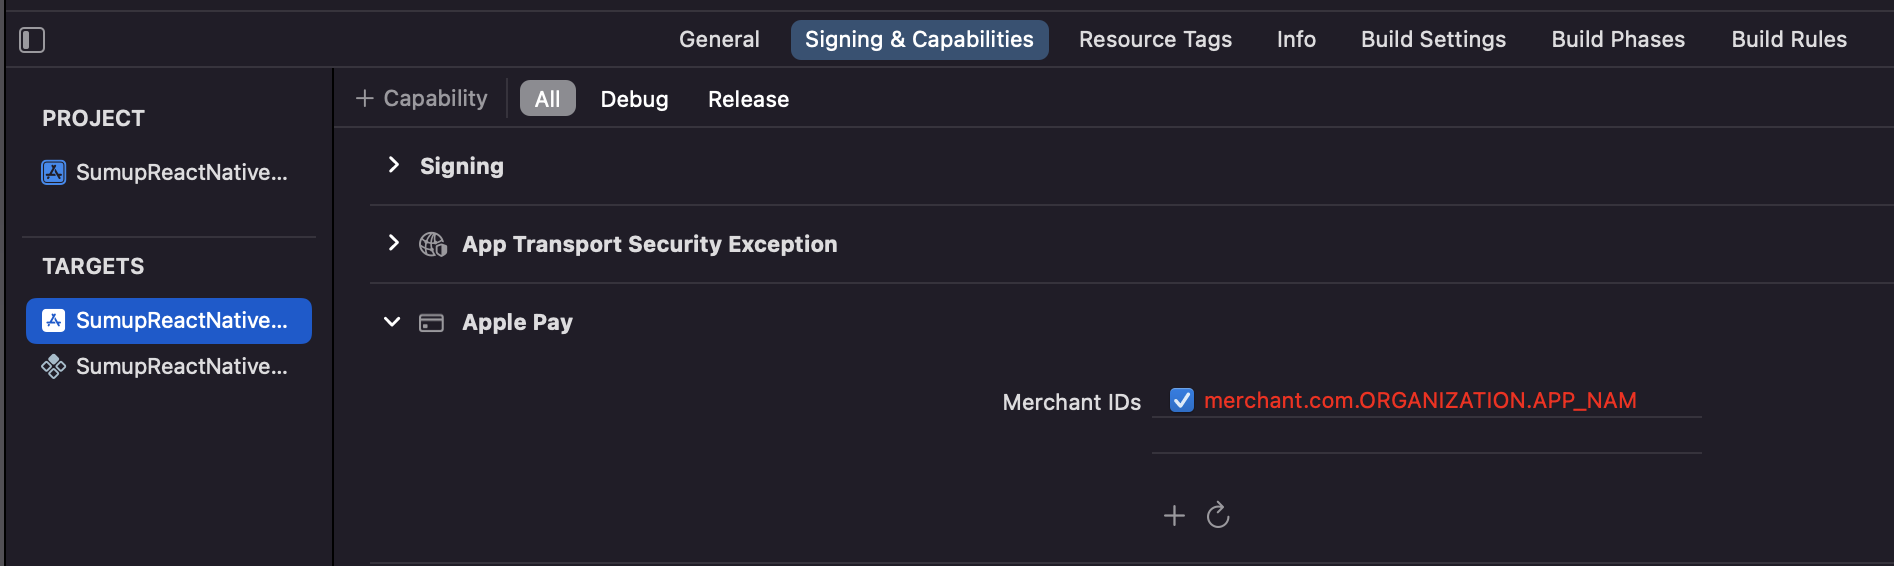
Then provide an `applePay` object in `initPaymentSheet` to initialize.
```js
await initPaymentSheet({
// ...
applePay: {
merchantIdentifier: 'merchant.com.{{YOUR_APP_NAME}}',
label: 'Pay',
},
});
```
# Rust SDK
> Use the `sumup` crate to access SumUp APIs from Rust.
[`sumup-rs`](https://github.com/sumup/sumup-rs) is the official crate published as [`sumup`](https://crates.io/crates/sumup). It covers all public APIs, supports async/await, and exposes helpers for card-present and e-commerce workflows.
## Installation
Install the crate with `cargo add sumup` (enable the `jiff` feature if you prefer alternative datetime handling).
## Configure Authentication
Set the `SUMUP_API_KEY` environment variable (or provide an OAuth token) and pass it to `Client::builder().with_api_key`. You can also inject the key directly:
```rs
let client = Client::builder()
.with_api_key("sup_sk_MvxmLOl0...")
.build()?;
```
## Examples
### Online Payment Checkout
```rs
use sumup::{resources::checkouts::CheckoutCreateRequest, Client, Currency};
#[tokio::main]
async fn main() -> Result<(), Box> {
let client = Client::builder()
.with_api_key(std::env::var("SUMUP_API_KEY")?)
.build()?;
let checkout = client
.checkouts()
.create(Some(CheckoutCreateRequest {
merchant_code: std::env::var("SUMUP_MERCHANT_CODE")?,
amount: 25.00,
checkout_reference: "ORDER-1001".into(),
currency: Currency::EUR,
description: Some("Online payment via card widget".into()),
customer_id: None,
purpose: None,
id: None,
status: None,
date: None,
valid_until: None,
transactions: None,
redirect_url: None,
return_url: None,
}))
.await?;
println!("{}", checkout.id.unwrap_or_default());
// Return checkout ID to your webpage so the SumUp card widget can complete the payment.
Ok(())
}
```
### Cloud API Checkout
```rs
use std::{
io::{Error, ErrorKind},
time::{SystemTime, UNIX_EPOCH},
};
use sumup::{
resources::readers::CreateReaderCheckoutRequestAffiliate,
Client, CreateReaderCheckoutRequest, Money,
};
#[tokio::main]
async fn main() -> Result<(), Box> {
let client = Client::builder()
.with_api_key(std::env::var("SUMUP_API_KEY")?)
.build()?;
let merchant_code = std::env::var("SUMUP_MERCHANT_CODE")?;
let readers = client.readers().list(&merchant_code).await?;
let solo = readers
.items
.into_iter()
.find(|reader| reader.device.model == "solo")
.ok_or_else(|| Error::new(ErrorKind::NotFound, "Pair a Solo reader before using the Cloud API."))?;
let checkout = client
.readers()
.create_checkout(
&merchant_code,
&solo.id,
CreateReaderCheckoutRequest {
total_amount: Money {
currency: "EUR".into(),
minor_unit: 2,
value: 1_500,
},
affiliate: None,
card_type: None,
description: None,
installments: None,
return_url: None,
tip_rates: None,
tip_timeout: None,
},
)
.await?;
println!("{}", checkout.data.client_transaction_id);
Ok(())
}
```
# Testing
> Learn how to test online payments using a sandbox merchant account and test cards with different 3D Secure flows.
import { Aside, Steps } from "@astrojs/starlight/components";
import Table from "@components/content/Table";
Testing your online payments integration is crucial before going live. SumUp provides sandbox merchant accounts and a comprehensive set of test cards to simulate various payment scenarios, including different 3D Secure authentication flows.
## Setting up a Sandbox Merchant Account
Before you can test online payments, you need to create a sandbox merchant account in the SumUp Dashboard.
1. Log in to your SumUp account.
2. Open [Developer Settings](https://me.sumup.com/settings/developer?tab=sandboxes).
3. In the **Sandboxes** tab, create a sandbox merchant account if you do not have one yet.
## How to Use Test Cards
When testing with card payments, you can use the following common details for all test cards:
- **CVV**: Any 3 digits (e.g., `123`)
- **Expiry Date**: Any future date (e.g., `12/25`)
- **Cardholder Name**: Any name
## Test Successful Payments
Use this section as your primary end-to-end test path. It validates that a payment can be completed successfully without additional customer authentication steps.
What to verify:
1. Your checkout completes successfully without additional cardholder action
2. You correctly handle frictionless authentication and continue order processing
3. Your success path is robust across different card brands
## Test Unsuccessful Payments
Use this section to verify how your integration handles declined or failed payments.
To simulate an unsuccessful payment, create a checkout for amount `11.00`, `42.01`, `42.76`, or `42.91` (depending on currency, for example `4201` in minor units[^minor_units]). These amounts result in a failed payment.
What to verify:
1. Your frontend displays a clear failure message and allows safe retry
2. Your backend marks the payment as failed and avoids creating a successful order
3. Your logs and monitoring capture the failure reason for troubleshooting
## Test 3D Secure Authentication
3D Secure (3DS) adds an authentication step between payment submission and final authorization when issuer verification is required.
Primary option: use the [Payment Widget](/online-payments/checkouts/card-widget/). It handles authentication screens and redirect behavior for you.
Secondary option: direct Checkouts API integration. This path requires PCI compliance and explicit onboarding/approval from SumUp. After [processing a checkout](/api/checkouts/process), use the returned `next_step` object (`url`, `method`, optional `payload`, `redirect_url`, and `mechanism`) to continue the flow.
### Successful 3D Secure Authentication Scenarios
For Payment Widget integrations, `onResponse` can emit `auth-screen` when challenge authentication starts. After challenge completion, verify the final checkout result on your backend with [Retrieve a checkout](/api/checkouts/get).
What to verify:
1. Your frontend handles challenge redirects and return URLs correctly
2. Your backend waits for the final authentication result before fulfillment
3. Retry and timeout handling behaves correctly when users abandon the challenge
### 3D Secure Failure Scenarios
Use these cards to validate failed authentication and non-participation behavior.
These cards simulate:
- Technical authentication errors
- Cardholder not enrolled for 3D Secure
- Card/issuer not participating in 3D Secure
What to verify:
1. You display actionable error messaging for technical authentication failures
2. You handle non-enrolled and non-participating cards without crashing
3. Failed payments do not create successful order states in your system
## Next Steps
Once you've thoroughly tested your integration with your sandbox merchant account and test cards:
1. Switch back to your live account in the Dashboard
2. Ensure your production credentials are properly configured
3. Process a small real transaction to verify everything works as expected
4. Monitor your first transactions closely to ensure proper payment processing
[^minor_units]: [Minor unit fractions](https://en.wikipedia.org/wiki/ISO_4217#Minor_unit_fractions) refer to the smallest denomination of a currency, which is used for representing transaction amounts. For example, if a currency has two decimal places, like USD (dollars and cents), the minor unit is the cent, and an amount is represented as a whole number of cents
# Webhooks
> Webhooks notify your application about checkout status changes.
import { Aside } from '@astrojs/starlight/components';
Webhooks are a convenient approach to notify an application about relevant events that have taken place within another application.
The event is similar to one in real-life, where you’re awaiting your favorite item to restock in a shop and ask a representative to notify you once it’s back. In this scenario, SumUp plays the role of the shop, the representative is the [SumUp APIs](/api) and the update seeker is your application.
## Events
At this time our system only allows you to get notified about a status change for a checkout. To subscribe to an event, specify a `return_url` parameter upon [checkout creation](/api/checkouts/create).
New events may be introduced at any time, without prior notice. Your application has to be able to cope with such. Our recommendation would be to silently ignore unknown events.
## Handling a Webhook
Webhooks are delivered in the form of a HTTP POST request, to which your application should reply to as soon as possible. If the response takes longer, our system accepts this as a failed notification and retries it.
Your application should return a valid, empty response with any `2xx` status code. Any response other than a `2xx` is treated as erroneous.
Here's a sample of the webhook payload:
```json
{
"event_type": "CHECKOUT_STATUS_CHANGED",
"id": "id-of-the-changed-checkout"
}
```
## Retries
When an erroneous response is received, a webhook delivery is retried with the following delays:
- 1 minute
- 5 minutes
- 20 minutes
- 2 hours
# Problems
> Reference of common SumUp API error responses with HTTP status codes, payload formats, and handling guidance.
This section lists the common error responses that the SumUp API can return. Each
page describes the HTTP status code, error structure and suggestions for how to
handle it in your integration.
- [Invalid Parameter](/problem/invalid-parameter)
- [Multiple Invalid Parameters](/problem/multiple-invalid-parameters)
- [Payment Method Not Allowed](/problem/payment-method-not-allowed)
- [Unknown Payment Method](/problem/unknown-payment-method)
- [Validation Failed](/problem/validation-failed)
- [Bad Request](/problem/bad-request)
- [Invalid Token](/problem/invalid-token)
- [Missing Token](/problem/missing-token)
- [Not Authorized Token](/problem/not-authorised-token)
- [Unauthorized](/problem/unauthorized)
- [Forbidden](/problem/forbidden)
- [Request Blocked](/problem/request-blocked)
- [Checkout Not Found](/problem/checkout-not-found)
- [Not Found](/problem/not-found)
- [Session Already Processed](/problem/session-already-processed)
- [Session Can't Be Deactivated](/problem/session-cant-be-deactivated)
- [Session Expired](/problem/session-expired)
- [Unprocessable Entity](/problem/unprocessable-entity)
- [Internal Server Error](/problem/internal-server-error)
- [Gateway Timeout](/problem/gateway-timeout)
# Bad Request
> Understand the SumUp API Bad Request response, common causes, and example payload for malformed requests.
Indicates that the server cannot or will not process the request due to a client error.
## Common Causes
- The request body is malformed JSON.
- A required field is missing or has an invalid value.
- The request uses an unsupported content type.
```json
{
"type": "https://developer.sumup.com/problem/bad-request",
"status": 400,
"detail": "Bad Request",
"fields": [
{
"path": "$.user.name",
"name": "name",
"message": "Name must not be empty"
}
]
}
```
# Checkout Not Found
> Understand the SumUp API Checkout Not Found response, common causes, and example payload for unknown checkout resources.
Indicates that the server can't find the requested checkout resource.
## Common Causes
- The checkout ID is incorrect or does not exist.
- The checkout belongs to a different merchant.
```json
{
"type": "https://developer.sumup.com/problem/checkout-not-found",
"title": "Not Found",
"status": 404,
"detail": "A checkout session with the id 61b06d01-ffc4-4432-9053-2ea587f735b1 does not exist"
}
```
# Forbidden
> Understand the SumUp API Forbidden response, common causes, and example payload for requests blocked by permissions.
Indicates that the server understood the request but refuses to authorize it.
## Common Causes
- The merchant account is not permitted to perform this action.
- The resource belongs to another merchant or app.
- The operation is blocked due to compliance or risk checks.
```json
{
"error_message": "request_not_allowed",
"error_code": "FORBIDDEN",
"status_code": 403
}
```
# Gateway Timeout
> Understand the SumUp API Gateway Timeout response, common causes, and example payload for upstream timeout failures.
Indicates that the server did not receive a timely response to complete the request. Retry the request, and if timeouts continue, check the [SumUp status page](https://status.sumup.com/) or [contact us](/contact).
## Common Causes
- An upstream dependency did not respond in time.
- Network latency or connectivity issues delayed the response.
- The request required longer processing than the timeout window.
```json
{
"type": "https://developer.sumup.com/problem/gateway-timeout",
"title": "Gateway Timeout",
"status": 504,
"instance": "8cb5b380786b"
}
```
# Internal Server Error
> Understand the SumUp API Internal Server Error response, common causes, and example payload for unexpected server failures.
Indicates that an unexpected server error occurred. Retry the request, if this persists, check the [SumUp status page](https://status.sumup.com/) or [contact us](/contact).
## Common Causes
- A transient internal exception occurred while processing the request.
- A downstream dependency returned an unexpected error.
- The service was temporarily unavailable under load.
```json
{
"type": "https://developer.sumup.com/problem/internal-server-error",
"title": "Internal server error.",
"status": 500,
"detail": "The service is temporarily unavailable.",
"trace_id": "8cb5b380896b"
}
```
When contacting support, include the `trace_id` or `ray_id` value from the response, whichever is available, so we can trace the failed request.
# Invalid Parameter
> Understand the SumUp API Invalid Parameter response, common causes, and example payload for requests with an invalid field value.
Indicates that the server cannot or will not process the request due to something that is perceived to be a client error (e.g., malformed request syntax, invalid request message framing, or deceptive request routing).
## Common Causes
- A required field is missing or empty.
- A field has the wrong type or format (for example, a string where a number is expected).
- A value is outside the allowed range or list of supported values.
```json
{
"message": "Validation error",
"error_code": "INVALID",
"param": "card.expiry_year"
}
```
# Invalid Token
> Understand the SumUp API Invalid Token response, common causes, and example payload for malformed or unusable access tokens.
Indicates that the request has not been applied because it lacks valid authentication credentials for the target resource.
## Common Causes
- The access token has expired.
- The token has been revoked or is no longer valid.
- The token belongs to a different app or environment.
```json
{
"error_message": "invalid access token",
"error_code": "NOT_AUTHORIZED"
}
```
# Missing Token
> Understand the SumUp API Missing Token response, common causes, and example payload for unauthenticated requests.
Indicates that the request has not been applied because it lacks valid authentication credentials for the target resource.
## Common Causes
- The `Authorization` header is missing.
- The token is not included in the request at all.
- The header is present but empty or malformed.
```json
{
"message": "access token required",
"error_code": "NOT_AUTHORIZED"
}
```
# Multiple Invalid Parameters
> Understand the SumUp API Multiple Invalid Parameters response, common causes, and example payload for requests with several invalid fields.
Indicates that the server cannot or will not process the request due to something that is perceived to be a client error (e.g., malformed request syntax, invalid request message framing, or deceptive request routing).
## Common Causes
- Multiple fields fail validation in the same request.
- Mutually exclusive parameters are provided together.
- A nested object contains one or more invalid fields.
```json
[
{
"error_code": "INVALID",
"message": "Validation error",
"param": "card.name"
},
{
"error_code": "INVALID",
"message": "Validation error",
"param": "card.number"
},
{
"error_code": "INVALID",
"message": "Validation error",
"param": "card.expiry_year"
}
]
```
# Not Authorized Token
> Understand the SumUp API Not Authorised Token response, common causes, and example payload for invalid token authorization.
Indicates that the request has not been applied because it lacks valid authentication credentials for the target resource.
## Common Causes
- The token lacks the required scopes for the endpoint.
- The token belongs to a different merchant than the resource.
- A refresh token is used instead of an access token.
```json
{
"error_message": "NOT_AUTHORIZED",
"error_code": "NOT_AUTHORIZED"
}
```
# Not Found
> Understand the SumUp API Not Found response, common causes, and example payload for missing resources.
Indicates that the server can't find the requested resource.
## Common Causes
- The resource ID is incorrect or no longer exists.
- The request isn't authenticated to access the resource.
- The resource was deleted or expired.
- The request path or method does not match a valid endpoint.
```json
{
"error_code": "NOT_FOUND",
"message": "Resource not found"
}
```
# Payment Method Not Allowed
> Understand the SumUp API Payment Method Not Allowed response, common causes, and example payload for unsupported payment methods.
Ensure the payment method for the respective checkout, supports the merchant's country. To check which countries a payment method supports, visit our documentation on [Alternative Payment Methods](/online-payments/apm).
## Common Causes
- The payment method is not enabled for the merchant account.
- The checkout currency is not supported by the selected payment method.
- The payment method is not available in the merchant's country.
```json
{
"type": "https://developer.sumup.com/problem/payment-method-not-allowed",
"title": "Bad Request",
"status": 400,
"detail": "The BLIK payment method is not allowed for this checkout session",
"instance": "7fe5fcddbf28"
}
```
# Request Blocked
> Understand the SumUp API Request Blocked response, common causes, and example payload for requests blocked by security policy.
Indicates that the request was blocked before it reached the SumUp API service. This can happen when a security policy, firewall rule, or traffic protection rule rejects the request.
## Common Causes
- The request matched a security or firewall rule.
- The request came from a blocked IP address, country, or network.
- The request pattern looked automated, abusive, or otherwise unsafe.
```json
{
"type": "https://developer.sumup.com/problem/request-blocked",
"title": "Request blocked.",
"status": 403,
"detail": "The request was blocked by security policy.",
"trace_id": "8cb5b380896b"
}
```
When contacting support, include the `trace_id` or `ray_id` value from the response, whichever is available, so we can trace the failed request.
# Session Already Processed
> Understand the SumUp API Session Already Processed response, common causes, and example payload for completed checkout sessions.
Indicates the checkout has already been processed. Check the transaction status by calling our `get transaction` endpoint.
## Common Causes
- The checkout has already completed successfully.
- A duplicate processing request is sent for the same checkout.
- A retry occurs after the transaction has already been captured.
```json
{
"type": "https://developer.sumup.com/problem/session-already-processed",
"title": "Conflict",
"status": 409,
"detail": "The checkout session ae98b9cc-2287-4621-afa1-d36ae2ea219d is already processed",
"instance": "1bfe72b34387"
}
```
# Session Can't Be Deactivated
> Understand the SumUp API Session Can't Be Deactivated response, common causes, and example payload for non-cancellable sessions.
Indicates checkout session can't be canceled due to a pending Boleto payment.
## Common Causes
- A Boleto payment is still pending for the checkout.
- The checkout is in a non-cancellable state.
- A payment authorization is already in progress.
```json
{
"type": "https://developer.sumup.com/problem/session-cant-be-deactivated",
"title": "Conflict",
"status": 409,
"detail": "The checkout can't be cancelled due to a pending Boleto payment",
"error_code": "CHECKOUT_CANT_BE_DEACTIVATED",
"message": "The checkout can't be cancelled due to a pending Boleto payment",
"instance": "8aeafaccae28"
}
```
# Session Expired
> Understand the SumUp API Session Expired response, common causes, and example payload for expired checkout sessions.
Indicates checkout session has reached its expiration point. Initiate a new checkout.
## Common Causes
- The checkout reached its expiration time before payment completed.
- The customer attempted to pay after the checkout TTL elapsed.
- A delayed payment method completed after expiration.
```json
{
"type": "https://developer.sumup.com/problem/session-expired",
"title": "Conflict",
"status": 409,
"detail": "The checkout session ae98b9cc-2287-4621-afa1-d36ae2ea219d is already processed",
"instance": "1bfe72b34387"
}
```
# Unauthorized
> Understand the SumUp API Unauthorized response, common causes, and example payload for invalid or expired credentials.
Indicates that the request lacks valid authentication credentials for the target resource.
## Common Causes
- The access token is missing or empty.
- The access token is expired or revoked.
- The token is for a different environment or app.
```json
{
"type": "https://developer.sumup.com/problem/unauthorized",
"status": 401,
"detail": "Unauthorized"
}
```
# Unknown Payment Method
> Understand the SumUp API Unknown Payment Method response, common causes, and example payload for unrecognized payment methods.
Indicates the payment method is unknown to SumUp.
## Common Causes
- The payment method value is misspelled or not supported.
- The method is not returned by the available payment methods endpoint.
- The method is not enabled for the merchant account.
```json
{
"type": "https://developer.sumup.com/problem/unknown-payment-method",
"title": "Bad Request",
"status": 400,
"detail": "Unknown payment method: NonExistingPaymentMethod",
"instance": "7fe5fcddbf28"
}
```
# Unprocessable Entity
> Understand the SumUp API Unprocessable Entity response, common causes, and example payload for semantically invalid requests.
Indicates that the server understands the content type of the request entity, and the syntax of the request entity is correct, but it was unable to process the contained instructions.
**Important:** The client should not repeat this request without modification.
## Common Causes
- The request is syntactically valid but violates business rules.
- A state transition is not allowed for the current resource status.
- Referenced resources exist but are incompatible (for example, currency mismatch).
# Validation Failed
> Understand the SumUp API Validation Failed response, common causes, and example payload for requests that do not pass validation.
Indicates that the request payload fails validation rules.
## Common Causes
- An ID or reference does not match the expected format.
- A field violates length or pattern constraints.
- A required nested field is missing in the payload.
```json
{
"type": "https://developer.sumup.com/problem/validation-failed",
"title": "Bad Request",
"status": 400,
"detail": "Validation failed",
"instance": "9b8eda265e35"
"failed_constraints": [
{
"reference": "checkoutId",
"message": "Invalid checkout ID: 'not_a_valid_id'"
}
]
}
```
# PSD2 Open Banking
> Learn how SumUp supports PSD2 Open Banking, including merchant impact, TPP access, and interface performance reports.
Payment Services Directive 2 is a European directive that regulates payment services and payment service providers throughout the European Union (EU) by creating a more integrated payments market. The directive also promotes safer payments and consumer protection.
As part of PSD2, all payment service providers are required to provide application programming interfaces (APIs) that permit third parties to electronically access financial information in a secure and efficient manner, and _only_ with customer approval.
To ensure the above, SumUp has partnered with Token.io to handle the data exchange.
The regulation allows users to access their payment account information and initiate payments through authorized third-party payment service providers (TPPs). Users can control this through a dedicated interface where they manage access levels between the Account Information Service (AIS) and Payment Initiation Service (PIS) options.
- **AIS** pulls data from your bank accounts and accumulates their information in the same location, through a certified TPP.
- **PIS** allows secure checkouts on any website that supports it.
## Impact on SumUp Merchants
All SumUp merchants who have connected their SumUp Card to their SumUp Business Account will find additional controls for allowing TPPs to access their account information through a dedicated interface. The SumUp Business Account information and payment initiation through a TPP will be performed in a secure and safe manner, upon the explicit approval of the merchant.
Our partnership with [Token.io](https://token.io) has allowed SumUp to enable a [publicly available test environment](https://sumup.dashboard.sandbox.token.io/) for TPPs to test the Open Banking APIs where technical documentation is also available.
## Interface Availability & Performance Data
We publish statistics every three months about the performance of our Open Banking services. You can find the quarterly reports below:
| | | | |
| ---------------- | --- | ------------------- | ------------------------------------------------------------------------------------------------------- |
| 1st October 2020 | to | 31st December 2020 | [PDF](/open-banking-reports/REP020_Q4.pdf) |
| 1st January 2021 | to | 31st March 2021 | [PDF](/open-banking-reports/REP021_Q1.pdf) |
| 1st April 2021 | to | 30th June 2021 | [PDF](/open-banking-reports/REP021_Q2.pdf) |
| 1st July 2021 | to | 30th September 2021 | [PDF](/open-banking-reports/REP021_Q3.pdf) |
| 1st October 2021 | to | 31st December 2021 | [PDF](/open-banking-reports/REP021_Q4.pdf) |
| 1st January 2022 | to | 31st March 2022 | [PDF](/open-banking-reports/REP022_Q1.pdf) |
| 1st April 2022 | to | 30th June 2022 | [PDF](/open-banking-reports/REP022_Q2.pdf) |
| 1st July 2022 | to | 30th September 2022 | [PDF](/open-banking-reports/REP022_Q3.pdf) |
| 1st October 2022 | to | 31st December 2022 | [PDF](/open-banking-reports/REP022_Q4.pdf) |
| 1st January 2023 | to | 31st March 2023 | [PDF](/open-banking-reports/REP023_Q1.pdf) |
| 1st April 2023 | to | 30th June 2023 | [PDF](/open-banking-reports/REP023_Q2.pdf) |
| 1st July 2023 | to | 30th September 2023 | [PDF](/open-banking-reports/REP023_Q3.pdf) |
| 1st October 2023 | to | 31st December 2023 | [PDF](/open-banking-reports/REP023_Q4.pdf) |
| 1st January 2024 | to | 31st March 2024 | [PDF](/open-banking-reports/REP024_Q1.pdf) |
| 1st April 2024 | to | 30th June 2024 | [PDF](/open-banking-reports/REP024_Q2.pdf) |
| 1st July 2024 | to | 30th September 2024 | [UK](/open-banking-reports/REP024_Q3_UK.pdf) [IE](/open-banking-reports/REP024_Q3_EU.pdf) |
| 1st October 2024 | to | 31st December 2024 | [UK](/open-banking-reports/REP024_Q4_UK.pdf) [IE](/open-banking-reports/REP024_Q4_EU.pdf) |
| 1st January 2025 | to | 31st March 2025 | [UK](/open-banking-reports/REP025_Q1_UK.pdf) [IE](/open-banking-reports/REP025_Q1_EU.pdf) |
| 1st April 2025 | to | 30th June 2025 | [UK](/open-banking-reports/REP025_Q2_UK_REP024.pdf) [IE](/open-banking-reports/REP025_Q2_EU_REP023.pdf) |
| 1st July 2025 | to | 30th September 2025 | [UK](/open-banking-reports/REP025_Q3_UK_REP024.pdf) [IE](/open-banking-reports/REP025_Q3_EU_REP023.pdf) |
| 1st October 2025 | to | 31st December 2025 | [UK](/open-banking-reports/REP025_Q4_UK.pdf) [IE](/open-banking-reports/REP025_Q4_EU.pdf) |
# In-Person Payments
> Understand SumUp's in-person payment integrations, supported readers, and how to choose between SDKs, Cloud API, and Payment Switch.
import ReaderGallery from '@components/content/ReaderGallery.astro';
import Confirm from '@components/content/Confirm.astro';
SumUp's in-person payment products let you accept card payments face-to-face using physical card readers or Tap to Pay on a mobile device. You can integrate them into your own app or system using our [Reader SDKs](/terminal-payments/sdks/), [Cloud API](/terminal-payments/cloud-api/), or, for legacy app handoff flows, [Payment Switch](/terminal-payments/payment-switch/).
This section helps you choose the right integration, understand reader compatibility, and get to your first payment quickly.
Need device-specific details? Browse the [reader guides](/terminal-payments/readers/).
## How It Works
Every in-person payment follows the same basic pattern:
1. Your app or system initiates a payment with the amount, currency, and optional metadata.
2. A reader, or the phone itself for Tap to Pay, presents the card interface to the customer.
3. The customer taps, inserts, or swipes their card.
4. SumUp processes the transaction and returns the result.
How the payment is initiated and where the UI runs depends on the integration path you choose.
## Choose Your Integration
There are three ways to integrate SumUp in-person payments:
| | Cloud API | Reader SDKs | Payment Switch |
| --------------------- | ------------------------------------------------------------------------- | ----------------------------------------------------------------------------------------------------------------------------- | ------------------------------------------------------------------------------------------------------------- |
| **What it does** | Trigger and manage payments on Solo readers via HTTPS requests. | Embed payment acceptance directly in your Android or iOS app. Your app controls the reader over Bluetooth or uses Tap to Pay. | Hand off payment acceptance from your app to the SumUp app, then return to your app when the payment is done. |
| **Best for** | Kiosk, POS, or web-based systems where the reader operates independently. | Mobile apps that need more control over the payment flow and user experience. | Quick integrations where you do not need to own the payment UI. |
| **Platform** | Any server-capable platform | Android, iOS | Android, iOS |
| **Reader connection** | Wi-Fi or cellular | Bluetooth from your app, or Tap to Pay on device | Bluetooth via the SumUp app |
## Feature Support by Integration
Different integration paths support different features:
| Feature | Android SDK | iOS SDK | Android Tap-to-Pay SDK | Cloud API |
| --- | --- | --- | --- | --- |
| **Card payments** | NFC and chip | Reader payments with NFC and chip, plus Tap to Pay on iPhone | NFC only | NFC and chip |
| **Tipping** | | | | |
| **Refunds** | Via SumUp API | Via SumUp API | Contact SumUp for current support details | |
| **Receipts** | Via SumUp API | Via SumUp API | Contact SumUp for current support details | Via SumUp API |
| **Offline transactions** | | | — | — |
| **Reader status via API** | | | | |
| **Multiple readers on one account** | — | — | — | |
| **Webhooks for transaction status** | — | — | — | |
## Reader Compatibility
Not every reader works with every integration:
| Reader | Android SDK | iOS SDK | Android Tap-to-Pay SDK | Cloud API | Payment Switch |
| --- | --- | --- | --- | --- | --- |
| [**Solo Lite**](/terminal-payments/readers/solo-lite/) | | | — | — | |
| [**Solo**](/terminal-payments/readers/solo/) | | | — | | |
| [**Air**](/terminal-payments/readers/air/) | | | — | — | |
| [**3G**](/terminal-payments/readers/3g/) | | | — | — | |
| [**PIN+**](/terminal-payments/readers/pin-plus/) | | | — | — | |
| [**Tap to Pay**](/terminal-payments/readers/tap-to-pay/) | — | | | — | — |
## Market Availability
Reader availability varies by region. Check the SumUp webshop in your country before planning a rollout.
Once a reader processes its first transaction with a merchant account from a specific country, it is locked to that country. For example, if the first payment is processed with a French account, that reader can only be used with French accounts afterward.
## Next Steps
- Ready to build? Start with the [Quickstart](/terminal-payments/quickstart/).
- Building a native mobile app? Go to the [Reader SDKs](/terminal-payments/sdks/).
- Building a server-driven or multi-platform POS? Use the [Cloud API](/terminal-payments/cloud-api/).
- Only need an app-to-app handoff? Review [Payment Switch](/terminal-payments/payment-switch/).
# Cloud API
> Details on using Solo card readers and processing remote in-person payments via the Cloud API.
import { Aside, Steps, Tabs, TabItem } from '@astrojs/starlight/components';
import Video from '@components/content/Video.astro';
import SoloScreen from '@components/content/SoloScreen.astro';
The Cloud API lets you start a transaction from a Point of Sale (POS) running on any platform (Windows, iOS, Linux, Android, Web-based, etc.) capable of sending HTTPS requests and complete that transaction via a Solo reader.
Key advantages include:
- Compatibility with any operating system and platform
- Ability to process simultaneous transactions on multiple Solo card readers at once
- No distance limitation between your POS device and the Solo card reader; transactions can be sent remotely
- No Bluetooth connection required
- PCI compliance, ensuring secure and compliant transactions
The Cloud API integration supports:
- Debit, credit, and installment transactions
- Pairing multiple Solo card readers with any SumUp account
- Naming each Solo card reader as desired to streamline checkout
- Wi-Fi and mobile data connectivity (mobile data needs manual enabling by SumUp)
## Prerequisites
- Your device must be authorized to use the Cloud API. [Refer to the authorization guide](/tools/authorization/) and implement the method that best fits your use case. An API key should be sufficient if you don’t plan to delegate access to third parties.
- You must [create an Affiliate Key](/tools/authorization/affiliate-keys/) for your app, as SumUp Cloud API requires this key in checkout requests.
- We strongly recommend keeping the Solo terminal plugged in when using the Cloud API.
- If you want to use mobile data, ensure you are not connected to Wi-Fi. Disconnect from Wi-Fi if necessary—when both mobile data and Wi-Fi are available, the Solo reader will always use Wi-Fi.
To disconnect Wi-Fi, navigate to **Connections** > **Wi-Fi** and disable Wi-Fi using the on-screen slider.
## Solo Virtual Terminal
If you don’t have a Solo reader yet, you can try out the flow using the [Virtual Solo](https://virtual-solo.sumup.com) with a [SumUp sandbox merchant account](/terminal-payments/quickstart/#sandbox-merchant-account).
Virtual Solo works like the real device but with some limitations. The following actions are not supported virtually:
- Physical card insertion or tap simulation (since there is no physical Solo device)
- Real funds transfer (sandbox merchant accounts only)
- PIN entry simulation (always auto-approved)
- Offline transactions
- Custom receipt printing
- Network configuration
- Real device pairing (the simulator uses virtual device identifiers)
## Pairing Solo Reader via Cloud API
The Cloud API acts as a bridge between your application and the Solo reader. It supports two main processes:
- Pairing a Solo reader to your account
- Taking in-person payments via Solo
Once the Solo reader is paired to your SumUp account, your application can initiate a card charge request. SumUp handles the rest, providing a seamless payment experience where all card data is encrypted end-to-end. Transaction results are available in real-time via webhooks.
```mermaid
sequenceDiagram
title: Cloud API Overview
participant A as Solo Reader
participant B as Cloud API
participant C as Your Device
autonumber
A ->> A: generate pairing code
C ->> B: Pair Reader using code
B ->> C: Return Reader ID
B ->> A: Display confirmation message
C ->> B: Start Checkout on Reader
B ->> A: Initiate Checkout
A ->> A: Present Checkout to Customer
```
### Log out of Solo
The Cloud API pairing process is only available for logged-out users. If you're logged in to your merchant account, do the following:
1. Open the top-side menu on your Solo.
2. Select **Settings**. The **Device settings** menu opens.
3. Go to the **About** section.
4. Select **Log out**. Solo should now display the login screen.
### Generate Pairing Code
To initiate a payment on the Solo card reader, it must be enrolled with the merchant account. This enrollment, called reader pairing, starts on the card reader by generating a pairing code and finishes when your device completes a pairing request using the Cloud API with that code. Both your application and Solo reader must be connected to the internet (not necessarily the same network).
1. Turn on the Solo card reader.
2. Make sure you're not logged in. [Log out from your Solo card reader](#log-out-of-solo) if you are.
3. Open the top menu drawer
4. Go to **Connections** and connect to Wi-Fi (connecting is skipped in the short video below).
5. Select **API**.
6. Click **Connect**. The pairing code is generated.
7. Copy the pairing code displayed on the
Solo card reader screen. You will need this code to pair your Solo reader with your device.
### Pair the Card Reader with Pairing Code
1. Send a request to the [Create Reader endpoint](/api/readers/create).
2. Verify pairing confirmation on the reader screen. It appears for a short while, after which the reader returns to the idle screen.
## Using Paired Reader
Cloud API lets you manage transactions and readers connected to your account.
### Initiate Transaction
This is an asynchronous process; starting the transaction on the device may take some time.
```bash
curl -X POST \
https://api.sumup.com/v0.1/merchants/$SUMUP_MERCHANT_CODE/readers/$READER_ID/checkout \
-H "Authorization: Bearer $SUMUP_API_KEY" \
-H 'Content-Type: application/json' \
-d '{
"total_amount": {
"currency": "EUR",
"minor_unit": 2,
"value": 1500,
}
}'
```
```ts
const checkout = await client.readers.createCheckout(merchantCode, readerId, {
total_amount: {
currency: "EUR",
minor_unit: 2,
value: 1500,
},
});
```
```csharp
var checkout = await client.Readers.CreateCheckoutAsync(
merchantCode,
readerId,
new CreateReaderCheckoutRequest
{
TotalAmount = new CreateReaderCheckoutRequestTotalAmount
{
Currency = "EUR",
MinorUnit = 2,
Value = 1500,
},
});
```
```java
var checkout = client.readers().createReaderCheckout(
merchantCode,
readerId,
CreateReaderCheckoutRequest.builder()
.totalAmount(
Money.builder()
.currency("EUR")
.minorUnit(2L)
.value(1500L)
.build()
)
.build()
);
```
```go
checkout, err := client.Readers.CreateCheckout(ctx, merchantCode, readerID, sumup.CreateCheckoutRequest{
TotalAmount: sumup.CreateCheckoutRequestTotalAmount{
Currency: "EUR",
MinorUnit: 2,
Value: 1500,
},
})
```
```py
checkout = await client.readers.create_checkout(
merchant_code,
reader_id,
CreateReaderCheckoutBody(
total_amount=CreateReaderCheckoutBodyTotalAmount(currency="EUR", minor_unit=2, value=1500),
),
)
```
```rust
let checkout = client.readers().create_checkout(
&merchant_code,
&reader_id,
CreateReaderCheckoutRequest {
total_amount: Money {
currency: "EUR".into(),
minor_unit: 2,
value: 1_500,
},
affiliate: None,
card_type: None,
description: None,
installments: None,
return_url: None,
tip_rates: None,
tip_timeout: None,
},
).await?;
```
Important notes:
- The target device must be online, otherwise checkout won't be accepted
- After the checkout is accepted, the system has 60 seconds to start the payment on the target device. During this time, any other checkout for the same device will be rejected.
- You need to send the Affiliate Key in the request.
Read the [Create Checkout API endpoint documentation](/api/readers/create-checkout) for details on the API request, examples, and parameter descriptions.
### Terminate Transaction
Stops the current transaction on the target device.
This process is asynchronous, and the actual termination may take some time to be performed on the device.
```bash
curl -X POST \
https://api.sumup.com/v0.1/merchants/$SUMUP_MERCHANT_CODE/readers/$READER_ID/terminate \
-H "Authorization: Bearer $SUMUP_API_KEY"
```
```ts
await client.readers.terminateCheckout(merchantCode, readerId)
```
```csharp
await client.Readers.TerminateCheckoutAsync(merchantCode, readerId);
```
```java
client.readers().createReaderTerminate(merchantCode, readerId, java.util.Map.of());
```
```go
err := client.Readers.TerminateCheckout(ctx, merchantCode, readerID)
```
```py
await client.readers.terminate_checkout(merchant_code, reader_id)
```
```rust
client.readers().terminate_checkout(&merchant_code, &reader_id).await?;
```
Important notes:
- The target device must be online, otherwise termination won't be accepted.
- This action is only possible if the device is waiting for cardholder action: waiting for card, waiting for PIN, etc.
There is no confirmation of the termination.
- If a transaction is successfully terminated and `return_url` has been provided on Checkout, the transaction status is sent as failed to the provided URL.
Read the [Terminate Checkout API endpoint documentation](/api/readers/terminate-checkout) for details on the API request, examples, and parameter descriptions.
### List Connected Readers
List all readers connected to your merchant account.
```bash
curl https://api.sumup.com/v0.1/merchants/$SUMUP_MERCHANT_CODE/readers \
-H "Authorization: Bearer $SUMUP_API_KEY"
```
```ts
const readers = await client.readers.list(merchantCode)
```
```csharp
var readers = await client.Readers.ListAsync(merchantCode);
```
```java
var readers = client.readers().listReaders(merchantCode);
```
```go
readers, err := client.Readers.List(ctx, merchantCode)
```
```py
readers = await client.readers.list(merchant_code)
```
```rust
let readers = client.readers().list(&merchant_code).await?;
```
Read the [List API endpoint documentation](/api/readers/list) for details on the API request, examples, and parameter descriptions.
### Check Reader Pairing
Check the pairing status of a specific reader.
Read the [Retrieve a Reader endpoint documentation](/api/readers/get) for details on the API request, examples, and parameter descriptions.
### Get Reader Status
Get the last known status for a Reader
Read the [Get Reader Status endpoint documentation](/api/readers/get-status) for details on the API request, examples, and parameter descriptions.
### Update Reader
Update the data of a specific reader.
Check the [Update a Reader endpoint documentation](/api/readers/update) for details on the API request, examples, and parameter descriptions.
### Delete Reader
Delete a reader from the Cloud API. After doing this, you also need to physically disconnect the reader using its menu.
Check the [Delete a Reader endpoint documentation](/api/readers/delete) for details on the API request, examples, and parameter descriptions.
## Unpairing Solo Reader
In order to unpair a reader from the merchant account, two steps are required:
1. [Delete Reader](#delete-reader) from the Merchant account (via Readers API).
2. [Disconnect Reader](#disconnect-reader-physically) (manually via Solo).
### Disconnect Reader Physically
1. Open the menu drawer on your Solo.
2. Go to **Connections**.
3. Select **API** from the menu.
4. Tap on **Disconnect**.
Your Solo device is now disconnected.
## What's Next?
For other integration possibilities, check the [SDK Integration Documentation](/terminal-payments/sdks/).
# Payment Switch
> Use the Payment Switch to hand off checkout to the SumUp app, with separate implementation guides for Android and iOS.
import { Aside } from '@astrojs/starlight/components';
The SumUp API Payment Switch is a lightweight integration where your app opens the SumUp app to request and execute a payment.
This approach is useful when you want a simpler mobile handoff instead of embedding the native SDK. Your app starts the transaction, the SumUp app handles the checkout flow, and then control returns to your app with the payment result.
The Payment Switch supports the same core handoff on both platforms:
- Prefill the amount, currency, title, and receipt contact details.
- Attach a unique external transaction reference for reconciliation.
- Receive a callback in your app when the payment succeeds or fails.
## Choose the Right Integration
- Use the [native Terminal SDKs](/terminal-payments/sdks/) when you are building a native iOS or Android app and want the best-supported in-app card-present experience.
- Use the [Cloud API](/terminal-payments/cloud-api/) when your POS is server-driven, web-based, desktop-based, or otherwise cannot embed the mobile SDKs.
- Use Payment Switch only when your app must hand off to the installed SumUp app and neither the native SDKs nor the Cloud API are viable for your setup.
## When Payment Switch Is the Fallback
Payment Switch can still be the right fallback when:
- You already depend on the installed SumUp app and need a simple app-to-app handoff.
- Your mobile integration cannot adopt the native SDK requirements.
- Your setup cannot be reworked to a platform-agnostic [Cloud API](/terminal-payments/cloud-api/) flow.
## Prerequisites
- A SumUp merchant account or [sandbox merchant account](/terminal-payments/quickstart/#sandbox-merchant-account).
- An [Affiliate Key](/tools/authorization/affiliate-keys/) configured for your app.
- The [required OAuth scopes](/tools/authorization/oauth/#authorization-scopes) enabled for your client.
- The SumUp app installed on the merchant device.
## Platform Guides
- [Android Payment Switch](/terminal-payments/payment-switch/android)
- [iOS Payment Switch](/terminal-payments/payment-switch/ios)
## Payment Flow
1. Build a Payment Switch request in your app.
2. Open the SumUp app with the payment details.
3. Let the merchant and customer complete the checkout in the SumUp app.
4. Receive the result back in your app through the callback URL.
Use a unique `foreign-tx-id` for every payment request. This prevents duplicate transaction conflicts and makes it easier to match the callback with your own order or cart state.
## Official Repositories
- [Android URL scheme repository](https://github.com/sumup/sumup-android-url-scheme)
- [iOS URL scheme repository](https://github.com/sumup/sumup-ios-url-scheme)
# Android
> Integrate the Payment Switch on Android by launching the SumUp app with a payment URI and handling the callback result.
import { Aside, Steps } from '@astrojs/starlight/components';
The Android Payment Switch opens the SumUp app from your Android app, lets the merchant complete the transaction there, and then routes the result back to your callback activity.
## Prerequisites
- A valid [Affiliate Key](/tools/authorization/affiliate-keys/) for your Android application ID.
- The SumUp app installed on the device.
- A custom callback URI scheme that your app can receive.
## Integration Steps
1. Register a callback activity.
Create an activity that can receive the callback URI from the SumUp app:
```xml
```
In this example, the callback URL is `myapp://sumup-callback`.
2. Open the SumUp app.
Build the Payment Switch URI and launch it with an `ACTION_VIEW` intent:
```java
String foreignTxId = UUID.randomUUID().toString();
Uri paymentUri = Uri.parse(
"sumupmerchant://pay/1.0"
+ "?affiliate-key=YOUR_AFFILIATE_KEY"
+ "&app-id=com.example.myapp"
+ "&total=12.34"
+ "¤cy=EUR"
+ "&title=Coffee"
+ "&receipt-email=customer@example.com"
+ "&receipt-mobilephone=%2B49123456789"
+ "&foreign-tx-id=" + foreignTxId
+ "&skip-screen-success=true"
+ "&callback=myapp://sumup-callback"
);
Intent payIntent = new Intent(Intent.ACTION_VIEW, paymentUri);
startActivity(payIntent);
```
`total`, `currency`, and `affiliate-key` define the checkout request. `app-id` must match the Android application ID configured for the Affiliate Key.
3. Handle the callback result.
The SumUp app returns the payment result through the callback URI:
```java
public class PaymentResultActivity extends Activity {
@Override
protected void onCreate(Bundle savedInstanceState) {
super.onCreate(savedInstanceState);
Uri result = getIntent().getData();
if (result == null) {
finish();
return;
}
String status = result.getQueryParameter("smp-status");
String message = result.getQueryParameter("smp-message");
String transactionCode = result.getQueryParameter("smp-tx-code");
String foreignTxId = result.getQueryParameter("foreign-tx-id");
if ("success".equals(status)) {
// Mark the order as paid and persist transactionCode / foreignTxId.
} else {
// Show the error state and allow retry.
}
finish();
}
}
```
The callback includes `smp-status` and may also include `smp-message`, `smp-tx-code`, `smp-receipt-sent`, and `foreign-tx-id`.
## Common Parameters
- `title`: Optional label shown in transaction history and receipts.
- `receipt-email`: Prefills the email receipt field.
- `receipt-mobilephone`: Prefills the SMS receipt field.
- `foreign-tx-id`: Your unique external transaction reference. Keep it unique per payment and under 128 characters.
- `skip-screen-success=true`: Skips the success screen after a successful payment. Use this only if your app shows the final state itself.
## Notes
- `total` is supported in newer SumUp app versions. If you still support older versions, keep compatibility with the older `amount` field as documented in the Android repository.
- The payment currency must match the currency of the merchant account logged in to the SumUp app.
- If you skip the SumUp success screen, your app becomes responsible for clearly presenting the final payment outcome to the merchant.
## Related Links
- [Cloud API](/terminal-payments/cloud-api/)
- [Affiliate Keys](/tools/authorization/affiliate-keys/)
- [Official Android Payment Switch repository](https://github.com/sumup/sumup-android-url-scheme)
# iOS
> Integrate the Payment Switch on iOS by opening the SumUp URL scheme and parsing the callback in your app.
import { Aside, Steps } from '@astrojs/starlight/components';
The iOS Payment Switch starts a payment by opening the SumUp app with a URL scheme. After the checkout completes, the SumUp app redirects back to your app with the payment result.
## Prerequisites
- A valid [Affiliate Key](/tools/authorization/affiliate-keys/) associated with your iOS bundle identifier.
- The SumUp app installed on the device.
- A custom URL scheme registered by your app to receive callbacks.
## Integration Steps
1. Register a callback URL scheme.
In Xcode, add a URL type for your app, for example `myapp`. That gives you a callback URL such as `myapp://sumup-callback`.
2. Open the SumUp app.
Use `URLComponents` to build the Payment Switch request and open the SumUp app:
```swift
let foreignTxId = UUID().uuidString
var components = URLComponents(string: "sumupmerchant://pay/1.0")!
components.queryItems = [
URLQueryItem(name: "amount", value: "12.34"),
URLQueryItem(name: "currency", value: "EUR"),
URLQueryItem(name: "affiliate-key", value: "YOUR_AFFILIATE_KEY"),
URLQueryItem(name: "title", value: "Coffee"),
URLQueryItem(name: "receipt-email", value: "customer@example.com"),
URLQueryItem(name: "receipt-mobilephone", value: "+49123456789"),
URLQueryItem(name: "foreign-tx-id", value: foreignTxId),
URLQueryItem(name: "callbacksuccess", value: "myapp://sumup-callback"),
URLQueryItem(name: "callbackfail", value: "myapp://sumup-callback"),
URLQueryItem(name: "skip-screen-success", value: "true"),
]
if let paymentURL = components.url {
UIApplication.shared.open(paymentURL)
}
```
The mandatory parameters are `amount`, `currency`, and `affiliate-key`. The callback URLs tell the SumUp app where to return after success or failure.
3. Handle the callback.
Parse the callback URL and inspect the query parameters when your app is reopened:
```swift
func scene(
_ scene: UIScene,
openURLContexts URLContexts: Set
) {
guard let url = URLContexts.first?.url,
let components = URLComponents(url: url, resolvingAgainstBaseURL: false) else {
return
}
let queryItems = Dictionary(
uniqueKeysWithValues: components.queryItems?.map { ($0.name, $0.value ?? "") } ?? []
)
let status = queryItems["smp-status"]
let transactionCode = queryItems["smp-tx-code"]
let foreignTxId = queryItems["foreign-tx-id"]
if status == "success" {
// Mark the order as paid and persist transactionCode / foreignTxId.
} else {
// Show the failure state and allow retry.
}
}
```
When available, the callback can include:
- `smp-status`: `success`, `failed`, or `invalidstate`
- `smp-tx-code`: The SumUp transaction code
- `foreign-tx-id`: The external transaction ID you sent with the request
## Common Parameters
- `title`: Optional label shown in transaction history and receipts.
- `receipt-email`: Prefills the email receipt field in the SumUp app.
- `receipt-mobilephone`: Prefills the SMS receipt field in the SumUp app.
- `foreign-tx-id`: Your unique external transaction reference. Keep it unique per payment and under 128 characters.
- `skip-screen-success=true`: Skips the success screen after a successful payment. Use this only if your app shows the final payment outcome itself.
## Notes
- The payment currency must match the currency of the merchant account logged in to the SumUp app.
- Use the same callback URL for both success and failure if you want a single result handler in your app.
- The official iOS repository also provides an `SMPPaymentRequest` helper if you prefer not to build the URL manually.
## Related Links
- [Cloud API](/terminal-payments/cloud-api/)
- [Affiliate Keys](/tools/authorization/affiliate-keys/)
- [Official iOS Payment Switch repository](https://github.com/sumup/sumup-ios-url-scheme)
# Quickstart
> Get your first in-person payment running with the right SumUp integration path and the prerequisites for testing.
import { Aside, Steps } from '@astrojs/starlight/components';
import Image from '@components/content/Image.astro';
Get your first in-person payment running quickly.
## Prerequisites
- A SumUp merchant account
- A supported reader or Tap to Pay-capable device
- The credentials required for your chosen integration:
- [Affiliate Key](/tools/authorization/affiliate-keys/) for Reader SDKs and Payment Switch
- [Authorization](/tools/authorization/) for Cloud API and Tap to Pay SDK flows
## Sandbox Merchant Account
To test without real money, create a sandbox merchant account from the SumUp Dashboard.
1. Log in to your SumUp account.
2. Open [Developer Settings](https://me.sumup.com/settings/developer?tab=sandboxes).
3. In the **Sandbox environment** section, create a sandbox merchant account if you do not have one yet.
4. Open the account switcher in the Dashboard and select **Sandbox Merchant Account**.
Sandbox accounts do not process real funds. They have a separate merchant ID, show a clear warning in the Dashboard, and requests with a value of `11` always fail by design so you can test failed transaction scenarios.
## Choose Your Path
### Reader SDKs
Best for native Android and iOS apps that want more control over the payment experience.
1. Install the SDK for [Android SDK](/terminal-payments/sdks/android-sdk/), [iOS SDK](/terminal-payments/sdks/ios-sdk/), or [Android Tap-to-Pay SDK](/terminal-payments/sdks/android-ttp/).
2. Authenticate the merchant.
3. Pair a reader over Bluetooth, or initialize Tap to Pay on device.
4. Start a payment and handle the result in your app.
### Cloud API
Best for server-driven, web-based, or multi-platform systems using Solo readers.
1. Set up [authorization](/tools/authorization/) for API access.
2. Pair or register a Solo reader through the [Cloud API](/terminal-payments/cloud-api/).
3. Create a checkout for the paired reader.
4. Let the reader complete the payment and track the result asynchronously.
### Payment Switch
Best for lightweight legacy mobile integrations that hand off checkout to the SumUp app.
1. Install the SumUp app on the merchant device.
2. Build a Payment Switch request with amount, currency, and a callback URL.
3. Open the SumUp app and let it handle the checkout.
4. Receive the payment result back in your app.
## Next Steps
- Need an embedded mobile flow? Continue with [Reader SDKs](/terminal-payments/sdks/).
- Need remote Solo payments? Continue with [Cloud API](/terminal-payments/cloud-api/).
- Need app handoff to SumUp? Continue with [Payment Switch](/terminal-payments/payment-switch/).
# Reader Guides
> Browse reader-specific pages for Tap to Pay, Solo, Solo Lite, Air, 3G, and PIN+.
Use these pages when you need reader-specific details instead of the higher-level overview.
## Available Readers
| Reader | Best fit | Main connection model |
| --- | --- | --- |
| [Solo](/terminal-payments/readers/solo/) | Standalone checkout and Cloud API | Wi-Fi, mobile data, Bluetooth |
| [Solo Lite](/terminal-payments/readers/solo-lite/) | App-paired mobile payments | Bluetooth to phone or tablet |
| [Tap to Pay](/terminal-payments/readers/tap-to-pay/) | No extra hardware | On-device NFC |
| [Air](/terminal-payments/readers/air/) | App-paired mobile payments | Bluetooth to phone or tablet |
| [3G](/terminal-payments/readers/3g/) | Standalone mobile payments | Built-in SIM, Wi-Fi, Bluetooth |
| [PIN+](/terminal-payments/readers/pin-plus/) | Paired mobile payments | Bluetooth Low Energy or cable |
## Notes
- Market availability varies by country and product generation.
- Product capabilities can vary by market, app version, and hardware generation.
# 3G
> 3G reader compatibility and basic information for SumUp in-person payments.
import ReaderHero from '@components/content/ReaderHero.astro';
import Country from '@components/content/Country.astro';
**Available in**:
The 3G reader is a standalone mobile reader with its own network connectivity and optional printer support.
## Basic Information
| Category | Details |
| --- | --- |
| Device type | Standalone card reader |
| Main connections | Built-in SIM, Wi-Fi, and Bluetooth |
| Hardware characteristics | Mobile standalone reader with optional paired printer support |
| Accepted payment types | Card-present payments on the reader, including contactless and chip flows |
| Good fit for | Merchants who want standalone mobility without depending on a phone for every sale |
## Integration Compatibility
- [Android SDK](/terminal-payments/sdks/android-sdk/)
- [iOS SDK](/terminal-payments/sdks/ios-sdk/)
- [Payment Switch](/terminal-payments/payment-switch/)
## What to Expect
- The built-in SIM and Wi-Fi support make 3G more independent than app-paired readers.
- Bluetooth support is also available for connected device workflows.
- Printed receipts typically rely on the 3G printer accessory rather than the reader alone.
# Air
> Air reader compatibility and basic information for SumUp in-person payments.
import ReaderHero from '@components/content/ReaderHero.astro';
import Country from '@components/content/Country.astro';
**Available in**:
Air is a Bluetooth reader for merchants who run checkout from a phone, tablet, or POS app.
## Basic Information
| Category | Details |
| --- | --- |
| Device type | App-paired card reader |
| Main connection | Bluetooth to a mobile device or compatible POS device |
| Hardware characteristics | Mobile reader designed for on-the-go use, with battery life advertised for more than 500 transactions on a charge in some markets |
| Accepted payment types | Contactless, chip card payments, Apple Pay, and Google Pay |
| Good fit for | Mobile sellers and existing tablet-based checkouts |
## Integration Compatibility
- [Android SDK](/terminal-payments/sdks/android-sdk/)
- [iOS SDK](/terminal-payments/sdks/ios-sdk/)
- [Payment Switch](/terminal-payments/payment-switch/)
## What to Expect
- Air depends on a paired device for checkout and network access.
- It is better suited to app-led flows than to fully standalone operation.
- Printer connectivity and device compatibility can vary by market and POS setup.
# PIN+
> PIN+ reader compatibility and basic information for SumUp in-person payments.
import ReaderHero from '@components/content/ReaderHero.astro';
import Country from '@components/content/Country.astro';
**Available in**:
PIN+ is an older paired SumUp reader that connected to mobile devices for card-present payments.
## Basic Information
| Category | Details |
| --- | --- |
| Device type | App-paired card reader |
| Main connections | Bluetooth Low Energy or cable connection to a phone or tablet |
| Platform compatibility | iOS and Android devices |
| Accepted payment types | Major debit and credit cards, including contactless-capable card-present flows in supported markets |
| Good fit for | Existing estates that still need compatibility guidance for earlier SumUp hardware |
## Integration Compatibility
- [Android SDK](/terminal-payments/sdks/android-sdk/)
- [iOS SDK](/terminal-payments/sdks/ios-sdk/)
- [Payment Switch](/terminal-payments/payment-switch/)
## What to Expect
- PIN+ is not part of the current Cloud API path.
- It was designed around phone- or tablet-connected checkout flows rather than standalone operation.
- If you are choosing new hardware today, compare it against Solo or Solo Lite before standardising on it.
# Solo
> Solo reader compatibility and basic information for SumUp in-person payments.
import ReaderHero from '@components/content/ReaderHero.astro';
import Country from '@components/content/Country.astro';
**Available in**:
Solo is SumUp's standalone reader with a touchscreen. It can accept payments independently and can also be used in connected integration flows.
## Basic Information
| Category | Details |
| --- | --- |
| Device type | Standalone card reader |
| Main connections | Wi-Fi, built-in mobile data, and Bluetooth |
| On-device capabilities | Touchscreen checkout flow, digital receipts, sales reporting, and printer support |
| Accepted payment types | Contactless, chip card payments, Apple Pay, and Google Pay |
| Good fit for | Merchants who want a standalone reader or platform teams building around the Cloud API |
## Integration Compatibility
- [Android SDK](/terminal-payments/sdks/android-sdk/)
- [iOS SDK](/terminal-payments/sdks/ios-sdk/)
- [Cloud API](/terminal-payments/cloud-api/)
- [Payment Switch](/terminal-payments/payment-switch/)
## What to Expect
- Solo can work independently, which makes it the most flexible option in this group.
- It is the right reader family when you need the current server-driven [Cloud API](/terminal-payments/cloud-api/).
- Solo can also connect to printers for printed receipts.
# Solo Lite
> Solo Lite reader compatibility and basic information for SumUp in-person payments.
import ReaderHero from '@components/content/ReaderHero.astro';
import Country from '@components/content/Country.astro';
**Available in**:
Solo Lite is a lightweight reader that pairs with the SumUp app over Bluetooth. It is aimed at mobile businesses that want simpler hardware than Solo.
## Basic Information
| Category | Details |
| --- | --- |
| Device type | App-paired card reader |
| Main connection | Bluetooth to a compatible phone or tablet running the SumUp app |
| Hardware characteristics | Lightweight reader with a Corning Gorilla Glass screen and battery life advertised for more than 1,000 transactions on one charge |
| Accepted payment types | Chip and PIN, contactless, Apple Pay, and Google Pay |
| Good fit for | Businesses that want a lower-cost paired reader for mobile or countertop use |
## Integration Compatibility
- [Android SDK](/terminal-payments/sdks/android-sdk/)
- [iOS SDK](/terminal-payments/sdks/ios-sdk/)
- [Payment Switch](/terminal-payments/payment-switch/)
## What to Expect
- Solo Lite relies on a companion device rather than built-in mobile data.
- It is a strong fit when you already have an app, phone, or tablet in the checkout flow.
- Charging docks and POS add-ons are available in some markets.
# Tap to Pay
> Tap to Pay compatibility and basic information for SumUp in-person payments.
import ReaderHero from '@components/content/ReaderHero.astro';
import Country from '@components/content/Country.astro';
**Available in (Android)**:
**Available in (iOS)**:
Tap to Pay lets merchants accept in-person contactless payments directly on a compatible phone without carrying a separate card reader.
## Basic Information
| Category | Details |
| --- | --- |
| Device type | Software-based payment acceptance on the merchant's phone |
| Hardware model | No separate reader required |
| Compatible merchant devices | iPhone XS or newer on supported iOS versions, or Android devices with NFC running Android 11 or later |
| Connection needs | The SumUp app or SDK flow plus internet access on the merchant device |
| Accepted payment types | Contactless cards, Apple Pay, Google Pay, Samsung Pay, and similar digital wallets |
| Good fit for | Merchants who want the fastest setup and the lightest hardware footprint |
## Integration Compatibility
- [iOS SDK](/terminal-payments/sdks/ios-sdk/)
- [Android Tap-to-Pay SDK](/terminal-payments/sdks/android-ttp/)
## What to Expect
- There is no separate reader to pair, charge, or carry.
- Tap to Pay is contactless-only. If you need chip insertion, use a physical reader such as Solo or Solo Lite.
- Customers can enter their PIN directly on the merchant device when required.
# SDKs
> Compare the mobile Terminal Payment SDKs for Android and iOS, then continue to the platform-specific guides and offline transaction documentation.
The Reader SDKs let you embed SumUp in-person payment acceptance directly into your Android or iOS app. Your app can connect to a Bluetooth card reader or, depending on platform, use Tap to Pay on the device itself.
## Available SDKs
| SDK | Platform | Readers supported | Tap to Pay |
| --- | --- | --- | --- |
| [Android SDK](/terminal-payments/sdks/android-sdk/) | Android | Solo Lite, Solo, Air, 3G, PIN+ | No |
| [Android Tap-to-Pay SDK](/terminal-payments/sdks/android-ttp/) | Android | — | Yes |
| [iOS SDK](/terminal-payments/sdks/ios-sdk/) | iOS | Solo Lite, Solo, Air, 3G, PIN+ | Yes |
## How It Works
The SDK provides the payment UI and handles communication with the card reader. Your app initiates checkout, the SDK guides the merchant and customer through the payment flow, and the transaction result is returned to your app at the end.
## Shared Concepts
- Start with the top-level [Quickstart](/terminal-payments/quickstart/) for a minimal first-payment flow.
- Use [Offline Transactions](/terminal-payments/sdks/offline-transactions/) if you need store-and-forward card payments when connectivity is unavailable.
- Use the platform-specific guides for setup, permissions, authentication, and full checkout implementation details.
## Platform Guides
- [Android SDK](/terminal-payments/sdks/android-sdk/)
- [Android Tap-to-Pay SDK](/terminal-payments/sdks/android-ttp/)
- [iOS SDK](/terminal-payments/sdks/ios-sdk/)
# Android SDK
> This guide walks you through integrating the Android SDK and embedding the checkout flow within your app.
import { Aside } from "@astrojs/starlight/components";
import Image from "@components/content/Image.astro";
This documentation provides a step-by-step guide for SumUp's native Android SDK, which enables you to integrate SumUp's proprietary card terminals and payment platform to accept credit and debit card payments (including VISA, MasterCard, American Express, and more). The SDK communicates with card terminals via Bluetooth (BLE 4.0).
During checkout, the SDK guides users through each payment step with appropriate screens. It also provides terminal setup and cardholder signature verification interfaces. The checkout result is returned with relevant transaction data for your records.
Sensitive card data is never passed to or stored on the merchant's phone. All data is encrypted by the card terminal, which complies with top industry standards (PCI, EMV I & II, Visa, MasterCard, Amex).
## At a Glance
| | |
| ---------------------- | ---------------------------------------------------- |
| **Platform** | Android |
| **Languages** | Java, Kotlin |
| **Readers** | Solo, Solo Lite, Air, 3G, PIN+ |
| **Distribution** | Maven (`com.sumup:merchant-sdk`) |
| **Source and samples** | [GitHub](https://github.com/sumup/sumup-android-sdk) |
## Prerequisites
- Registered for a merchant account via SumUp's [country websites](https://sumup.com/) or use a [sandbox merchant account](/terminal-payments/quickstart/#sandbox-merchant-account)
- A supported SumUp card reader: Solo, Solo Lite, Air, 3G, or PIN+
- An [Affiliate Key](/tools/authorization/affiliate-keys/) linked to your Android application ID
- Access to the [Android SDK repository](https://github.com/sumup/sumup-android-sdk)
## Requirements
| Requirement | Minimum |
| --------------------- | ------- |
| `minSdkVersion` | 26 |
| `targetSdkVersion` | 36 |
| Android Gradle Plugin | 9.2.1 |
| Kotlin | 2.4.0 |
| Java | 17 |
## Sandbox Merchant Account
Use the shared [Quickstart sandbox setup](/terminal-payments/quickstart/#sandbox-merchant-account) to create and test with a sandbox merchant account before integrating the Android SDK.
## Compatibility
Starting with firmware version 1.0.1.84, Air card readers with serial numbers starting with 108, 109 or later require SDK version 4.0.0 and later. Please update to the latest SDK version if you need to support these readers.
For store-and-forward payments when connectivity is unavailable, see [Offline Transactions](/terminal-payments/sdks/offline-transactions/).
## Integrate the Android SDK
You can use the sample app provided in the repository as a reference.
### Adding Dependencies
1. Add the SumUp maven repository to your Gradle project dependencies build file:
```groovy
allprojects {
repositories {
maven { url 'https://maven.sumup.com/releases' }
}
}
```
2. Add the SDK dependency to your app module build file:
```groovy
implementation 'com.sumup:merchant-sdk:7.1.0'
```
3. Sync your project.
### Initializing SumUp Components
Initialize the SumUp components in your app:
```java
public class SampleApplication extends Application {
@Override
public void onCreate() {
super.onCreate();
SumUpState.init(this);
}
}
```
### Logging Merchant In and Out
Before calling any features of the Android SDK, a registered SumUp merchant account needs to be logged in. Log in by supplying your Affiliate Key ([create one](/tools/authorization/affiliate-keys) if necessary):
```java
SumUpLogin sumupLogin = SumUpLogin.builder(mAffiliateKey).build();
SumUpAPI.openLoginActivity(MainActivity.this, sumupLogin, 1);
```
To integrate with the Activity Result API, use `SumUpLoginContract`:
```kotlin
val loginLauncher = registerForActivityResult(SumUpLoginContract()) { result ->
// Login result
}
loginLauncher.launch(sumupLogin)
```
To log Merchant out, call:
```java
SumUpAPI.logout();
```
### Making Payments
After logging in, start accepting card payments. If no account is logged in, an error `ERROR_NOT_LOGGED_IN` is returned.
Once logged in, you can start using the Android SDK to accept card payments. If no account is logged in, `SumUpAPI.Response.ResultCode.ERROR_NOT_LOGGED_IN` will be returned.
```java
SumUpPayment payment = SumUpPayment.builder()
// mandatory parameters
.total(new BigDecimal("1.12")) // minimum 1.00
.currency(SumUpPayment.Currency.EUR)
// optional: to be used only if the card reader supports the feature, what can be checked with `SumUpApi.isTipOnCardReaderAvailable()`
.tipOnCardReader()
// optional: include a tip amount in addition to the total, ignored if `tipOnCardReader()` is present
.tip(new BigDecimal("0.10"))
// optional: add details
.title("Taxi Ride")
.receiptEmail("customer@mail.com")
.receiptSMS("+3531234567890")
// optional: Add metadata
.addAdditionalInfo("AccountId", "taxi0334")
.addAdditionalInfo("From", "Paris")
.addAdditionalInfo("To", "Berlin")
// optional: foreign transaction ID, must be unique!
.foreignTransactionId(UUID.randomUUID().toString()) // can not exceed 128 chars
// optional: skip the success screen
.skipSuccessScreen()
// optional: time out for the success screen
.successScreenTimeout(3)
// optional: skip the failed screen
.skipFailedScreen()
.build();
SumUpAPI.checkout(MainActivity.this, payment, 2);
```
### Handling Payment Result
Override `onActivityResult` to handle payment results:
```java
@Override
protected void onActivityResult(int requestCode, int resultCode, Intent data) {
if (requestCode == 2 && data != null) {
// Handle the response here
}
}
```
To integrate with the Activity Result API, use `SumUpCheckoutContract`:
```kotlin
val checkoutLauncher = registerForActivityResult(SumUpCheckoutContract()) { result ->
// Checkout result
}
checkoutLauncher.launch(payment)
```
### Connecting Reader
## Additional Features
### Response Fields
Several response fields are available when the callback activity is called:
| Property | Type | Description / Possible Values |
| -------------------------------------------------- | ------------------------------------------------------ | ------------------------------------------------------------------------------------------------------------------------------------------------------------------------------------------------------------------------------------------------------------------------------------------------------------------------------------------------------------------------------------------------------------------------------------------------------------------------------------------------------------------------------------------------------------- |
| **SumUpAPI.Response.RESULT_CODE** | int | Possible Values:
- SUCCESSFUL = 1
- ERROR_TRANSACTION_FAILED = 2
- ERROR_GEOLOCATION_REQUIRED = 3
- ERROR_INVALID_PARAM = 4
- ERROR_INVALID_TOKEN = 5
- ERROR_NO_CONNECTIVITY = 6
- ERROR_PERMISSION_DENIED = 7
- ERROR_NOT_LOGGED_IN = 8
- ERROR_DUPLICATE_FOREIGN_TX_ID = 9
- ERROR_INVALID_AFFILIATE_KEY = 10
- ERROR_ALREADY_LOGGED_IN = 11
- ERROR_INVALID_AMOUNT_DECIMALS = 12
- ERROR_API_LEVEL_TOO_LOW = 13
- ERROR_CARD_READER_SETTINGS_OFF = 14
- ERROR_UNKNOWN_TRANSACTION_STATUS = 15 |
| **SumUpAPI.Response.MESSAGE** | String | A human readable message describing the result of the payment |
| **SumUpAPI.Response.TX_CODE** | String | The transaction code associated with the payment |
| **SumUpAPI.Response.TX_INFO** | Parcelable (com.sumup.merchant.Models.TransactionInfo) | Transaction info object containing information about the transaction:
- Transaction Code
- Merchant Code
- Amount (including tip amount and VAT)
- Tip amount
- VAT
- Currency (e.g. EUR)
- Payment Status (PENDING \| SUCCESSFUL \| CANCELLED \| FAILED)
- Payment Type (CASH \| POS \| ECOM \| UNKNOWN \| RECURRING \| BITCOIN \| BALANCE)
- Entry Mode (e.g. CHIP)
- Number of Installments
- Card Type (e.g. MASTERCARD)
- Last four digits of the card
- Product information |
| **SumUpAPI.Response.RECEIPT_SENT** | boolean | true if a receipt was issued to the customer, false otherwise |
| **SumUpAPI.Response.CARD_READER_MODEL** | String | The model of the card reader used for the transaction |
| **SumUpAPI.Response.CARD_READER_FIRMWARE_VERSION** | String | The firmware version of the card reader used for the transaction |
The response flags are provided within the Bundle that is passed back to the callback activity:
```java
int resultCode = getIntent().getExtras().getInt(SumUpAPI.Response.RESULT_CODE);
```
### Card Reader Page
When a merchant is logged in, you can open this activity to access all the settings and options related to the card reader.
- Connect to new readers.
- View the reader attributes when previously connected i.e. Battery percentage, Serial number, Last three digits of serial number, Software version.
- Connect to the last saved reader if it is inactive.
- Update firmware of the reader if available.
- Visual illustration of the saved reader with its current connectivity status and name.
```java
SumUpAPI.openCardReaderPage(MainActivity.this, 4);
```
To integrate with the Activity Result API, use `SumUpCardReaderPageContract`:
```kotlin
val cardReaderPageLauncher = registerForActivityResult(SumUpCardReaderPageContract()) { result ->
// Card reader page result
}
cardReaderPageLauncher.launch(null)
```
### Preparing the SumUp Card Terminal for Checkout
`prepareForCheckout()` offers the possibility to connect the card reader ahead of initiating the checkout which speeds up the overall checkout time.
To call this method, user needs to be logged in with a SumUp account and their card reader should already be setup. Next, call `prepareForCheckout()` before initiating a checkout.
```java
SumUpAPI.prepareForCheckout()
```
> Note: Air and Solo card readers remain connected via BLE after each transaction while `prepareForCheckout()` is used when the card reader becomes disconnected (e.g. the reader is out of range, the host app looses focus, or the reader is turned off).
### Additional Checkout Parameters
When setting up the `SumUpPayment` object, the following optional parameters can be included:
#### Tip Amount
A tip amount can be processed in addition to the `total` using the `tip` parameter. The tip amount will then be shown during the checkout process and be included in the response. Please note that a tip amount cannot be changed during/after the checkout.
##### Tip on Card Reader
This allows the customer to add a tip directly on the card reader, rather than prompting for a tip amount on the Android device.
A tip amount can be prompted directly in the card reader by using `tipOnCardReader` parameter, if the card reader supports tipping. See the [tipOnCardReader payment example](https://github.com/sumup/sumup-android-sdk#4-make-a-payment) for this field.
#### Timeout on Success Screen
Use `.successScreenTimeout(int seconds)` to configure how long the success screen is displayed. The screen will automatically dismiss after the specified duration if the user has not closed it manually. The value must be greater than 0.
#### Retry Policy Configuration
The `configureRetryPolicy()` feature allows you to set custom retry parameters for transaction result retrieval, using `pollingInterval`, `maxWaitingTime`, and `disableBackButton`.
- Parameters: Both `pollingInterval` and `maxWaitingTime` should be provided in milliseconds, with default values of 2000 ms and 60000 ms, respectively. Setting `disableBackButton` to true disables the back button during retries.
- Timeout: If `maxWaitingTime` elapses with no result, the SDK returns `SumUpAPI.ResultCode.ERROR_UNKNOWN_TRANSACTION_STATUS`. Pressing the back button (if enabled) during retries will also trigger this error.
- Adjustments: If `pollingInterval` exceeds `maxWaitingTime`, `maxWaitingTime` will automatically be adjusted to match. Negative values for either parameter default to 0.
- Default: If `configureRetryPolicy()` is not used, the SDK defaults to returning `SumUpAPI.ResultCode.ERROR_TRANSACTION_FAILED`.
##### Querying the Transaction Status
When using the SumUp payment as shown below:
```java
SumupPayment.builder()
...
.foreignTransactionId(UUID.randomUUID().toString())
.configureRetryPolicy(2000, 60000, true)
.build();
```
If there are connectivity issues and the transaction status can not be retrieved, the API will return `ERROR_UNKNOWN_TRANSACTION_STATUS`. In such cases, you can query the transaction status by calling [SumUp transaction status API](https://developer.sumup.com/api/transactions/get) using the specified `foreignTransactionId`.
#### Transaction Identifier
The `foreignTransactionID` identifier will be associated with the transaction and can be used to retrieve details related to the transaction. See [API documentation](https://developer.sumup.com/rest-api/#tag/Transactions) for details. Please make sure that this ID is unique within the scope of the SumUp merchant account and sub-accounts. It must not be longer than 128 characters.
The foreignTransactionID is available when the callback activity is called: `SumUpAPI.Param.FOREIGN_TRANSACTION_ID`
#### Skip Success Screen
To skip the success screen shown at the end of a successful transaction, the `skipSuccessScreen` parameter can be used. When using this parameter, your application is responsible for displaying the transaction result to the customer. In combination with the Receipts API your application can also send your own receipts, see [API documentation](https://developer.sumup.com/rest-api/#tag/Receipts) for details. Please note success screens will still be shown when using the SumUp Air Lite readers.
#### Skip Failed Screen
To skip the failed screen shown at the end of a failed transaction, the `skipFailedScreen` parameter can be used. When using this parameter, your application is responsible for displaying the transaction result to the customer. Please note failed screens will still be shown when using the SumUp Air Lite readers.
### Transparent Authentication
To authenticate an account without the user typing in their SumUp credentials each time, you can generate an access token using the OAuth 2.0 authorization code flow and use it to transparently log in to the Android SDK.
```java
SumUpLogin sumupLogin = SumUpLogin.builder(mAffiliateKey).accessToken("MY_ACCESS_TOKEN").build();
SumUpAPI.openLoginActivity(MainActivity.this, sumupLogin, 1);
```
For information about how to obtain a token, please see the [Authorization Documentation](/tools/authorization/).
If the token is invalid, `SumUpAPI.Response.ResultCode.ERROR_INVALID_TOKEN` is returned.
### Retrieve Data of the Active Merchant Account
If a merchant account is currently logged in, it is possible to retrieve the data for this account.
```java
if (!SumUpAPI.isLoggedIn()) {
// no merchant account currently logged in
} else {
Merchant currentMerchant = SumUpAPI.getCurrentMerchant();
}
```
### Retrieve Connected Card Reader's Data
You can check the connection status and retrieve details about the saved card reader using the following methods:
- **`isCardReaderConnected()`**: Returns a `boolean` indicating whether a card reader is currently connected.
- **`getSavedCardReaderDetails()`**: Returns an object containing the reader's serial number, type, and last known battery percentage.
#### Supported Reader Types
The reader type returned by `getSavedCardReaderDetails()` will be one of the following constants:
- `SOLO`
- `SOLO_LITE`
- `AIR`
- `THREE_G`
- `PIN_PLUS`
- `UNKNOWN` — returned only if the SDK encounters an issue and cannot identify the reader type.
### Enable ProGuard
```groovy
buildTypes {
release {
// All ProGuard rules required by the SumUp SDK are packaged with the library
minifyEnabled true
proguardFiles getDefaultProguardFile('proguard-android.txt')
}
}
```
### Use Google Location Services
The SDK supports Google Location Services, to improve location accuracy and reduce power consumption.
In order to use it you need to add the dependency in `build.gradle` file
```groovy
implementation "com.google.android.gms:play-services-location:19.0.1"
```
If the GLS dependency is not added to the project or Google Play Services are not installed on the mobile device, the Android SDK will determine the location with the default Location Service provided by Android.
## Sample App
SumUp provides a sample app which implements main SDK components. You can find the app under [App directory](https://github.com/sumup/sumup-android-sdk/tree/master/app) of the repository.
## Out of Scope
The following functions are handled by the [SumUp APIs](/api/):
- [Refunds](/api/transactions/refund/)
- [Transaction history](/api/transactions/list/)
- [Receipts](/api/receipts/get/)
- [Account management](/api/merchant/)
- [Online Payments](/online-payments/)
## Community
- **Questions?** Get in contact with our integration team through the [contact form](/contact).
- **Found a bug?** [Open an issue](https://github.com/sumup/sumup-android-sdk/issues/new).
Please provide as much information as possible.
## Changelog
See the [SumUp Changelog](/changelog/) for updates.
## License
See [SumUp Android SDK License](https://github.com/sumup/sumup-android-sdk/blob/master/LICENSE.md).
# Android Tap-to-Pay SDK
> Integrate with the Android Tap to Pay SDK to process contactless payments directly on a phone.
import { Aside, Steps } from "@astrojs/starlight/components";
import Image from "@components/content/Image.astro";
The Android Tap-to-Pay SDK enables your mobile app to accept card-present contactless payments using only a smartphone, without any additional hardware. This guide explains how to integrate this functionality into your Android app.
- Intended for live, customer-facing use.
- The SDK is not debuggable. Additionally, **Attestation & Monitoring** is enabled. If a device fails to meet our security policies (e.g., debug mode enabled or rooted device), payment operations will be disabled.
- For testing purposes, use dedicated developer credentials to prevent actual card charges. The more information about testing can be found in the [Testing the SDK](#testing-the-sdk) section.
- For the latest updates, consult the [Android Tap-to-Pay SDK Changelog](/changelog/?tag=android-tap-to-pay-sdk).
- See our [Android Tap-to-Pay SDK sample app](https://github.com/sumup/android-tap-to-pay) to get started. As noted below, credentials to access and use the SDK is restricted pending review and must be requested via our Integration team.
## Prerequisites
- Kotlin version: 1.9.22 or later
- `minSDK`: 30 or later
- `targetSDK`/`compileSDK`: 34 or later
- Android Gradle Plugin: 7.3.0 or later
- Java 17 or later
- [Core library desugaring](https://developer.android.com/studio/write/java8-support#library-desugaring) enabled (required since SDK version 1.1.1)
- maven repository credentials (to access the SDK repository, request them through the [contact form](/contact)).
- A Secret API key, if not using OAuth 2.0 authentication. You can generate a Secret API key on the [API keys page](https://me.sumup.com/settings/api-keys) in the SumUp Dashboard.
### Hardware Requirements
- NFC-enabled Android device (emulators are not supported)
- Android 11 or later
## Integration
You can use the sample app provided in the [GitHub repository](https://github.com/sumup/android-tap-to-pay) as a reference.
### Dependencies
1. Add the following to the Gradle dependencies:
```kotlin
allprojects {
repositories {
maven {
url = uri("https://maven.sumup.com/releases")
}
maven {
url = uri("https://tap-to-pay-sdk.fleet.live.sumup.net/")
credentials {
username = "your_username" // The maven credentials are provided by SumUp
password = "your_password"
}
}
google()
mavenCentral()
}
}
```
2. Add the dependency to a module `build.gradle`:
```kotlin
implementation("com.sumup.tap-to-pay:utopia-sdk:1.1.4")
```
3. Starting from SDK version 1.1.1, [core library desugaring](https://developer.android.com/studio/write/java8-support#library-desugaring) is required. Add the following to your module `build.gradle`:
```kotlin
android {
compileOptions {
isCoreLibraryDesugaringEnabled = true
}
}
dependencies {
coreLibraryDesugaring("com.android.tools:desugar_jdk_libs:2.1.5")
}
```
### Authentication
The Android Tap-to-Pay SDK uses a transparent authentication approach: authentication is handled by the consumer app, not the SDK.
The SDK provides the `init` [method](#1-initialization) with the `AuthTokenProvider` interface as a parameter.
The `AuthTokenProvider` interface is responsible for providing the access token to the SDK.
```kotlin
interface AuthTokenProvider {
fun getAccessToken(): String
}
```
There are several ways for a consumer app to provide the access token to the SDK.
1. Using the OAuth 2.0 [flow](/tools/authorization/oauth/#authorization-code-flow):
The consumer app can implement the OAuth 2.0 flow to get the access token and provide it to the SDK. The SDK provides the `AuthTokenProvider` interface that should be implemented by the consumer app. The implementation of the `getAccessToken` method should return the access token. This way is preferable and recommended because it provides a more secure way to authenticate the user.
2. Using API Key:
You can use an API key as an auth token. Generate the key on the [API keys page](https://me.sumup.com/settings/api-keys) in the SumUp Dashboard and provide it to the SDK through `AuthTokenProvider.getAccessToken()` method.
> ⚠️ **Important:**
> The API keys should be stored securely and should not be hardcoded in the app. Instead, they should be stored in the secure storage and provided to the SDK when needed. Do not share your secret API keys in publicly accessible places such as GitHub repositories, client-side code, etc.
### Using API
The `TapToPay` interface provides methods to interact with the SDK. To get an implementation of the `TapToPay` interface, call:
```kotlin
val tapToPay = TapToPayApiProvider.provide(applicationContext)
```
where `applicationContext` is the context of a consumer application.
The `TapToPay` interface has the following methods:
#### 1. Initialization
```kotlin
suspend fun init(authTokenProvider: AuthTokenProvider): Result
```
The `init` method initializes the session. The `AuthTokenProvider` interface is responsible for providing the access token to the SDK (see [Authentication](#authentication)).
Please, note that the `init` method should be called only once during the app lifecycle. The `init` method should be called as soon as possible after the app starts.
The `init` function returns a `Result` object that can be either a `Result.Success` if the initialization was successful.
The function can also return `Result.Failure` with one exception from the list of exceptions mentioned [under Exceptions](#exceptions).
#### 2. Start Payment
```kotlin
suspend fun startPayment(
checkoutData: CheckoutData,
skipSuccessScreen: Boolean
): Flow
```
The `startPayment` method initiates the payment process. It returns a `Flow` that emits `PaymentEvent` or throws an exception with an error message.
The list of possible events:
- `CardRequested` - the SDK is trying to detect a card, waiting for the cardholder to tap/present their card.
- `CardPresented` - a card is detected.
- `CVMRequested` - a CVM (Cardholder Verification Method) is requested. This event is fired when the card is detected and the SDK is waiting for the cardholder to enter the PIN.
- `CVMPresented` - a CVM was entered by the cardholder. This event is fired upon completion of the CVM regardless if it was successful or not.
- `TransactionDone(val paymentOutput: PaymentOutput)` - transaction was completed. `PaymentOutput` param is:
```kotlin
data class PaymentOutput(
val txCode: String,
val serverTransactionId: String,
val cardType: String? = null,
val lastFour: String? = null,
val merchantCode: String? = null,
val cardScheme: String? = null
)
```
- `TransactionFailed(val paymentOutput: PaymentOutput?, val tapToPayException: TapToPayException?)` - transaction failed. It might happen due to many reasons, like attestation error, backend error, card reader error, and so on. The full list of errors is described in the [Exceptions](#exceptions) section. `PaymentOutput` param might be null if the transaction failed before reaching the backend.
- `TransactionCanceled(val paymentOutput: PaymentOutput?)` - transaction was cancelled by the user.
- `TransactionResultUnknown(val paymentOutput: PaymentOutput?)` - transaction result is unknown. This might happen on remote calls, when there is no response due to timeout.
- `PaymentFlowClosedSuccessfully(val paymentOutput: PaymentOutput?, val shouldDisplayReceipt: Boolean)` - after a successful transaction, users see the successful screen with two buttons: **Send receipt** and **Done**. Once the user clicks on any button, the screen closes and fires the `PaymentClosed` event.
##### Parameters
`checkoutData` - The checkout data object.
`skipSuccessScreen` - A boolean value that controls whether the user is redirected to a built-in success screen after a successful payment.
```kotlin
data class CheckoutData(
val totalAmount: Long,
val tipsAmount: Long?,
val vatAmount: Long?,
val clientUniqueTransactionId: String,
val customItems: List?,
val priceItems: List?,
val products: List?,
val processCardAs: ProcessCardAs?,
val affiliateData: AffiliateModel?
) : Serializable
```
Where:
- `totalAmount` - The amount expressed in the minor unit of the currency. Total amount includes tip amount and VAT amount.
- `tipsAmount` - The amount of tips expressed in the minor unit of the currency. Please, note that the tip amount is included in the total amount. Ignored if null.
- `vatAmount` - The amount of VAT expressed in the minor unit of the currency. Please, note that the VAT amount is included in the total amount. Ignored if null.
- `clientUniqueTransactionId` - This should be a unique identifier for the transaction. A random UUID is can be used.
- `customItems` - The list of custom items. Set null if not used.
- `priceItems` - The list of price items. Set null if not used.
- `products` - The list of product items. Set null if not used.
- `processCardAs` - The type of the card processing. The default value is `null`. The possible values are `ProcessCardAs.Credit(val instalments: Int)` and `ProcessCardAs.Debit`, where `instalments` is the number of installments. This parameter is optional and only applicable to some markets, such as Brazil, where the card type selection and installments are supported.
- `affiliateData` - The affiliate data refers to tracking and attributing transactions to specific affiliates, integrators, or referral sources.
**Note:** The amounts shall be provided in minor unit of the currency according to the list below.
Currencies with exponent 2 : `AUD, BGN, BRL, CHF, CLP, COP, CZK, DKK, EUR, GBP, HRK, HUF, NOK, PEN, PLN, RON, SEK, USD`.
For example, an amount of `$12.34` corresponds to a value of `1234`, `$11.00` corresponds to a value of `1100`.
**Note 2:** Some currencies (Hungarian Forint `HUF`, Chilean Peso `CLP` and Colombian Peso `COP`) are displayed to the merchant and cardholder without minor unit of the currency but still require it.
For these specific currencies, the amount shall still be multiplied by 100 (exponent 2).
For example, `Ft100` should be provided as `10000`.
The `AffiliateModel` data type has the following parameters:
```kotlin
data class AffiliateModel(
val key: String,
val foreignTransactionId: String? = null,
val tags: Map? = null
) : Serializable
```
Where:
- `key` - The primary identifier for the affiliate or integrator partner.
- `foreignTransactionId` - An optional reference to an external transaction ID (from the integrator's system).
- `tags` - Flexible key-value pairs for additional metadata about the transaction or affiliate.
The required minimum to make the transaction looks like:
```kotlin
fun startPayment() {
tapToPay.startPayment(
checkoutData = CheckoutData(
totalAmount = 1234, // 12.34 EUR
clientUniqueTransactionId = "123",
tipsAmount = null,
vatAmount = null,
customItems = null,
priceItems = null,
processCardAs = null,
),
skipSuccessScreen = false
).collectLatest {
Log.d("Payment event: $it")
}
}
```
#### 3. Tear Down
```kotlin
suspend fun tearDown(): Result
```
The `tearDown` function logs out the user, cleans up keys and other sensitive data, and closes the session.
The `tearDown` method should be called when the app is closed or when the user logs out.
It returns a `Result` object that can be either a `Result.Success` if the teardown was successful or a `Result.Failure` if there was an error during the teardown.
#### Exceptions
The Android Tap-to-Pay SDK may return a `Result.Failure` containing an exception when one of its methods is called.
Every exception belongs to one of the base types.
The base types are listed below, and each of these is further divided into more specific exception types.
- `CommonException` - These exceptions cover scenarios such as initialization issues, registration problems, authentication failures, and required updates, providing a consistent and predictable way to handle errors across the system.
- `NetworkException` - These exceptions represent network-related and communication errors encountered during SDK operation. They include issues such as interrupted connections, authentication problems, and server/client-side failures.
- `PaymentException` - These exceptions represent errors related to the payment transaction flow, covering everything from preprocessing to final charge attempts. They include issues such as invalid payment actions, timeouts, incorrect amounts, unsupported card technologies, and unexpected states during card reading.
- `PaymentPreparationException` - These exceptions relate to the preparation and availability of the payment process. They indicate failures such as the unavailability of the payment function, issues during kernel setup, missing security-related data, and general checkout failures. These errors typically occur before or at the start of a transaction and prevent it from proceeding.
- `AttestationException` - These exceptions represent errors related to the attestation process, which is crucial for ensuring the security and integrity of the payment environment. They include issues like enabled USB debugging, non secure device or network.
- `TapToPayException.Unknown` - The Unknown exception represents an internal error that cannot be exposed externally. It acts as a fallback for unexpected or unclassified issues that occur within the SDK, ensuring sensitive or implementation-specific details are not leaked.
#### Error Codes
| **Base Type** | **Exception Type** | **Error Code** | **Description** |
| ------------------------------- | --------------------------- | -------------- | --------------------------------------------------------- |
| **CommonException** | Parsing | 101 | Error occurred during parsing. |
| | Environment | 102 | Environment-related issue. |
| | NotRegisteredTerminal | 103 | Terminal is not registered. |
| | AuthTokenProvider | 105 | Authentication token issue. |
| | Update | 106 | Update is required. |
| | SDKIsAlreadyInitialized | 107 | SDK is already initialized. |
| | SDKIsNotInitialized | 108 | SDK is not initialized. |
| | SDKTearDown | 109 | SDK teardown process. |
| | TerminalRegistration | 110 | Terminal registration issue. |
| | MissingResult | 111 | Missing result error. |
| **NetworkException** | NetworkConnection | 201 | General network error. |
| | Authentication | 202 | Authentication failure. |
| | Server | 204 | Server-related issue. |
| | Client | 205 | Client-related issue. |
| | NetworkSecurity | 206 | Secure network (mTLS) issue. |
| **PaymentException** | InvalidPaymentAction | 1001 | Invalid payment action. |
| | UncertainTransaction | 1002 | Transaction status is uncertain. |
| | Timeout | 1003 | Payment process timed out. |
| | Preprocessing | 1005 | Error during preprocessing. |
| | CombinationSelection | 1006 | Error in combination selection. |
| | Transaction | 1007 | Transaction-related issue. |
| | ExtractPAN | 1008 | Error extracting PAN. |
| | UnknownCVM | 1009 | Unknown Cardholder Verification Method. |
| | IncorrectAmount | 1010 | Incorrect amount specified. |
| | UnsupportedCardTechnology | 1011 | Unsupported card technology. |
| | UnexpectedCardReadState | 1012 | Unexpected card read state. |
| | UnexpectedOutcome | 1013 | Unexpected transaction outcome. |
| | IncorrectFormat | 1014 | Card read process failed. |
| | ReadEMVTagsException | 1015 | Error reading EMV tags. |
| | TechnoPollingStopped | 1016 | Techno polling process stopped. |
| | CancelationFailed | 1017 | Cancellation process failed. |
| | ChargeFailed | 1018 | Charge process failed. |
| | UnsupportedOnlinePin | 1020 | Unsupported online PIN. |
| | UnsupportedSignatureRequest | 1021 | Unsupported signature request. |
| | ErrorAction | 1022 | Error in payment action. |
| | TransactionInterrupted | 1023 | Transaction was interrupted. |
| | CardReadFailed | 1024 | Card read failed. |
| | DeclinedOutcome | 1025 | Card declined. |
| | EmptyCandidatesList | 1026 | No candidates available. |
| | UnknownKernel | 1027 | Unknown kernel error. |
| **PaymentPreparationException** | PaymentAvailability | 1101 | Payment availability issue. |
| | KernelPreparation | 1102 | Error during kernel preparation. |
| | EmptyAntireplayData | 1103 | Antireplay data is empty. |
| | CheckoutFailed | 1104 | Checkout process failed. |
| **AttestationException** | UsbDebuggingEnabled | 301 | USB debugging enabled. Disable USB debugging. |
| | AppDebuggable | 302 | App is build as debuggable. Rebuild it as non debuggable. |
| | AdbSessionActive | 303 | There is an active ADB session. |
| | DeviceSecurity | 305 | The device is not secure. |
| | NetworkSecurity | 304 | The network is not secure. |
| **TapToPayException** | Unknown | 0 | An internal error that cannot be exposed externally |
### Testing the SDK
With SDK v1.1.0 and later, you can use sandbox account for testing purposes.
1. Go to the [Developer Settings](https://me.sumup.com/settings/developer) in the SumUp Dashboard.
2. Create a Sandbox Account:
3. In your new sandbox merchant account, create an [API key](https://me.sumup.com/settings/api-keys) or configure [OAuth 2.0](https://me.sumup.com/settings/oauth2-applications) for authentication.
_Note_: These test accounts run in the production environment and allows you debug mode to be enabled in the SDK. To process live transactions with a real account, you must disable debug mode, otherwise, payments will not be executed.
When you’re done experimenting with the sandbox merchant account, switch back to a regular account for business purposes.
Before testing in production, make sure of the following:
1. The app is not debuggable. Making the build debuggable will cause the attestation to fail and the payments will not work.
```kotlin
buildTypes {
release {
isDebuggable = false
}
}
```
2. You have USB debugging disabled on your device. Even if you install the app through a cable, disable the USB debugging after installation.
3. You have Developer Mode disabled on your device. Even if you install the app through a cable, disable the Developer Mode after installation.
On some devices (e.g. Samsung), you still have to disable USB debugging before disabling the Developer Mode.
It is still possible to have a USB debugging enabled and Developer Mode disabled, but it depends on the device manufacturer.
### Testing in Specific Regions
#### Brazil and Chile
To test the Android Tap-to-Pay SDK in Brazil and Chile, you should set `processCardAs` for each transaction. For example:
```kotlin
tapToPay.startPayment(
CheckoutData(
totalAmount = amount,
clientUniqueTransactionId = UUID.randomUUID().toString(),
tipsAmount = null,
vatAmount = null,
customItems = null,
products = null,
priceItems = null,
processCardAs = ProcessCardAs.Credit(instalments = 5), // or ProcessCardAs.Debit
affiliateData = null
)
)
```
Additionally, PIN verification for transactions is mandatory for these countries.
However, the PIN entry screen will appear only if _Developer Options_ are _disabled_ on the device - otherwise, the transaction will fail with an error.
# iOS SDK
> Explains how the iOS SDK works, how to set it up, and how it delivers card-present and Tap to Pay experiences.
import { Aside, Steps, Tabs, TabItem } from '@astrojs/starlight/components';
import Image from '@components/content/Image.astro';
SumUp provides a [native iOS SDK](https://github.com/sumup/sumup-ios-sdk) that enables you to integrate SumUp's proprietary
card terminal(s) and its payment platform to accept credit and debit card payments
(incl. VISA, MasterCard, American Express and more) as well as Tap-to-Pay payments on iPhones. SumUp's SDK communicates transparently
to the card terminal(s) via Bluetooth. Upon initiating
a checkout, the SDK guides your user using appropriate screens through each step of the payment
process. As part of the process, SumUp also provides the card terminal setup screen, along with the
cardholder signature verification screen. The checkout result is returned with the relevant
data for your records.
No sensitive card data is ever passed through to or stored on the merchant’s phone.
All data is encrypted by the card terminal, which has been fully certified to the highest
industry standards (PCI, EMV I & II, Visa, MasterCard & Amex).
SumUp iOS SDK is provided as an Objective C binary. However, when you use the SDK in Swift projects, Xcode uses automatic bridging to generate Swift-friendly interfaces from the Objective-C headers. For that reason, code samples in this guide are provided both in Swift and Objective C.
The iOS SDK includes a [Sample App](https://github.com/sumup/sumup-ios-sdk/tree/master/SampleApp/SumUpSDKSampleApp), which you can run out-of-the-box to immediately test the implementation in practice.
## Prerequisites
* Registered for a merchant account via SumUp's [country websites](https://sumup.com/) or use a [sandbox merchant account](/terminal-payments/quickstart/#sandbox-merchant-account).
* Received SumUp card terminal: Solo Lite, Solo, Air, 3G, PIN+.
* Requested an Affiliate (Access) Key in the [Developer Settings](https://me.sumup.com/settings/developer) of the SumUp Dashboard.
* Xcode 26.2 or later.
* Deployment Target iOS 16.0 or later.
* iPhone or iPad.
* If your device is managed by an organization, make sure app installation is permitted.
## Sandbox Merchant Account
Use the shared [Quickstart sandbox setup](/terminal-payments/quickstart/#sandbox-merchant-account) to create and test with a sandbox merchant account before integrating the iOS SDK.
### Compatibility
* The SDK supports all device orientations on iPad and portrait on iPhone. Feel free to support other orientations on iPhone but please keep in mind that the SDK's UI will be presented in portrait on iPhone. See `UISupportedInterfaceOrientations` in the sample app's `Info.plist` or the "General" tab in Xcode's Target Editor.
### Match Affiliate Key to App Bundle ID
iOS SDK uses the Affiliate Key from your merchant account to authenticate your app.
1. Log in to SumUp with your merchant account and open the [Developer Settings](https://me.sumup.com/settings/developer) page.
2. Create an Affiliate Key if you don't have one yet.
3. Add your app's _Bundle ID_ in the SumUp portal's _Application ID_ field. This way, your app will be able to call SumUp APIs, which require the Affiliate Key.
### Add Property List Keys to Project
The SumUp iOS SDK requires access to the user's location and Bluetooth peripherals. If your app has not asked for the user's permission, the SumUp iOS SDK will ask at the time of the first login or checkout attempt.
Please add the following keys to your `info.plist` file and set some values:
```txt
NSLocationWhenInUseUsageDescription
NSBluetoothAlwaysUsageDescription
```
Check the [Sample App property list](https://github.com/sumup/sumup-ios-sdk/tree/master/SampleApp/SumUpSDKSampleApp/SumUpSDKSampleApp-Info.plist) for reference.
### Location Services Requirement
## Fast-Track Implementation
If you want to dive straight into implementation, carry out the following steps:
### Card Reader Flow
1. [Install the SDK](#adding-sdk-framework-to-project).
2. [Import the SDK into your project file](#importing-sdk).
3. [Initialize the SDK with an Affiliate Key](#initialization).
4. [Log the user in](#logging-the-user-in).
5. [Prepare user's device for checkout](#prepare-for-checkout).
6. [Allow the user to select a card reader](#present-card-reader-settings).
7. Finally, [implement the full checkout](#implement-full-checkout).
### Tap-to-Pay Flow
Please consider the following when building Tap-to-Pay solutions, as Apple reviews them with high scrutiny:
* Follow the [Human Interface Guidelines](https://developer.apple.com/design/human-interface-guidelines/tap-to-pay-on-iphone) to save time when Apple reviews your app.
* Also consider [Apple’s marketing guidelines](https://developer.apple.com/tap-to-pay/marketing-guidelines/) and use standard assets where possible.
1. [Install the SDK](#adding-sdk-framework-to-project).
2. [Import the SDK into your project file](#importing-sdk).
3. [Initialize the SDK with an Affiliate Key](#initialization).
4. [Log the user in](#logging-the-user-in).
5. Follow steps under [Implementing Tap-to-Pay](#implementing-tap-to-pay).
## Integrating iOS SDK
### Adding SDK Framework to Project
The SumUp iOS SDK is provided as an XCFramework `SumUpSDK.xcframework` that contains
the headers and bundles containing resources such as images and localizations. You can add the SDK binary manually or use a package manager such as Swift Package Manager or Cocoapods.
Please follow the relevant instructions below to prepare your project:
The latest Swift Package Manager version added support to [distribute binary frameworks as Swift Packages](https://developer.apple.com/documentation/xcode/distributing-binary-frameworks-as-swift-packages).
Follow this workaround to manage SumUp iOS SDK versions via Swift PM in those cases:
1. Add the package dependency to the repository `https://github.com/sumup/sumup-ios-sdk` (*File > Swift Packages > Add Package Dependency...*) with the version `Up to Next Major: 7.1.0`
2. Leave the checkbox unchecked for the SumUpSDK at the integration popup (*Add Package to ...:*)
3. From the Project Navigator, drag and drop the `SumUpSDK/Referenced Binaries/SumUpSDK.xcframework` to your Xcode project's "Frameworks, Libraries, and Embedded Content" on the General settings tab.
4. Make sure the [required Info.plist keys](#add-property-list-keys-to-project) are present.
To learn more about adding Swift Package dependencies, please refer to the [official documentation](https://developer.apple.com/documentation/xcode/adding-package-dependencies-to-your-app).
1. Drag and drop the `SumUpSDK.xcframework` to your Xcode project's "Frameworks,
Libraries, and Embedded Content" on the project General Settings tab.
2. Make sure the [required Info.plist keys](#add-property-list-keys-to-project) are present.
```ruby
target '' do
pod 'SumUpSDK', '~> 7.1.0'
end
```
### Importing SDK
To import the SDK in Objective-C source files, you can use `#import `. If module
support is enabled in your project, you can use `@import SumUpSDK;` instead.
In Swift, use `import SumUpSDK`. You do not have to add any headers to your bridging header.
### Initialization
Before calling any additional feature of the SumUp iOS SDK, you are required to set up the SDK with your Affiliate Key. Call on the main thread. You may wish to defer calling `setupWithAffiliateKey:` until after app launch, as it requests the user's location permission.
```swift
import SumUpSDK
import UIKit
@main
class AppDelegate: UIResponder, UIApplicationDelegate {
var window: UIWindow?
func application(_ application: UIApplication, didFinishLaunchingWithOptions launchOptions: [UIApplication.LaunchOptionsKey: Any]?) -> Bool {
/*
* This will setup the SumUpSDK.
*
* You might consider moving this to a later point in your application's lifecycle,
* as this will start updating for locations.
*
* Also remember to provide the necessary usage descriptions in your info.plist
* and to properly localize it, see the
* Add Property List Keys to Project section.
*
* Ensure to add the Bundle Identifier of your iOS app to your
* Affiliate Key's Application identifiers in the SumUp developer portal.
*/
SumUpSDK.setup(affiliateKey: "sup_afk_abcqwerty")
return true
}
}
```
```objc
#import "SUSAppDelegate.h"
#import
@implementation SUSAppDelegate
- (BOOL)application:(UIApplication *)application didFinishLaunchingWithOptions:(NSDictionary *)launchOptions {
/*
* This will setup the SumUpSDK.
*
* You might consider moving this to a later point in your application's lifecycle,
* as this will start updating for locations.
*
* Also remember to provide the necessary usage descriptions in your info.plist
* and to properly localize it, see the
* Add Property List Keys to Project section.
*
* Ensure to add the Bundle Identifier of your iOS app to your
* Affiliate Key's Application identifiers in the SumUp developer portal.
*/
[SMPSumUpSDK setupWithAffiliateKey:@"sup_afk_abcqwerty"];
return YES;
}
```
### Authentication - Component Definitions
SumUp iOS SDK supports either the OAuth 2.0 Authorization Code Flow login with Access Token or a modally presented login from a View Controller (as you can see implemented in the Sample App). We strongly recommend the OAuth 2.0 approach for new integrations, due to support for MFA, better overall security, and possible deprecation of the View Controller in the future.
```objc
/**
* Logs in a merchant with an access token acquired via /tools/authorization/oauth/.
* You must implement the "Authorization code flow", the "Client credentials flow" is not supported.
* Make sure that no user is logged in already when calling this method.
*
* @param aToken a user-scoped access token
* @param block a completion block that will run after login has succeeded/failed
*/
+ (void)loginWithToken:(NSString *)aToken completion:(nullable SMPCompletionBlock)block;
```
```objc
/**
* Presents the login modally from the given view controller.
*
* The login is automatically dismissed if login was successful or cancelled by the user.
* If error is nil and success is NO, the user cancelled the login.
* Errors are handled internally and usually do not need any display to the user.
* Does nothing if merchant is already logged in (calls completion block with success=NO, error=nil).
*
* @param fromViewController The UIViewController instance from which the login should be presented modally.
* @param animated Pass YES to animate the transition.
* @param block The completion block is called after each login attempt.
*/
+ (void)presentLoginFromViewController:(UIViewController *)fromViewController
animated:(BOOL)animated
completionBlock:(nullable SMPCompletionBlock)block;
```
```objc
/**
* Performs a logout of the current merchant and resets the remembered password.
*
* @param block The completion block is called once the logout has finished.
*/
+ (void)logoutWithCompletionBlock:(nullable SMPCompletionBlock)block;
```
### Implementing Authentication with OAuth 2.0
SumUp can issue Access Tokens in accordance with the OAuth 2.0 Authorization Code Flow, which is our recommended authorization approach (Client Credentials Flow is not supported by this SDK). See the [Authorization Documentation](/tools/authorization/oauth/#authorization-code-flow) for more details.
### Implementing Authentication with View Controller
If you want to use the View Controller embedded in the SDK, this section explains how to do it. Please note that OAuth 2.0 Authorization Code Flow is supported and recommended, and the View Controller may become deprecated in the future.
#### Logging the User In
Following app authentication, a registered SumUp merchant account needs to be logged in. Present a login screen from your UIViewController:
```swift
private func presentLogin() {
// present login UI and wait for completion block to update button states
SumUpSDK.presentLogin(from: self, animated: true) { [weak self] (success: Bool, error: Error?) in
print("Did present login with success: \(success). Error: \(String(describing: error))")
guard error == nil else {
// errors are handled within the SDK, there should be no need
// for your app to display any error message
return
}
self?.updateCurrency()
self?.updateButtonStates()
}
}
```
```objc
- (IBAction)buttonLoginTapped:(id)sender {
[SMPSumUpSDK presentLoginFromViewController:self
animated:YES
completionBlock:^(BOOL success, NSError *error) {
if (error) {
// errors are handled within the SDK, there should be no need
// for your app to display any error message
}
[self updateButtonState];
}];
}
```
#### Logging the User Out
Similarly, you can log the user out.
```swift
fileprivate func requestLogout() {
SumUpSDK.logout { [weak self] (success: Bool, error: Error?) in
print("Did log out with success: \(success). Error: \(String(describing: error))")
self?.updateButtonStates()
}
}
```
```objc
- (IBAction)buttonLogoutTapped:(id)sender {
[SMPSumUpSDK logoutWithCompletionBlock:^(BOOL success, NSError *error) {
[self updateButtonState];
}];
}
```
### Payment Checkout Definitions
* In order to prepare a SumUp card terminal for checkout, `prepareForCheckout` can be called in advance. A registered SumUp merchant account needs to be logged in, and the card terminal must already be setup.
You should use this method to let the SDK know that the user is most
likely starting a checkout attempt soon; for example when entering an amount or adding products to a shopping cart. This allows the SDK to take appropriate measures, like attempting to wake a connected card terminal.
* When logged in you can let merchants check and update their card reader settings. Merchants can select their preferred card terminal and set up a
new one if needed. The preferences available to a merchant depend on their
respective account settings.
* Present Checkout View is the main checkout request definition.
Check these methods and included comments before moving on to implementation below.
```objc
/**
* Can be called in advance when a checkout is imminent and a user is logged in.
* You should use this method to let the SDK know that the user is most likely starting a
* checkout attempt soon, e.g. when entering an amount or adding products to a shopping cart.
* This allows the SDK to take appropriate measures, like attempting to wake a connected card terminal.
*/
+ (void)prepareForCheckout;
/**
* Call in advance when you know that checkout will occur for the logged-in user.
*
* Functionally the same as prepareForCheckout.
* This version provides the option of supplying a SMPCompletionBlock where you can
* dismiss custom UI, check the reader status or perform a checkout.
*
* @param block The block is called at the end of the preparation after asking the reader to wake.
*/
+ (void)prepareForCheckout:(nullable SMPCompletionBlock)block;
```
```objc
/**
* Presenting card reader settings allows the current merchant to switch to a different
* card reader, view general information about the current card reader, and connect to it.
* Can only be called when a merchant is logged in and checkout is not in progress.
* The completion block will be executed once the screen has been dismissed.
* If not successful an error will be provided, see SMPSumUpSDKError.
*
* @param fromViewController The UIViewController instance from which the checkout should be presented modally.
* @param animated Pass YES to animate the transition.
* @param block The completion block is called after the view controller has been dismissed.
*/
+ (void)presentCardReaderSettingsFromViewController:(UIViewController *)fromViewController
animated:(BOOL)animated
completion:(nullable SMPCompletionBlock)block;
```
```objc
/**
* Presents a checkout view with all necessary steps to charge a customer.
*
* @param request The SMPCheckoutRequest encapsulates all transaction relevant data such as total amount, label, etc.
* @param controller The UIViewController instance from which the checkout should be presented modally.
* @param block The completion block will be called when the view will be dismissed.
*/
+ (void)checkoutWithRequest:(SMPCheckoutRequest *)request
fromViewController:(UIViewController *)controller
completion:(nullable SMPCheckoutCompletionBlock)block;
```
### Adding Payment Checkout View
In this step, we implement the payment checkout.
#### Prepare for Checkout
```objc
- (BOOL)textFieldShouldReturn:(UITextField *)textField {
if (textField == self.textFieldTotal) {
// we assume a checkout is imminent
// let the SDK know to e.g. wake a connected terminal
[SMPSumUpSDK prepareForCheckout];
[self.textFieldTitle becomeFirstResponder];
} else if ([SMPSumUpSDK isLoggedIn]) {
[self buttonChargeTapped:nil];
} else {
[textField resignFirstResponder];
}
return YES;
}
```
```swift
extension ViewController: UITextFieldDelegate {
func textFieldShouldReturn(_ textField: UITextField) -> Bool {
if textField == textFieldTotal {
// we assume a checkout is imminent
// let the SDK know to e.g. wake a connected terminal
SumUpSDK.prepareForCheckout()
textFieldTitle?.becomeFirstResponder()
} else if SumUpSDK.isLoggedIn {
requestCheckout()
} else {
textField.resignFirstResponder()
}
return true
}
}
```
A variant of `prepareForCheckout` accepts a completion block, called after the SDK has asked the reader to wake. Use it to check reader status or proceed straight to checkout:
```swift
SumUpSDK.prepareForCheckout { (success: Bool, error: Error?) in
guard success, let status = SumUpSDK.lastReaderStatus, status.isActive else {
// reader did not wake — handle accordingly
return
}
// reader is active, proceed to checkout
}
```
```objc
[SMPSumUpSDK prepareForCheckout:^(BOOL success, NSError * _Nullable error) {
if (!success) {
// reader did not wake — handle accordingly
return;
}
SMPReaderStatus *status = SMPSumUpSDK.lastReaderStatus;
if (status.isActive) {
// reader is active, proceed to checkout
}
}];
```
#### Present Card Reader Settings
Provides the user a way to search for nearby Bluetooth card readers and select one to be used. The selected card reader will be saved to `UserDefaults` and used for subsequent checkouts. Using this screen is optional. If a checkout is started but no card reader has been saved, the checkout itself will automatically present the screen to search for and select a card reader, and this will be saved for next time.
```swift
private func presentCardReaderSettings() {
SumUpSDK.presentCardReaderSettings(from: self, animated: true) { [weak self] (success: Bool, presentationError: Error?) in
print("Did present checkout preferences with success: \(success). Error: \(String(describing: presentationError))")
guard let safeError = presentationError as NSError? else {
// no error, nothing else to do
return
}
print("error presenting checkout preferences: \(safeError)")
let errorMessage: String
switch (safeError.domain, safeError.code) {
case (SumUpSDKErrorDomain, SumUpSDKError.accountNotLoggedIn.rawValue):
errorMessage = "not logged in"
case (SumUpSDKErrorDomain, SumUpSDKError.checkoutInProgress.rawValue):
errorMessage = "checkout is in progress"
default:
errorMessage = "general error"
}
self?.showResult(string: errorMessage)
}
}
```
```objc
- (IBAction)buttonOpenPreferencesTapped:(id)sender {
[SMPSumUpSDK presentCardReaderSettingsFromViewController:self
animated:YES
completion:^(BOOL success, NSError *_Nullable error) {
if (!success || error) {
[self showResultsString:@"not logged in"];
}
}];
}
```
#### Reader Status
The `lastReaderStatus` class property returns the most recently reported information about a saved or connected card reader. It returns `nil` if the merchant is not logged in or no reader has been connected and saved.
The returned `SMPReaderStatus` object exposes:
- `batteryLevel` — last reported battery level (updated during pairing or transaction processing; freshness varies with reader usage).
- `serialNumber` — the serial number printed on the back of the physical reader.
- `readerType` — the reader model (`SMPReaderType` / `ReaderType`): Air, Air Lite, 3G, Solo, Solo Lite.
- `isActive` — `YES` when the reader is currently active or becoming active (e.g. after calling `prepareForCheckout:`). Returns `NO` if no reader has been connected or the saved reader is currently disconnected.
```swift
if let status = SumUpSDK.lastReaderStatus {
print("Reader: \(status.serialNumber), active: \(status.isActive), battery: \(status.batteryLevel)%")
}
```
```objc
SMPReaderStatus *status = SMPSumUpSDK.lastReaderStatus;
if (status) {
NSLog(@"Reader: %@, active: %d, battery: %lu%%", status.serialNumber, status.isActive, (unsigned long)status.batteryLevel);
}
```
#### Present Checkout View
Prepare a checkout request that encapsulates the information regarding the transaction.
```swift
SumUpSDK.checkout(with: request, from: self) { [weak self] (result: CheckoutResult?, error: Error?) in
if let safeError = error as NSError? {
print("error during checkout: \(safeError)")
if (safeError.domain == SumUpSDKErrorDomain) && (safeError.code == SumUpSDKError.accountNotLoggedIn.rawValue) {
self?.showResult(string: "not logged in")
} else {
self?.showResult(string: "general error")
}
return
}
```
```objc
[SMPSumUpSDK checkoutWithRequest:request fromViewController:self completion:^(SMPCheckoutResult *result, NSError *error) {
if ([error.domain isEqualToString:SMPSumUpSDKErrorDomain] && (error.code == SMPSumUpSDKErrorAccountNotLoggedIn)) {
[self showResultsString:@"not logged in"];
return;
}
```
```objc
NS_SWIFT_NAME(SumUpSDKErrorDomain)
extern NSString * const SMPSumUpSDKErrorDomain;
/**
* The error codes returned from the SDK
*/
typedef NS_ENUM(NSInteger, SMPSumUpSDKError) {
/// General error
SMPSumUpSDKErrorGeneral = 0,
/// The merchant's account is not activated
SMPSumUpSDKErrorActivationNeeded = 1,
/// General error with the merchant's account
SMPSumUpSDKErrorAccountGeneral = 20,
/// The merchant is not logged in to their account
SMPSumUpSDKErrorAccountNotLoggedIn = 21,
/// A merchant is logged in already. Call logout before logging in again.
SMPSumUpSDKErrorAccountIsLoggedIn = 22,
/// General checkout error
SMPSumUpSDKErrorCheckoutGeneral = 50,
/// Another checkout process is currently in progress.
SMPSumUpSDKErrorCheckoutInProgress = 51,
/// The currency code specified in the checkout request does not match that of the current merchant.
SMPSumUpSDKErrorCheckoutCurrencyCodeMismatch = 52,
/// The foreign transaction ID specified in the checkout request has already been used.
SMPSumUpSDKErrorDuplicateForeignID = 53,
/// The access token is invalid. Login to get a valid access token.
SMPSumUpSDKErrorInvalidAccessToken = 54,
/// The amount entered contains invalid number of decimals.
SMPSumUpSDKErrorInvalidAmountDecimals = 55,
/// The processAs property of CheckoutRequest is not valid
SMPSumUpSDKErrorInvalidProcessAs = 56,
/// The numberOfInstallments property of CheckoutRequest is not valid
SMPSumUpSDKErrorInvalidNumberOfInstallments = 57,
/// Reader wake error during Prepare for Checkout process.
/// Includes when a reader has never been paired.
SMPSumUpSDKErrorPrepareCheckoutReaderWakeFailed = 60,
/// Tap to Pay on iPhone payment method is not available for the current merchant. This may be
/// because the payment method is not available in their country.
SMPSumUpSDKErrorTapToPayNotAvailable = 100,
/// Tap to Pay on iPhone: activation is required. Call `presentTapToPayActivationFromViewController:animated:completionBlock:`.
SMPSumUpSDKErrorTapToPayActivationNeeded = 101,
/// Tap to Pay on iPhone: an unspecified error occurred
SMPSumUpSDKErrorTapToPayInternalError = 102,
/// Tap to Pay on iPhone requires an iPhone XS or later and does not work on iPads.
SMPSumUpSDKErrorTapToPayMinHardwareNotMet = 103,
/// Tap to Pay on iPhone requires a newer version of iOS; please check the documentation for the
/// minimum supported version.
SMPSumUpSDKErrorTapToPayiOSVersionTooOld = 104,
/// Tap to Pay on iPhone has some other (unspecified) requirement(s) that are not met.
SMPSumUpSDKErrorTapToPayRequirementsNotMet = 105,
} NS_SWIFT_NAME(SumUpSDKError);
```
```swift
public enum SumUpSDKError : Int, @unchecked Sendable {
/// General error
case general = 0
/// The merchant's account is not activated
case activationNeeded = 1
/// General error with the merchant's account
case accountGeneral = 20
/// The merchant is not logged in to their account
case accountNotLoggedIn = 21
/// A merchant is logged in already. Call logout before logging in again.
case accountIsLoggedIn = 22
/// General checkout error
case checkoutGeneral = 50
/// Another checkout process is currently in progress.
case checkoutInProgress = 51
/// The currency code specified in the checkout request does not match that of the current merchant.
case checkoutCurrencyCodeMismatch = 52
/// The foreign transaction ID specified in the checkout request has already been used.
case duplicateForeignID = 53
/// The access token is invalid. Login to get a valid access token.
case invalidAccessToken = 54
/// The amount entered contains invalid number of decimals.
case invalidAmountDecimals = 55
/// The processAs property of CheckoutRequest is not valid
case invalidProcessAs = 56
/// The numberOfInstallments property of CheckoutRequest is not valid
case invalidNumberOfInstallments = 57
/// Reader wake error during Prepare for Checkout process.
/// Includes when a reader has never been paired.
case prepareCheckoutReaderWakeFailed = 60
/// Tap to Pay on iPhone payment method is not available for the current merchant. This may be
/// because the payment method is not available in their country.
case tapToPayNotAvailable = 100
/// Tap to Pay on iPhone: activation is required. Call `presentTapToPayActivationFromViewController:animated:completionBlock:`.
case tapToPayActivationNeeded = 101
/// Tap to Pay on iPhone: an unspecified error occurred
case tapToPayInternalError = 102
/// Tap to Pay on iPhone requires an iPhone XS or later and does not work on iPads.
case tapToPayMinHardwareNotMet = 103
/// Tap to Pay on iPhone requires a newer version of iOS; please check the documentation for the
/// minimum supported version.
case tapToPayiOSVersionTooOld = 104
/// Tap to Pay on iPhone has some other (unspecified) requirement(s) that are not met.
case tapToPayRequirementsNotMet = 105
}
```
### Handling Payment Checkout
Detailed information on the payment checkout.
#### Note on Tipping
There are three modes for tipping:
1. No tipping. Leave `tipAmount` set to nil when creating the `SMPCheckoutRequest` object.
2. Programmatic tipping via the `tipAmount` property. Ask the user in your own UI for an appropriate tip amount and then set the `tipAmount` property on `SMPCheckoutRequest`. This will be added to the total amount, but will be displayed to the user separately during checkout.
3. Tip on Card Reader. TCR prompts the customer directly on the card reader's display for a tip amount, rather than prompting for a tip amount on the iPhone or iPad display.
#### Definitions
You have an option to add the `paymentMethod` to checkout request, or skip it and let it default to Card Reader payment, as shown in the examples below. You can also familiarize yourself with the payment properties before moving on to implementation.
```objc
/**
* Creates a new checkout request.
*
* Be careful when creating the NSDecimalNumber to not falsely use the NSNumber class creator methods.
*
* @param totalAmount The total amount to be charged to a customer. Cannot be nil.
* @param title An optional title to be displayed in the merchant's history and on customer receipts.
* @param currencyCode Currency Code in which the total should be charged (ISO 4217 code, see SMPCurrencyCode). Cannot be nil, has to match the currency of the merchant logged in. Use [[[SMPSumUpSDK currentMerchant] currencyCode] and ensure its length is not 0.
*
* @return A new request object or nil if totalAmount or currencyCode are nil.
*/
+ (SMPCheckoutRequest *)requestWithTotal:(NSDecimalNumber *)totalAmount
title:(nullable NSString *)title
currencyCode:(NSString *)currencyCode
paymentMethod:(SMPPaymentMethod)paymentMethod;
```
```objc
/**
* Creates a new checkout request using a card reader as the method of payment.
*
* Be careful when creating the NSDecimalNumber to not falsely use the NSNumber class creator methods.
*
* @param totalAmount The total amount to be charged to a customer. Cannot be nil.
* @param title An optional title to be displayed in the merchant's history and on customer receipts.
* @param currencyCode Currency Code in which the total should be charged (ISO 4217 code, see SMPCurrencyCode). Cannot be nil, has to match the currency of the merchant logged in. Use [[[SMPSumUpSDK currentMerchant] currencyCode] and ensure its length is not 0.
*
* @return A new request object or nil if totalAmount or currencyCode are nil.
*/
+ (SMPCheckoutRequest *)requestWithTotal:(NSDecimalNumber *)totalAmount
title:(nullable NSString *)title
currencyCode:(NSString *)currencyCode;
```
```objc
/**
* The total amount to be charged to a customer.
*/
@property (nonatomic, strong, readonly, nullable) NSDecimalNumber *totalAmount;
/// A title to be displayed in the merchant's history and on customer receipts.
@property (nonatomic, strong, readonly, nullable) NSString *title;
/**
* Currency code in which the total should be charged (ISO 4217 code, see SMPCurrencyCode).
*/
@property (nonatomic, strong, readonly, nullable) NSString *currencyCode;
/**
* An (optional) ID to be associated with this transaction.
* See:
* https://docs.sumup.com/rest-api/#tag/Transactions
*
* on how to retrieve a transaction using this ID.
*
* This ID has to be unique in the scope of a SumUp merchant account and its sub-accounts.
* It must not be longer than 128 characters and can only contain printable ASCII characters.
*/
@property (nonatomic, copy, nullable) NSString *foreignTransactionID;
/**
* An optional additional tip amount to be charged to a customer.
*
* @note This property will be ignored if the connected card reader supports the
* Tip-on-Card Reader (TCR) feature and if it is enabled by setting tipOnCardReaderIfAvailable to
* YES.
*
* Important: The customer may use a reader that does not support TCR. You must handle this
* case yourself in order to avoid no tip from being prompted.
*
* To do this:
*
* Before calling SMPSumUpSDK checkoutWithRequest:fromViewController:completion:,
* check SMPSumUpSDK.isTipOnCardReaderAvailable:
*
* - If NO, you should prompt the user for a tip amount yourself and set tipAmount
* - If YES, you may set tipOnCardReaderIfAvailable to YES.
* Do not prompt the user for a tip amount or set tipAmount if you do this.
*
* Will be added to the totalAmount. Must be greater than zero if set.
*/
@property (nonatomic, copy, nullable) NSDecimalNumber *tipAmount;
/**
* Optional list of suggested tip percentages shown during checkout.
*
* Values are interpreted as whole-number percentages, for example, 15.33 is treated as 15%.
* Negative values are also ignored.
*
* The SDK evaluates only the first 3 elements provided in the array. Within this subset, any
* values that are duplicates or fall outside the 1-100 range are ignored.
*
* If the property is not set, or if the processed subset contains no valid values, the SDK reverts
* to the default suggestions: 10%, 15%, 20%.
*
* Note: Valid values are automatically displayed in ascending order.
*
* The "No Tip" option is always shown and is not part of this list.
*
* In Tip-on-Card Reader (TCR) mode, fewer than 3 values may be displayed
* depending on hardware support.
*/
@property (nonatomic, copy, nullable) NSArray *customTipRates;
/**
* Enables Tip-on-Card Reader (TCR), if the feature is available.
*
* @note TCR prompts the customer directly on the card reader's display for a tip amount, rather
* than prompting for a tip amount on the iPhone or iPad display.
*
* Not all card readers support this feature. To find out if the feature is supported for the last-used
* card reader, check SMPSumUpSDK.isTipOnCardReaderAvailable.
*
* Setting this property to YES when the feature is not available will do nothing.
*/
@property (nonatomic, assign) BOOL tipOnCardReaderIfAvailable;
/**
* An optional count for the display of the number of sale items throughout the checkout process.
*
* Default is zero which will hide the display of the item count.
*
* This value is currently not reflected in the merchant's history or the customer receipts.
*/
@property (nonatomic, assign) NSUInteger saleItemsCount;
/**
* An optional flag to skip the confirmation screen in checkout.
* If set, the checkout will be dismissed w/o user interaction.
*
* Default is SMPSkipScreenOptionNone.
*/
@property (nonatomic, assign) SMPSkipScreenOptions skipScreenOptions;
/**
* The method of payment to use during checkout; for example, a bluetooth-connected card
* reader, or Tap to Pay on iPhone.
*
* Defaults to `SMPPaymentMethodCardReader`.
*/
@property (nonatomic, assign) SMPPaymentMethod paymentMethod;
/**
* Some cards contain multiple applications. Use `processAs` to allow the customer to
* control which application is used to process the transaction, e.g. credit or debit.
*
* To do this, display a UI that asks the user to select either Credit or Debit.
* If they choose Credit, there should also be a way for them to enter the number of
* installments, which you should assign to `numberOfInstallments`
*
* Warning: The transaction will fail if `isProcessAsRequired` on `SMPSumUpSDK` is `YES` but `processAs` is
* `SMPProcessAsNotSet`.
*
* Defaults to `SMPProcessAsNotSet`.
*/
@property (nonatomic, assign) SMPProcessAs processAs;
/**
* Some markets allow the customer to pay in installments. Ignored unless `processAs` is set to `SMPProcessAsCredit`.
*/
@property (nonatomic, assign) NSInteger numberOfInstallments;
/**
* Automatically close the checkout if the user stops on the Send Receipt screen without manually dismissing it.
* This can be useful for kiosk environments where users might walk away without manually closing the Send Receipt screen.
*
* If the user starts entering a phone number or email address on the Send Receipt screen, this duration will automatically
* increase to 60 seconds after the last edit is made.
*
* If set to 0.0, the Send Receipt screen remains on-screen forever or until the user dismisses it.
*/
@property (nonatomic, assign) NSTimeInterval successScreenTimeout;
```
#### Implement Full Checkout
In this step, we implement the checkout.
1. Verify that Merchant is logged in and using a valid currency code.
2. Define total amount to be charged. Please note that you need to pass an `NSDecimalNumber` as the total value. While `NSDecimalNumber` is a subclass of `NSNumber` it is not advised to use the convenience method of `NSNumber` to create an `NSDecimalNumber`.
3. Set up the request.
4. Add a tip if selected ([see the section about tipping](#note-on-tipping)).
5. Check if the option to skip receipt is enabled, if so, execute it.
6. Check for `foreignTransactionID`.
7. Execute the request with error handling and confirmation.
8. Verify that the checkout started correctly.
```swift
fileprivate func requestCheckout() {
// ensure that we have a valid merchant
guard let merchantCurrencyCode = SumUpSDK.currentMerchant?.currencyCode else {
showResult(string: "not logged in")
return
}
guard let totalText = textFieldTotal?.text else {
return
}
// create an NSDecimalNumber from the totalText
// please be aware to not use NSDecimalNumber initializers inherited from NSNumber
let total = NSDecimalNumber(string: totalText)
guard total != NSDecimalNumber.zero else {
return
}
// setup payment request
let request = CheckoutRequest(total: total,
title: textFieldTitle?.text,
currencyCode: merchantCurrencyCode)
// add tip if selected
if let selectedTip = segmentedControlTipping?.selectedSegmentIndex,
selectedTip > 0,
tipAmounts.indices ~= selectedTip {
let tipAmount = tipAmounts[selectedTip]
request.tipAmount = tipAmount
}
// set screenOptions to skip if switch is set to on
if let skip = switchSkipReceiptScreen?.isOn, skip {
request.skipScreenOptions = .success
}
// the foreignTransactionID is an **optional** parameter and can be used
// to retrieve a transaction from SumUp's API. See -[SMPCheckoutRequest foreignTransactionID]
request.foreignTransactionID = "your-unique-identifier-\(ProcessInfo.processInfo.globallyUniqueString)"
SumUpSDK.checkout(with: request, from: self) { [weak self] (result: CheckoutResult?, error: Error?) in
if let safeError = error as NSError? {
print("error during checkout: \(safeError)")
if (safeError.domain == SumUpSDKErrorDomain) && (safeError.code == SumUpSDKError.accountNotLoggedIn.rawValue) {
self?.showResult(string: "not logged in")
} else {
self?.showResult(string: "general error")
}
return
}
guard let safeResult = result else {
print("no error and no result should not happen")
return
}
print("result_transaction==\(String(describing: safeResult.transactionCode))")
if safeResult.success {
print("success")
var message = "Thank you - \(String(describing: safeResult.transactionCode))"
if let info = safeResult.additionalInfo,
let tipAmount = info["tip_amount"] as? Double, tipAmount > 0,
let currencyCode = info["currency"] as? String {
message = message.appending("\ntip: \(tipAmount) \(currencyCode)")
}
self?.showResult(string: message)
} else {
print("cancelled: no error, no success")
self?.showResult(string: "No charge (cancelled)")
}
}
// after the checkout is initiated we expect a checkout to be in progress
if !SumUpSDK.checkoutInProgress {
// something went wrong: checkout was not started
showResult(string: "failed to start checkout")
}
}
```
```objc
- (IBAction)buttonChargeTapped:(id)sender {
// check total and currency code
NSString *total = [[self textFieldTotal] text];
NSString *currencyCode = [[SMPSumUpSDK currentMerchant] currencyCode];
if (([total doubleValue] <= 0) || ![currencyCode length]) {
[self showResultsString:@"not logged in"];
return;
}
SMPCheckoutRequest *request;
request = [SMPCheckoutRequest requestWithTotal:[NSDecimalNumber decimalNumberWithString:total]
title:self.textFieldTitle.text
currencyCode:currencyCode];
// Tip is optional. Default is no tip.
NSInteger selectedTipSegment = self.segmentedControlTipping.selectedSegmentIndex;
if (selectedTipSegment > 0) {
[request setTipAmount:[[self tipAmounts] objectAtIndex:selectedTipSegment]];
}
// Skip receipt screen if toggle is set to on
if (self.switchSkipReceiptScreen.isOn) {
[request setSkipScreenOptions:SMPSkipScreenOptionSuccess];
}
// the foreignTransactionID is an optional parameter and can be used
// to retrieve a transaction from SumUp's API. See -[SMPCheckoutRequest foreignTransactionID]
[request setForeignTransactionID:[NSString stringWithFormat:@"your-unique-identifier-%@", [[NSProcessInfo processInfo] globallyUniqueString]]];
[SMPSumUpSDK checkoutWithRequest:request fromViewController:self completion:^(SMPCheckoutResult *result, NSError *error) {
if ([error.domain isEqualToString:SMPSumUpSDKErrorDomain] && (error.code == SMPSumUpSDKErrorAccountNotLoggedIn)) {
[self showResultsString:@"not logged in"];
return;
}
NSMutableArray *strings = [NSMutableArray array];
[strings addObject:[NSString stringWithFormat:@"%@ - %@", result.success ? @"Thank you" : @"No charge", result.transactionCode ? : @"no transaction"]];
if (result.transactionCode) {
// get optional tip amount
NSNumber *tipAmount = result.additionalInfo[@"tip_amount"];
// display tip only if greater than zero
if ([tipAmount isKindOfClass:[NSNumber class]] && (tipAmount.doubleValue > 0)) {
[strings addObject:[NSString stringWithFormat:@"%@ (incl. %@ tip) %@", result.additionalInfo[@"amount"], tipAmount, result.additionalInfo[@"currency"]]];
} else {
[strings addObject:[NSString stringWithFormat:@"%@ %@ (no tip)", result.additionalInfo[@"amount"], result.additionalInfo[@"currency"]]];
}
}
[self showResultsString:[strings componentsJoinedByString:@"\n"]];
if (result.success) {
[self.textFieldTitle setText:nil];
}
}];
// something went wrong checkout was not started
if (![SMPSumUpSDK checkoutInProgress]) {
[self showResultsString:@"failed to start checkout"];
}
}
```
### Credit/Debit Selection (processAs Property)
Some countries require the customer to select Credit or Debit at the beginning of the checkout.
This is because a payment card may contain multiple applications linked with different accounts, making it necessary for the customer to specify which application should be used to process the transaction.
For countries that do not require credit/debit selection, you can set the `processAs` property of `SMPCheckoutRequest` to `SMPProcessAsNotSet`.
To tell if the current country requires `processAs` to be set to a value other than `SMPProcessAsNotSet`, check `SMPSumUpSDK.isProcessAsRequired`.
If needed, your app should set the `processAs` property of `SMPCheckoutRequest` to `SMPProcessAsCredit` or `SMPProcessAsDebit` after showing its own UI that prompts the customer to select Credit or Debit.
SDK 6.0 and earlier presented two screens during the checkout that prompted the user to select Credit or Debit, and if Credit, to also choose the number of installments. This behavior was previously available via `SMPProcessAsPromptUser`.
#### Installments
When `SMPProcessAsCredit` is used, you should obtain the number of installments from the customer using your own UI. Assign the positive, non-zero value to `numberOfInstallments` on `SMPCheckoutRequest`.
### Implementing Tap-to-Pay
With Tap to Pay on iPhone merchants can accept contactless card payments on their iPhone without needing a card reader.
To add Tap to Pay on iPhone to your app:
* Request the Tap to Pay on iPhone entitlement from Apple, receive approval, and then add the `com.apple.developer.proximity-reader.payment.acceptance` entitlement to your app. [Setting up the entitlement](https://developer.apple.com/documentation/proximityreader/setting-up-the-entitlement-for-tap-to-pay-on-iphone?language=objc).
* This feature requires an iPhone XS or later, running iOS 16.4 (iOS 16.7 starting July 8th) or later (ideally 17.5 or later.) The feature does not work on iPad.
* For debugging and testing you will need to be logged into an iPhone with a non-Sandbox Apple ID. Using a Sandbox Apple ID requires both Apple and SumUp implementations to connect to their respective non-production (test) backends, which the SDK does not support.
* **During testing use a SumUp sandbox merchant account**, to avoid transactions going to the acquirer and transferring real money.
In your code:
* Make a call to check feature availability: is the Tap to Pay on iPhone payment method available for the current merchant?
* Trigger activation if needed. Activation sets up the iPhone to receive payments, shows the merchant how to use the feature, and links the SumUp account and Apple ID.
* Start the checkout.
#### Check Feature Availability
* Call `checkTapToPayAvailability` on `SMPSumUpSDK` to check the availability of the Tap to Pay on iPhone payment method. This call, which requires the SDK to be in a logged-in state, may internally perform one or more network calls.
* If the feature is not available, your app could, as an example, hide or disable a button or menu item representing the Tap to Pay on iPhone payment method.
* The feature is generally available when the following criteria are fulfilled:
* the iPhone model and iOS version requirements are met
* the user logs in with a SumUp account registered in one of the countries where SumUp supports Tap to Pay on iPhone (temporarily with exception of Brazil)
#### Perform Activation If Needed
* Activation must be completed before the first transaction can be performed. Activation means:
* the merchant links their Apple ID with their SumUp account
* the iPhone is prepared, which can take 45 seconds or longer
* This needs to be done once per merchant account, per device.
* In addition to determining feature availability, `checkTapToPayAvailability` also indicates whether Tap to Pay on iPhone has been activated yet for the current merchant.
* If it has not yet been activated then you should trigger activation by calling `presentTapToPayActivation` at a convenient time. Calling it more than once will still show the user education screens each time. Independently, the activation from the initial setup will remain valid.
#### Definitions
These methods handle Tap to Pay processing. Note that the SDK supports both Completion Block and async implementation.
```swift
/**
* Checks whether the Tap to Pay on iPhone payment method is available for the current merchant and whether or
* not it requires activation to be performed via a call to
* `presentTapToPayActivationFromViewController:animated:completionBlock:`.
*
* For the merchant to be able to use this payment method the following must be true:
*
* - The feature must be available in the merchant's country
*
* - It must be activated. This is where the merchant's Apple ID is linked with their SumUp account and the
* iPhone is prepared to work as a card reader. As this can take a minute or so the first time, the
* merchant is shown a UI that introduces them to the feature as it initializes in the background.
*
* The merchant must be logged in before you call this method.
*
* @param availability YES if the feature is available for the current merchant and it's OK to start activation.
* @param isActivated YES if activation has already been done for this device and merchant account
*/
open class func checkTapToPayAvailability(completion block: @escaping (Bool, Bool, (any Error)?) -> Void)
/**
* Checks whether the Tap to Pay on iPhone payment method is available for the current merchant and whether or
* not it requires activation to be performed via a call to
* `presentTapToPayActivationFromViewController:animated:completionBlock:`.
*
* For the merchant to be able to use this payment method the following must be true:
*
* - The feature must be available in the merchant's country
*
* - It must be activated. This is where the merchant's Apple ID is linked with their SumUp account and the
* iPhone is prepared to work as a card reader. As this can take a minute or so the first time, the
* merchant is shown a UI that introduces them to the feature as it initializes in the background.
*
* The merchant must be logged in before you call this method.
*
* @param availability YES if the feature is available for the current merchant and it's OK to start activation.
* @param isActivated YES if activation has already been done for this device and merchant account
*/
open class func checkTapToPayAvailability() async throws -> (Bool, Bool)
/**
* Performs activation for Tap to Pay on iPhone. This prepares the device, introduces the merchant to the
* feature and links their Apple ID to their SumUp account (which will require confirmation from the merchant.)
*
* Call `checkTapToPayAvailability:` before calling this method to find out if this payment method is available
* and if activation is needed.
*
* The merchant must be logged in before you call this method.
*
* Tap to Pay on iPhone requirements:
*
* - The hosting app must have the `com.apple.developer.proximity-reader.payment.acceptance`
* entitlement.
*
* - The merchant must have an iPhone XS or later with iOS 16.4 or later (iOS 17 or later recommended.)
* The feature does not work with iPads.
*
* @param fromViewController The UIViewController instance from which the UI should be presented modally.
* @param animated Pass YES to animate the transition.
* @param block The completion block is called after the view controller has been dismissed.
*/
open class func presentTapToPayActivation(from fromViewController: UIViewController, animated: Bool, completionBlock block: SMPCompletionBlock? = nil)
/**
* Performs activation for Tap to Pay on iPhone. This prepares the device, introduces the merchant to the
* feature and links their Apple ID to their SumUp account (which will require confirmation from the merchant.)
*
* Call `checkTapToPayAvailability:` before calling this method to find out if this payment method is available
* and if activation is needed.
*
* The merchant must be logged in before you call this method.
*
* Tap to Pay on iPhone requirements:
*
* - The hosting app must have the `com.apple.developer.proximity-reader.payment.acceptance`
* entitlement.
*
* - The merchant must have an iPhone XS or later with iOS 16.4 or later (iOS 17 or later recommended.)
* The feature does not work with iPads.
*
* @param fromViewController The UIViewController instance from which the UI should be presented modally.
* @param animated Pass YES to animate the transition.
* @param block The completion block is called after the view controller has been dismissed.
*/
open class func presentTapToPayActivation(from fromViewController: UIViewController, animated: Bool) async throws -> Bool
```
```objc
/**
* Checks whether the Tap to Pay on iPhone payment method is available for the current merchant and whether or
* not it requires activation to be performed via a call to
* `presentTapToPayActivationFromViewController:animated:completionBlock:`.
*
* For the merchant to be able to use this payment method the following must be true:
*
* - The feature must be available in the merchant's country
*
* - It must be activated. This is where the merchant's Apple ID is linked with their SumUp account and the
* iPhone is prepared to work as a card reader. As this can take a minute or so the first time, the
* merchant is shown a UI that introduces them to the feature as it initializes in the background.
*
* The merchant must be logged in before you call this method.
*
* @param availability YES if the feature is available for the current merchant and it's OK to start activation.
* @param isActivated YES if activation has already been done for this device and merchant account
*/
+ (void)checkTapToPayAvailability:(void (^ _Nonnull)(BOOL isAvailable, BOOL isActivated, NSError * _Nullable error))block NS_SWIFT_NAME(checkTapToPayAvailability(completion:));
/**
* Performs activation for Tap to Pay on iPhone. This prepares the device, introduces the merchant to the
* feature and links their Apple ID to their SumUp account (which will require confirmation from the merchant.)
*
* Call `checkTapToPayAvailability:` before calling this method to find out if this payment method is available
* and if activation is needed.
*ń
* The merchant must be logged in before you call this method.
*
* Tap to Pay on iPhone requirements:
*
* - The hosting app must have the `com.apple.developer.proximity-reader.payment.acceptance`
* entitlement.
*
* - The merchant must have an iPhone XS or later with iOS 16.4 or later (iOS 17 or later recommended.)
* The feature does not work with iPads.
*
* @param fromViewController The UIViewController instance from which the UI should be presented modally.
* @param animated Pass YES to animate the transition.
* @param block The completion block is called after the view controller has been dismissed.
*/
+ (void)presentTapToPayActivationFromViewController:(UIViewController *)fromViewController
animated:(BOOL)animated
completionBlock:(nullable SMPCompletionBlock)block;
```
#### Product Name
`tapToPayProductName` returns the localized "Tap To Pay on iPhone" string. It is localized in all languages supported by the SDK and exposed as a convenience for use in your app's UI — use it instead of hardcoding the product name, as Apple may update the branding.
```swift
let productName = SumUpSDK.tapToPayProductName()
// e.g. "Tap To Pay on iPhone"
```
```objc
NSString *productName = [SMPSumUpSDK tapToPayProductName];
// e.g. @"Tap To Pay on iPhone"
```
#### Implementation
```swift
SumUpSDK.checkTapToPayAvailability { isAvailable, isActivated, error in
if let error {
// An error occurred
return
}
if !isAvailable {
// Tap to Pay on iPhone is not available for the merchant
return
}
if !isActivated {
// Tap to Pay on iPhone needs activation - call presentTapToPayActivation
return
}
// The app is ready to take Tap to Pay on iPhone payments!
}
```
```objc
[SMPSumUpSDK checkTapToPayAvailability:^(BOOL isAvailable, BOOL isActivated, NSError * _Nullable error) {
if (error == nil) {
if (!isAvailable) {
// Tap to Pay on iPhone is not available for the merchant
return;
}
if (!isActivated) {
// Tap to Pay on iPhone needs activation - call presentTapToPayActivation
return;
}
// The app is ready to take Tap to Pay on iPhone payments!
} else {
// An error occurred
}
}];
```
### Testing Your Integration
In your debug setup you can call `+[SMPSumUpSDK testSDKIntegration]` or `SumUpSDK.testIntegration()` in Swift.
It will run various checks and print its findings to the console.
Please do not call it in your Release build.
## SDK Structure
The SDK uses Objective C header files, but XCode can also display its public types as Swift. The table below outlines the interfaces in the SDK and their purpose.
| Header (Swift alias) | Purpose |
| --- | --- |
| SMPSumUpSDK.h (SumUpSDK) | Includes methods and properties for handling authentication, initial SDK setup, presenting checkout view, and testing your integration. Bundles all other headers and serves as the main SDK interface. |
| SMPCheckoutRequest.h (CheckoutRequest) | Includes methods and properties handling checkout requests, such as amounts, currencies, and payment methods |
| SMPCheckoutResult.h (CheckoutResult) | Handles checkout result structure, including status and transaction code |
| SMPCurrencyCodes.h | Defines available currency codes |
| SMPMerchant.h (Merchant) | Describes a Merchant, including Merchant Code (identifier) and currency used by merchant |
| SMPReaderStatus.h | Reader information: battery level, serial number, model type, and active state |
| SMPReaderType.h (ReaderType) | Enumeration of card reader models: Pin Plus, 3G, Air, Solo, Solo Lite |
| SMPOfflineSessionDetails.h | Offline session state: remaining time, transaction counts, total approved amount |
| SMPSkipScreenOptions.h (SkipScreenOptions) | Describes options allowing to skip transaction confirmation screen |
| SumUpSDK.h | Declares project version |
## Sample App
A [sample app](https://github.com/sumup/sumup-ios-sdk/tree/master/SampleApp) is provided in the SDK repository. It demonstrates SDK setup, login, checkout, and card reader settings in a minimal Swift project.
To run it, clone the [repository](https://github.com/sumup/sumup-ios-sdk) and open `SampleApp/SumUpSDKSampleApp.xcodeproj` in Xcode.
## Known Issues
* In Tap-to-Pay solutions, if entitlements are not correctly set up in your app, `presentTapToPayActivation` may show an error Alert with `Failed to show Terms of Service`.
* Businesses using SumUp sub-accounts must first activate the feature on their main account before using it on devices logged in with sub-accounts, otherwise an error message will appear during activation for the sub-account user.
## Community
Got questions or found a bug? Get in contact with our integration team through the [contact form](/contact).
## Out of Scope
The following functions are handled by the [SumUp APIs](/api/):
* [Refunds](/api/transactions/refund/)
* [Transaction history](/api/transactions/list/)
* [Receipts](/api/receipts/get/)
* [Account management](/api/merchant/)
## What's Next?
Check other resources we have, such as:
* [SumUp Android SDK](https://github.com/sumup/sumup-android-sdk)
* Our [Postman REST API collection](https://github.com/sumup/sumup-postman)
# Offline Transactions
> Use store-and-forward offline transactions with the Android and iOS Reader SDKs, including requirements, lifecycle, and platform-specific APIs.
import { Aside, Tabs, TabItem } from '@astrojs/starlight/components';
import Confirm from '@components/content/Confirm.astro';
Offline Transactions let merchants continue accepting card payments when internet connectivity is unavailable or unreliable. In this store-and-forward flow, card data is captured and cached securely on the device, then uploaded later for processing and authorization.
The feature is available for the [Android SDK](/terminal-payments/sdks/android-sdk/) and [iOS SDK](/terminal-payments/sdks/ios-sdk/). It is not available for Tap to Pay.
## Before You Begin
Make sure all of the following are true:
- You already have an active Android or iOS Reader SDK integration.
- The device and reader meet the minimum requirements below.
- The merchant has completed at least one successful online transaction.
- Your organization has completed the opt-in process for Offline Transactions.
To request access, contact us through the [contact form](/contact).
## Platform Availability
| Capability | Android SDK | iOS SDK |
| --- | --- | --- |
| Offline Transactions | Supported | Supported |
| Tap to Pay | ❌ Not supported | ❌ Not supported |
| Supported card schemes | Visa, Mastercard | Visa, Mastercard |
| Solo firmware | 3.3.31.0 or higher | 3.3.31.0 or higher |
| Solo Lite firmware | 2.2.1.25 or higher | 2.2.1.25 or higher |
## Geographic Availability
Offline Transactions are currently supported in Europe through Worldpay.
## Minimum Requirements
| Requirement | Minimum |
| --- | --- |
| Android OS | Android 8 |
| Card reader (Solo) | Firmware 3.3.31.0 or higher |
| Card reader (Solo Lite) | Firmware 2.2.1.25 or higher |
| Supported card schemes | Visa, Mastercard |
| Requirement | Minimum |
| --- | --- |
| iOS version | 16.0 or higher |
| Secure Enclave | Required |
| Free storage | 10 MB recommended |
| Card reader (Solo) | Firmware 3.3.31.0 or higher |
| Card reader (Solo Lite) | Firmware 2.2.1.25 or higher |
| Supported card schemes | Visa, Mastercard |
## Lifecycle
Offline Transactions follow four phases: preparation, activation, offline payment acceptance, and reconciliation.
| Phase | What happens |
| --- | --- |
| **Preparation** | The SDK downloads offline rules and merchant limits while the device is online. |
| **Activation** | Your app starts an offline session. |
| **Offline window** | Transactions are validated locally, signed, and stored securely on device. |
| **Reconciliation** | Stored transactions are uploaded to SumUp when connectivity returns. |
## Preparation
Before going offline, sync the latest offline rules and limits while the device is online.
- Method: `SumUpAPI.updateOfflineSecurityPatch(SecurityPatchUpdateCallback callback)`
- Internet required: Yes
If you skip this step, `startOfflineSession(...)` can fail with `OfflineLimitsAbsent`.
- Method: `setupOfflineSession`
- Internet required: Yes
Best practice: run preparation after merchant login or when the merchant explicitly enables offline mode.
## Activation
Offline sessions are explicit on both platforms.
- Start: `SumUpAPI.startOfflineSession(StartOfflineSessionCallback callback)`
- Internet required: No
- Start: `startOfflineSession`
- Internet required: No
Once an offline session starts, subsequent payments are attempted as offline transactions until the session is ended.
## Offline Window
During an active offline session, transactions are validated locally and stored securely on the device. The SDK still returns an immediate result to your app.
- Method: `SumUpAPI.fetchCurrentOfflineSession(OfflineSessionCallback callback)`
- Internet required: No
- Returns session information such as remaining time, approved transaction count, failed transaction count, and total approved amount.
- Methods: `getOfflineSessionDetails`, `getOfflineSessionRemainingTime`
- Internet required: No
Offline sessions are constrained by merchant limits, total stored volume, and session duration. Once those limits are reached or the session expires, new offline transactions are rejected.
## Reconciliation
When connectivity returns, upload stored transactions as soon as possible.
- Manual upload: `SumUpAPI.uploadOfflineTransactions(UploadOfflineTransactionsStatusListener callback)`
- End session: `SumUpAPI.stopOfflineSession(StopOfflineSessionCallback callback)`
Stopping the session also triggers an upload attempt.
- Manual upload: `uploadOfflineSession`
- End session: `endOfflineSession`
## Android API Summary
| API | Purpose | Internet required |
| --- | --- | --- |
| `SumUpAPI.updateOfflineSecurityPatch(...)` | Download the latest offline rules and limits | Yes |
| `SumUpAPI.startOfflineSession(...)` | Start an offline session | No |
| `SumUpAPI.stopOfflineSession(...)` | Stop the session and trigger upload | No |
| `SumUpAPI.uploadOfflineTransactions(...)` | Upload stored offline transactions manually | Yes |
| `SumUpAPI.fetchCurrentOfflineSession(...)` | Inspect current session status | No |
## Android Integration Example
### Update Offline Security Patch
```java
SumUpAPI.updateOfflineSecurityPatch(new SecurityPatchUpdateCallback() {
@Override
public void onSuccess() {
// Security patch update successful
}
@Override
public void onFailure() {
// Security patch update failed
}
});
```
### Start Offline Session
```java
SumUpAPI.startOfflineSession(new StartOfflineSessionCallback() {
@Override
public void onResult(@NonNull StartOfflineSessionResult result) {
// Handle the start result
}
});
```
### Stop Offline Session
```java
SumUpAPI.stopOfflineSession(new StopOfflineSessionCallback() {
@Override
public void onResult(@NonNull StopOfflineSessionResult result) {
// Handle the stop result
}
});
```
## Common Failure Modes
| Scenario | Behavior |
| --- | --- |
| Preparation step skipped or failed | Session start can fail because offline limits are missing |
| Reader switched mid-session | Offline processing is suspended until a new session is started |
| Session expired | New offline transactions are rejected |
| Cumulative limit reached | New offline transactions are rejected until stored transactions are uploaded |
| Concurrent offline API calls | Not supported on Android; keep calls serial |
## Testing
For testing guidance, contact your SumUp technical contact or reach out through the [contact form](/contact).
# Authorization
> Compare SumUp API keys, OAuth 2.0, and affiliate keys to choose the right authorization model for your integration.
SumUp exposes REST APIs for managing checkouts, retrieving transactions, and more.
Every integration needs a way to authorize its API requests, and card-present solutions also need to identify the integration itself.
## Choose the Right Option
- **[API keys](/tools/authorization/api-keys/)** – Static credentials owned by a single merchant. Use them for direct server-to-server integrations when you control the merchant account and need full API access.
- **[OAuth 2.0](/tools/authorization/oauth/)** – Standards-based authorization for multi-merchant solutions. Use it when other merchants or their employees connect to your application and must explicitly grant access.
- **[Affiliate Keys](/tools/authorization/affiliate-keys/)** – Required for card-present scenarios to attribute transactions to your integration. Combine them with API keys or OAuth depending on how you authorize API calls.
## Next Steps
- Review the [API reference](/api/) once you have your credentials.
- Follow product-specific guides such as [terminal integrations](/terminal-payments/) or [online payments](/online-payments/) with the appropriate authorization method in place.
# Affiliate Keys
> Learn about the role of Affiliate Keys at SumUp
import { Steps } from '@astrojs/starlight/components';
SumUp uses Affiliate Keys to identify critical metrics such as Total Processing Volume coming through a Partner's integration. The key associates all merchant account users of the Affiliate Key with the partner, allowing SumUp to enforce agreed terms such as fast onboarding, revenue share, and transaction fees. For that reason, **Affiliate Keys are mandatory for card-present integrations**, such as:
- Mobile SDKs including Android SDK and [iOS SDK](/terminal-payments/sdks/ios-sdk/)
- [API Payment Switch](/terminal-payments/payment-switch/)
- [Solo API (Cloud API)](/terminal-payments/cloud-api/)
Affiliate keys are not an authorization mechanism. Use them together with either [API keys](/tools/authorization/api-keys/) or [OAuth 2.0](/tools/authorization/oauth/) depending on how your integration calls SumUp APIs.
## Create Affiliate Key
1. Log in to [your SumUp account](https://me.sumup.com).
2. Expand your user account menu and open **Settings**.
3. Go to **For Developers** > **Toolkit**.
4. Select **Affiliate Keys**.
The page shows the **Application identifier** field if no key exists, or lists existing keys.
5. Enter the **Application identifier** matching the App ID/Bundle ID from your development project (such as `com.example.app`).
6. Select **Add**. The key is generated, and the App ID is assigned to it. You can add more App IDs to the key if you need to integrate more apps, but **the key itself is immutable**.
## Example Usage
The Solo Terminal API includes the Affiliate Key in the [Reader Checkout Request](https://developer.sumup.com/api/readers/create-checkout) under the affiliate section:
- `app_id`: This is the aforementioned application ID.
- `key`: This is the Affiliate key unique to each account and mandatory for every merchant in their checkout requests.
```json
{
"affiliate": {
"app_id": "your_application_id",
"key": "your_affiliate_key"
},
"checkout": {
"amount": 10.0,
"currency": "EUR",
"description": "Test Transaction"
}
}
```
## What's Next?
Check the following resources to build your integration:
- [OAuth 2.0 App Registration Guide](/tools/authorization/oauth/#register-an-oauth-application)
- [iOS SDK Guide](/terminal-payments/sdks/ios-sdk/)
- [Android SDK Guide](/terminal-payments/sdks/android-sdk/)
- [PHP SDK Guide](/online-payments/sdks/php/)
- [React Native SDK](/online-payments/sdks/react-native/)
- [Cloud API for the Solo Card Reader](/terminal-payments/cloud-api/)
# API Keys
> Learn how to use and protect SumUp API keys for direct integrations.
import { Aside, Steps } from '@astrojs/starlight/components';
API keys are static credentials that let your application act on behalf of the merchant account that created the key. Use them when you control the merchant account and need direct access to SumUp APIs with the full set of permissions.
## Authorize Requests with an API Key
Include the API key in the `Authorization` header using the `Bearer` scheme when calling SumUp APIs.
```bash
curl https://api.sumup.com/v0.1/me -H "Authorization: Bearer $SUMUP_API_KEY"
```
## Create an API Key
1. Log in to [https://me.sumup.com](https://me.sumup.com).
2. Expand your profile and open **Settings**.
3. Go to **For Developers** > **Toolkit**.
4. Select **API Keys**. If this is your first key, the page only shows the SumUp Public Key. Existing API keys are also listed here. Do not use the public key in your integration.
5. Select **Create** and name the key so you can identify it later.
6. When prompted, copy or download the key. SumUp does not store the key, so you are responsible for keeping it secure.
## Handle API Keys Securely
- Keep the key in a secure secret store and rotate it regularly.
- Avoid sharing the key with third parties. If sharing is unavoidable, make sure they meet your security expectations.
- Monitor how the key is used and revoke it promptly if you suspect misuse.
## When to Choose Another Method
Use [OAuth 2.0](/tools/authorization/oauth/) when you build an integration that other merchants or their staff will authorize.
For card-present scenarios, combine your chosen authorization method with an [Affiliate Key](/tools/authorization/affiliate-keys/).
# OAuth 2.0
> Learn how to request SumUp API access on behalf of other merchants.
import { Aside, Steps } from '@astrojs/starlight/components';
import Image from '@components/content/Image.astro';
OAuth 2.0 lets your application request permission to act on behalf of other SumUp users and access their merchant accounts. It follows the industry-standard OAuth 2.0 protocol and is the right choice for integrations where your application needs delegated access to a merchant’s data or needs to perform actions on their behalf.
If you are building a multi-tenant integration, marketplace, SaaS platform, or any app that connects to multiple merchants, you should use OAuth 2.0.
SumUp exposes two OAuth 2.0 endpoints:
- `https://api.sumup.com/authorize`
- `https://api.sumup.com/token`
SumUp supports two OAuth 2.0 flows:
- The [authorization code flow](#authorization-code-flow) when an end user grants your application access.
- The [client credentials flow](#client-credentials-flow) when your application authenticates as itself.
## Authorization Flows
Choose the flow that matches how your application obtains access while keeping scope verification requirements in mind.
## Authorization Code Flow
This flow implements the [RFC 6749 Authorization Code Grant](https://datatracker.ietf.org/doc/html/rfc6749#section-4.1). It lets a SumUp user review the permissions you request and authorize your application accordingly. The [requested scopes](#authorization-scopes) determine the allowed actions.
Use this flow when your application has a backend that can keep the client secret confidential. The flow separates user authorization from token issuance, so your application never sends the user's credentials to your own systems.
1. Redirect the user to `https://api.sumup.com/authorize` with the required parameters.
2. SumUp shows an authorization prompt describing your application and the scopes requested.
3. After the user approves, SumUp redirects to your **Redirect URI** with an authorization code and the original `state`.
4. Your application verifies the returned `state` and exchanges the authorization code for tokens by calling the token endpoint described below.
5. Use the `access_token` in the `Authorization: Bearer` header when calling SumUp APIs.
When building this flow:
- Register the exact redirect URIs your application uses and send the same `redirect_uri` value in the authorization request and token exchange.
- Always send a `state` value and verify that the callback returns the same value before exchanging the code.
- Treat the authorization code as short-lived and single-use. Exchange it immediately from your backend and never reuse it.
Example authorization request:
```http
GET /authorize?response_type=code&client_id={CLIENT_ID}&redirect_uri={REDIRECT_URI}&scope=payments%20customers%20payment_instruments&state={STATE} HTTP/1.1
Host: api.sumup.com
```
### Exchange the Authorization Code
After the user is redirected back to your application, read the `code` and `state` query parameters from the callback URL. If the `state` matches the value your application originally sent, exchange the authorization code at `https://api.sumup.com/token`:
```http
POST /token HTTP/1.1
Host: api.sumup.com
Content-Type: application/x-www-form-urlencoded
grant_type=authorization_code
&code={AUTHORIZATION_CODE}
&redirect_uri={REDIRECT_URI}
&client_id={CLIENT_ID}
&client_secret={CLIENT_SECRET}
```
The response contains an access token, refresh token, and metadata such as token lifetime and granted scopes.
```json
{
"access_token": "{ACCESS_TOKEN}",
"token_type": "Bearer",
"expires_in": 3599,
"refresh_token": "{REFRESH_TOKEN}",
"scope": "payments customers payment_instruments"
}
```
### Refresh the Access Token
Access tokens are short-lived. Use the `expires_in` value to track when the current access token is expected to expire. You can refresh shortly before expiry, or you can wait until an API request fails because the access token is no longer valid. In both cases, request a new token from `https://api.sumup.com/token` using the OAuth 2.0 refresh token grant:
```http
POST /token HTTP/1.1
Host: api.sumup.com
Content-Type: application/x-www-form-urlencoded
grant_type=refresh_token
&refresh_token={REFRESH_TOKEN}
&client_id={CLIENT_ID}
&client_secret={CLIENT_SECRET}
```
Your integration should still handle cases where an API request fails because the access token became invalid earlier than expected, for example after revocation or other account changes.
The token endpoint responds with a new access token and may also return a new refresh token:
```json
{
"access_token": "{NEW_ACCESS_TOKEN}",
"token_type": "Bearer",
"expires_in": 3599,
"refresh_token": "{NEW_REFRESH_TOKEN}"
}
```
Handle refresh tokens according to standard OAuth 2.0 practices:
- Store refresh tokens securely because they are long-lived credentials.
- After a successful refresh, persist and use the latest `refresh_token` returned by the token endpoint. If the response does not include a new `refresh_token`, continue using the one you already have.
- If refresh fails with an OAuth error such as `invalid_grant`, treat the refresh token as no longer usable and restart the authorization code flow.
- When refresh fails, do not keep retrying with the same invalid refresh token. Ask the user to authorize again.
## Authorization Scopes
Scopes restrict what your application may do on behalf of the merchant. Request only the scopes you need. When you omit scopes, SumUp grants the defaults listed below. To obtain additional scopes later, repeat the authorization code flow.
| Scope name | Default | Access Level | Description |
| ----------------------- | ------- | ------------ | ----------------------------------------------------------------------------------------- |
| `transactions.history` | yes | merchant | View transactions and transaction history for the merchant user. |
| `user.app-settings` | yes | merchant | View and modify SumUp mobile app settings for the merchant user. |
| `user.profile_readonly` | yes | merchant | View profile details of the merchant user. |
| `user.profile` | no | merchant | Modify profile details of the merchant user. |
| `user.subaccounts` | no | merchant | View and modify sub-account profiles for the merchant user. |
| `user.payout-settings` | no | merchant | View and modify payout settings for the merchant user. |
| `products` | no | merchant | View and modify products, shelves, prices, and VAT rates in the merchant's product store. |
| `payments`* | no | feature | Create and process payment checkouts. Requires manual verification by SumUp. |
| `payment_instruments`* | no | feature | Save customers and tokenize their payment cards. Requires manual verification by SumUp. |
## Client Credentials Flow
The client credentials flow follows [RFC 6749 Client Credentials Grant](https://datatracker.ietf.org/doc/html/rfc6749#section-4.4). It issues an access token without involving a merchant user. Because no user is associated with the token, the flow does not allow access to merchant-specific data such as transactions or stored customers. You can still process payments for merchants linked to your application.
Request an access token from `https://api.sumup.com/token` using the client credentials grant parameters. This flow does not return a refresh token.
## Register an OAuth Application
To integrate an external application with SumUp, register an OAuth application and generate client credentials. These credentials let you complete the OAuth flows in this guide and obtain access tokens for protected SumUp resources.
### Before You Begin
1. Prepare a SumUp merchant account with completed [account details](https://me.sumup.com/account).
2. Choose your application name.
3. Prepare one or more redirect URIs. SumUp redirects users to these URIs after authentication and sends the authorization codes you exchange for tokens in the [authorization code flow](#authorization-code-flow).
### Steps
1. Log in to [your SumUp account](https://me.sumup.com/login). Once logged in, **Account** appears in place of the **Log in** button at the top right.
2. Navigate to the [OAuth apps page](https://me.sumup.com/settings/oauth2-applications) to create or manage OAuth applications.
Select **Create application** at the bottom right to define your application.
Describe your application, provide its homepage, and select **Register application** to continue.
You can edit the registered application by selecting it. The edit page lets you update details and add optional information such as a logo, terms and conditions, and privacy policy URLs.
You can also select the scopes your application requires. Each scope includes a short description of the access it grants.
3. On the [OAuth apps page](https://me.sumup.com/settings/oauth2-applications), open your application and choose **Create client secret**.
Provide the following details:
| Name | Required | Description |
| ----- | -------- | ---------- |
| Client name | Yes | A descriptive name for your client application. |
| Application type | Yes | The type of your client application. Options: Web, Android, iOS, Other. |
| Authorized redirect URL | Yes | Redirect URL to register for your client application. Specify multiple URLs by separating them with commas. |
| Authorized JavaScript Origin | No | Origin URI for browser-based web applications. SumUp enables CORS for registered origins. |
Select **Save** to generate the credentials. The **Client secrets** section lists each credential with its name, application type, and client ID.
4. After creation, credentials appear in the **Client credentials** section of your OAuth application.
Use the download button to receive a JSON file with the full credential details, for example:
```json
{
"id": "CCCFAXYD",
"name": "SA web client",
"client_id": "fOcmczrYtYMJ7Li5GjMLLcUeC9dN",
"client_secret": "717bd571b54297494cd7a79b491e8f2c1da6189c4cc2d3481380e8366eef539c",
"application_type": "web",
"redirect_uris": ["https://sample-app.example.com/callback"]
}
```
### Result
You have registered at least one OAuth application and have downloaded its client credentials. Proceed with the [OAuth 2.0 flows](#authorization-flows) to obtain access tokens. Use them to accept payments with a [customer-entered card](/online-payments/guides/single-payment/) or with stored payment data in recurring scenarios.
## What's Next?
- [Review your OAuth application scopes](#authorization-scopes)
- [iOS SDK Guide](/terminal-payments/sdks/ios-sdk/)
- [Android SDK Guide](https://github.com/sumup/sumup-android-sdk)
- [PHP SDK Guide](/online-payments/sdks/php/)
- [React Native SDK](/online-payments/sdks/react-native/)
- [Cloud API for the Solo Card Reader](/terminal-payments/cloud-api/)
# Address
> Address object format and country-specific requirements.
import SearchableTable from "@components/content/SearchableTable";
The Address object uses a comprehensive format that can handle addresses from
around the world. The address fields used depend on the country conventions.
For example, in Great Britain, `city` is `post_town`. In the United States, the
top-level administrative unit used in addresses is `state`, whereas in Chile
it's `region`.
The address structure is based on
[libaddressinput](https://github.com/google/libaddressinput) used by Android
and Chromium.
Whether an address is valid depends on whether the locally required fields are
present. For example:
- **Germany**: requires `street_address`, `post_code`, and `city`
- **United States**: uses `state` for the top-level administrative unit
- **Great Britain**: uses `post_town` instead of `city`
- **Chile**: uses `region` for the top-level administrative unit
- **Ireland**: uses `eircode` instead of `post_code`
## Core Address Fields
- **`country`**: The two letter country code formatted according to [ISO3166-1 alpha-2](https://en.wikipedia.org/wiki/ISO_3166-1_alpha-2). Example: `["DE", "GB"]`
- **`street_address`**: The address lines, with each element representing one line. Example: `["Paul-Linke-Ufer 39-40", "2. Hinterhof"]`
## Post Code
A postal code included in a postal address for the purpose of sorting mail.
The following fields are used for post code, depending on the country:
- **`post_code`** (default): used by most countries. Example: `"10999"`
- **`zip_code`**: used in the United States
- **`eircode`**: used in Ireland
## Administrative Areas
The address supports up to 3 levels of administrative areas, `administrative_area_level_1` through `administrative_area_level_3`.
The following fields are used for administrative divisions, depending on the country:
- **`province`** (default): used in some countries for administrative divisions
- **`state`**: used in countries like the United States for the top-level administrative unit
- **`region`**: used in countries like Chile for administrative divisions
- **`county`**: used in countries like Ireland and Romania
- **`autonomous_community`**: used in Spain for the first sub-national level
## Locality Levels
The address supports up to 3 levels of locality levels, `locality_level_1`
through `locality_level_3`.
For more specific location information:
- **`city`** (default): a city
- **`post_town`**: used in Great Britain instead of city
- **`district`**: a district within a city or region
- **`neighborhood`**: a neighborhood or local area
- **`suburb`**: a suburb or outlying area of a city
- **`village`**: a village or small settlement
- **`municipality`**: a municipality or local government area
## Country-Specific Requirements
Use the table below to search by country, field name, alias, and requirement.
# Merchant
> Merchant object represents the business operating with SumUp.
import SearchableTable from "@components/content/SearchableTable";
A Merchant is a business and a User can own and/or manage multiple businesses.
Within SumUp every Merchant is identified by its merchant code, typically a
string like `MK01A8C2`. For a detailed list of properties of the Merchant,
please have a look at the [Merchants API reference](/api/merchants).
## Company
The `company` field of the Merchant contains the business's legal information.
This is the data SumUp checks when verifying the merchant before enabling
products.
### Company Identifiers
A key part of the company data are identification numbers contained in the
`identifiers` array. Each identifier is a `CompanyIdentifier` object with:
- **`ref`** (string): the unique reference for the identifier type
- **`value`** (string): the actual identifier value
For every identifier, we use a unique reference as key following the pattern
`{country_code}.{identifier_type}`. The prefix indicates the country (using ISO 3166-1 alpha-2 codes), and the
suffix identifies the specific type of identifier.
Example:
```json
{
"identifiers": [
{
"ref": "de.hrb",
"value": "HRB 123456 B"
},
{
"ref": "de.ust_idnr",
"value": "DE123456789"
}
]
}
```
### Legal Types
Legal type is the official way the business is set up and recognized by the law.
Legal types are of the pattern `{country_code}.{identifier_type}`. The prefix indicates the country (using [ISO3166-1 alpha-2](https://en.wikipedia.org/wiki/ISO_3166-1_alpha-2)), and the suffix identifies the specific legal type within that country.
## Business Profile
A Merchant's business profile contains information that a Merchant wants to be
publicly visible for their customers, for example on their website.
## Addresses
For address structure, fields, and country-specific requirements, see the
[Address glossary](/tools/glossary/address/).
## Persons
A Person is someone who plays some legally relevant role in the Merchant.
### Person Relations
Persons can have various roles within a merchant:
- **Legal Representative**: the person legally representing the business towards SumUp
- **Business Owner**: owner of the business (especially for sole traders)
- **Business Officer**: officer of the business (for corporations)
### Person Identifiers
# Overview
> Use LLMs to guide you through developing with SumUp SDKs.
You can use large language models (LLMs) to assist in the building of SumUp integrations. We provide a set of tools and best practices if you use LLMs during development.
## Plain Text Docs
You can access all of our documentation as plain text Markdown files by adding `index.md` to the end of any URL. For example, you can find the plaintext version of this page itself at https://developer.sumup.com/tools/llms/index.md.
This helps AI tools and agents consume our content and allows you to copy and paste the entire contents of a doc into an LLM. This format is preferable to scraping or copying from our HTML and JavaScript-rendered pages because:
- Plain text contains fewer formatting tokens.
- Content that isn’t rendered in the default view (for example, it’s hidden in a tab) of a given page is rendered in the plaintext version.
- LLMs can parse and understand Markdown hierarchy.
We also host an [/llms.txt](/llms.txt) file which instructs AI tools and agents how to retrieve the plaintext versions of our pages. The `/llms.txt` file is an [emerging standard](https://llmstxt.org/) for making websites and content more accessible to LLMs.
## Agent Skills
If you use AI coding assistants, SumUp provides [Agent Skills](/tools/llms/agent-skills/) with targeted guidance for building payment integrations. Install only the skill folders with `npx skills`, copy them into your assistant's skills directory, or use the hosted Agent Skills Discovery index at `https://developer.sumup.com/.well-known/agent-skills/index.json`.
## Plugins
SumUp also publishes [plugins, extensions, and powers](/tools/llms/plugins/) for Claude Code, Cursor, Gemini CLI, OpenAI Codex, and Kiro. Use these packaged integrations when you want the assistant-specific setup from the `sumup/sumup-skills` repository.
## SumUp Model Context Protocol (MCP) Server
Use the [SumUp MCP server](/tools/llms/mcp-server/) to connect MCP-compatible clients and AI assistants to SumUp APIs and documentation tools.
Hosted MCP URL: [https://mcp.sumup.com/mcp](https://mcp.sumup.com/mcp)
You can also run MCP locally:
```sh
SUMUP_API_KEY='sup_sk_...' npx -y @sumup/mcp
```
For full setup instructions and client examples, see [MCP Server](/tools/llms/mcp-server/).
## SumUp Agent Toolkit SDK
If you’re building agentic software, we provide an SDK for adding SumUp functionality to your agent’s capabilities. Learn more in our [agents documentation](/tools/llms/agent-toolkit/).
# Agent Skills
> Use SumUp Agent Skills in AI coding assistants when building payment integrations.
[Agent Skills](https://www.anthropic.com/engineering/equipping-agents-for-the-real-world-with-agent-skills) let AI coding assistants load focused instructions for specific tasks. We publish SumUp skills in the [`sumup/sumup-skills`](https://github.com/sumup/sumup-skills) repository to help you build terminal and online payment integrations faster and with fewer mistakes.
## Install Skills
If your assistant supports standard Agent Skills folders, install the SumUp skills with:
```bash
npx skills add https://github.com/sumup/sumup-skills
```
You can also clone the repository and copy the skill folders into your assistant's skill directory.
| Agent | Skill directory |
| ------------ | ---------------------------- |
| Claude Code | `~/.claude/skills/` |
| Cursor | `~/.cursor/skills/` |
| OpenCode | `~/.config/opencode/skills/` |
| OpenAI Codex | `~/.codex/skills/` |
| Pi | `~/.pi/agent/skills/` |
For packaged editor and assistant integrations, see [Plugins](/tools/llms/plugins/).
## Discover Skills
Agents and tools that support the [Agent Skills Discovery RFC](https://github.com/cloudflare/agent-skills-discovery-rfc) can discover the SumUp skills from:
```txt
https://developer.sumup.com/.well-known/agent-skills/index.json
```
Use this URL in clients that accept a discovery index. Clients that automatically check well-known locations can start from:
```txt
https://developer.sumup.com
```
## Available Skills
- `sumup`: Implementing SumUp checkout flows end-to-end across Checkouts API, Card Widget, Hosted Checkout, recurring tokenization, and terminal flows.
- `sumup-best-practices`: Choosing the right integration path and security posture across online, mobile, terminal SDK, and Cloud API integrations.
- `upgrade-sumup`: Planning and executing SumUp API and SDK upgrades across server and mobile surfaces.
- `sumup-debug`: Diagnosing integration failures such as webhook signature mismatches, scope issues, session expiry, widget failures, and duplicate refs.
- `sumup-mcp`: Configuring and using the SumUp MCP server (`https://mcp.sumup.com/mcp`) from MCP-capable clients.
- `sumup-testing`: Setting up sandbox test merchants, running success and failure scenarios, and validating end-to-end checkout behavior.
## Use Skills
After installation, ask your assistant to use the relevant SumUp skill for checkout work, for example:
- "Use `$sumup` to build a Cloud API payment flow for Solo."
- "Use `$sumup` to implement a Card Widget checkout with server-side checkout creation."
- "Use `$sumup-debug` to troubleshoot 3DS and webhook handling for online payments."
## Related
- [Plugins](/tools/llms/plugins/)
- [LLMs overview](/tools/llms/)
- [Agentic workflows](/tools/llms/agent-toolkit/)
- [SumUp MCP Server](https://mcp.sumup.com/mcp)
# Agentic Workflows
> Use SumUp in your agentic workflows.
Use SumUp to enhance your agent with SumUp functionalities. By enabling access to financial services and tools, you allow your agents to help you earn money, manage funds, and other provide other functionalities available in SumUp APIs.
## OpenAI
Example usage of the [SumUp Agent Toolkit](https://github.com/sumup/sumup-agent-toolkit) with the [OpenAI](https://github.com/openai/openai-node).
```ts
import { SumUpAgentToolkit } from "@sumup/agent-toolkit/openai";
import OpenAI from "openai";
import type { ChatCompletionMessageParam } from "openai/resources";
require("dotenv").config();
const openai = new OpenAI();
const sumupAgentToolkit = new SumUpAgentToolkit({
apiKey: process.env.SUMUP_API_KEY!,
});
(async (): Promise => {
let messages: ChatCompletionMessageParam[] = [
{
role: "user",
content: "Tell me about my last 10 transactions please.",
},
];
while (true) {
// eslint-disable-next-line no-await-in-loop
const completion = await openai.chat.completions.create({
model: "gpt-4o",
messages,
tools: sumupAgentToolkit.getTools(),
});
const message = completion.choices[0].message;
messages.push(message);
if (message.tool_calls) {
// eslint-disable-next-line no-await-in-loop
const toolMessages = await Promise.all(
message.tool_calls.map((tc) => sumupAgentToolkit.handleToolCall(tc)),
);
messages = [...messages, ...toolMessages];
} else {
console.log(completion.choices[0].message);
break;
}
}
})();
```
## AI SDK
Example usage of the [SumUp Agent Toolkit](https://github.com/sumup/sumup-agent-toolkit) with the [AI SDK](https://sdk.vercel.ai/).
```ts
import { openai } from "@ai-sdk/openai";
import { SumUpAgentToolkit } from "@sumup/agent-toolkit/ai";
import { generateText } from "ai";
require("dotenv").config();
const sumupAgentToolkit = new SumUpAgentToolkit({
apiKey: process.env.SUMUP_API_KEY!,
});
const model = openai("gpt-4o");
(async () => {
const result = await generateText({
model: model,
tools: {
...sumupAgentToolkit.getTools(),
},
maxSteps: 5,
prompt: "Tell me about my last 5 transactions and their status.",
});
console.log(result);
})();
```
# MCP Server
> Connect MCP-compatible clients and assistants to SumUp APIs and tools.
[MCP](https://modelcontextprotocol.io/introduction) is an open protocol that standardizes how applications provide context to LLMs. For developers using AI-powered code editors such as Cursor or Windsurf, or general-purpose tools such as Claude Desktop, we provide the [SumUp Model Context Protocol (MCP) server](https://github.com/sumup/sumup-agent-toolkit/tree/main/mcp).
The MCP server gives AI agents tools for calling the SumUp API and searching our knowledge base (documentation, support articles, and so on).
SumUp runs a managed MCP server at [https://mcp.sumup.com/mcp](https://mcp.sumup.com/mcp). This endpoint allows your MCP client to interact with SumUp APIs to manage your account, create checkouts, or process payments using [Cloud API](/terminal-payments/cloud-api). The server supports streamable HTTP[^streamable_http] transport via `/mcp` and the SSE transport (deprecated) via `/sse`.
## Hosted MCP (managed)
If your MCP client supports streamable HTTP, connect directly to the hosted server instead of running a local process. Configure your MCP client to use `https://mcp.sumup.com/mcp` and send your SumUp API key as a Bearer token in the `Authorization` header (or equivalent auth configuration in your client).
## CLI
Run the following command to start the MCP server locally.
```sh
SUMUP_API_KEY='sup_sk_MvxmLOl0...' npx -y @sumup/mcp
```
The MCP server uses either the passed `--api-key` or the `SUMUP_API_KEY` environment variable.
## [Cursor](https://www.cursor.com/)
1. Go to `Cursor Settings` > `MCP`
2. Click `+ Add new Global MCP Server`
3. Add the following configuration to your global `.cursor/mcp.json` file.
See the [Cursor documentation](https://docs.cursor.com/context/model-context-protocol) for more details. You can also add this to your project-specific Cursor configuration (supported in Cursor 0.46+).
```json
{
"mcpServers": {
"sumup": {
"command": "npx",
"args": ["-y", "@sumup/mcp"],
"env": {
"SUMUP_API_KEY": "sup_sk_..."
}
}
}
}
```
## [Claude](https://claude.ai)
Add the following to your `claude_desktop_config.json` file. See the [Claude Desktop documentation](https://modelcontextprotocol.io/quickstart/user) for more details.
```json
{
"mcpServers": {
"sumup": {
"command": "npx",
"args": ["-y", "@sumup/mcp"],
"env": {
"SUMUP_API_KEY": "sup_sk_..."
}
}
}
}
```
The code editor agent automatically detects available tools and calls the relevant tool when you ask related questions.
[^streamable_http]: https://modelcontextprotocol.io/specification/2025-11-25/basic/transports#streamable-http
# Plugins
> Install SumUp plugins, extensions, and powers for AI coding assistants.
SumUp publishes packaged integrations for AI coding assistants in the [`sumup/sumup-skills`](https://github.com/sumup/sumup-skills) repository. These packages include SumUp skill instructions and, where supported by the host application, SumUp MCP configuration.
Use the repository URL when an application asks for a GitHub source:
```txt
https://github.com/sumup/sumup-skills
```
## Claude Code
Install the SumUp plugin from the Claude Code plugin marketplace:
```bash
/plugin marketplace add sumup/sumup-skills
/plugin install sumup@sumup
```
## Cursor
Install from the Cursor Marketplace, or add it manually in:
`Settings` -> `Rules` -> `Add Rule` -> `Remote Rule (Github)` with:
```txt
sumup/sumup-skills
```
## Gemini CLI
Install the SumUp Gemini extension from GitHub:
```bash
gemini extensions install https://github.com/sumup/sumup-skills --ref=main
```
## OpenAI Codex
Install the SumUp plugin with the Codex plugin marketplace:
```bash
codex plugin marketplace add sumup/sumup-skills
```
## Kiro
Import the repository as a custom Kiro power:
1. Open `Powers`.
2. Select `Add Custom Power`.
3. Select `Import power from GitHub`.
4. Use `https://github.com/sumup/sumup-skills`.
## Related
- [Agent Skills](/tools/llms/agent-skills/)
- [MCP Server](/tools/llms/mcp-server/)